When one reaches a certain age the event needs to be celebrated with some pomp and in the last week of August, I managed to get away on a tour of Iceland with Nature Explorer. With just 6 clients we were very comfortable in two huge modified Nissan Patrol cars and for a whole week, we bounced around southern Iceland on 42” wheels, crossing rivers and remote desolate plains, driving on a glacier and going up and down impossibly steep inclines to some breath-taking locations. What follows is a brief summary of the photographic fun that we had.
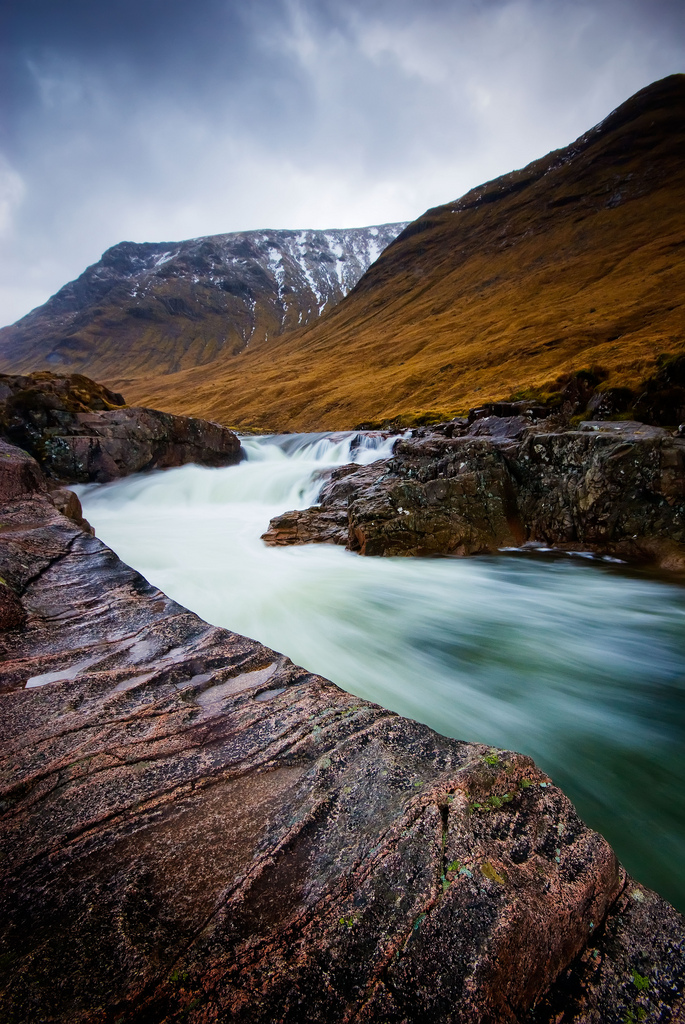
The Gullfoss waterfall has a massive flow of 109 cu m of water per second. This is a challenging subject though because the usual viewpoints are rather restricted and most compositions have been done before, leaving little scope for originality. However, we also went to the far side of the Gullfoss gorge, inaccessible to tour buses and so with no risk of tripod rage. The steep sides of the gorge still limit the viewpoints, but I am pleased with my picture of a central portion of the cascade mimicking the shape of the cloud-shrouded volcano in the distance.
Gullfoss Mamiya 645
The next day brought the most miserable weather: cold and dark with almost incessant rain. Driving through the sleet and rain showers along the remote Kjolur road, with only a few snatched photo-stops on the way, we eventually bounced across some moraine to arrive at the Langjokull (long glacier). To my amazement, we drove right onto the glacier and carried on up till we reached a reasonably flat shoulder. A biting cold wind and occasional driving showers worked against serious photography, but my trusty LX5 was a godsend and I am very impressed with what can be achieved with this remarkable little camera.
Langjokull - Panasonic LX5
Our itinerary took us further into the remote highlands and the Highland Hotel was our base for three nights. From here we made excursions into the Fjallabak (behind the mountain) and photographed the breathtaking Veidivotn region with its brilliant blue lakes surrounded by lush green fields.
Veidivotn - Nikon F100 - Elite Chrome
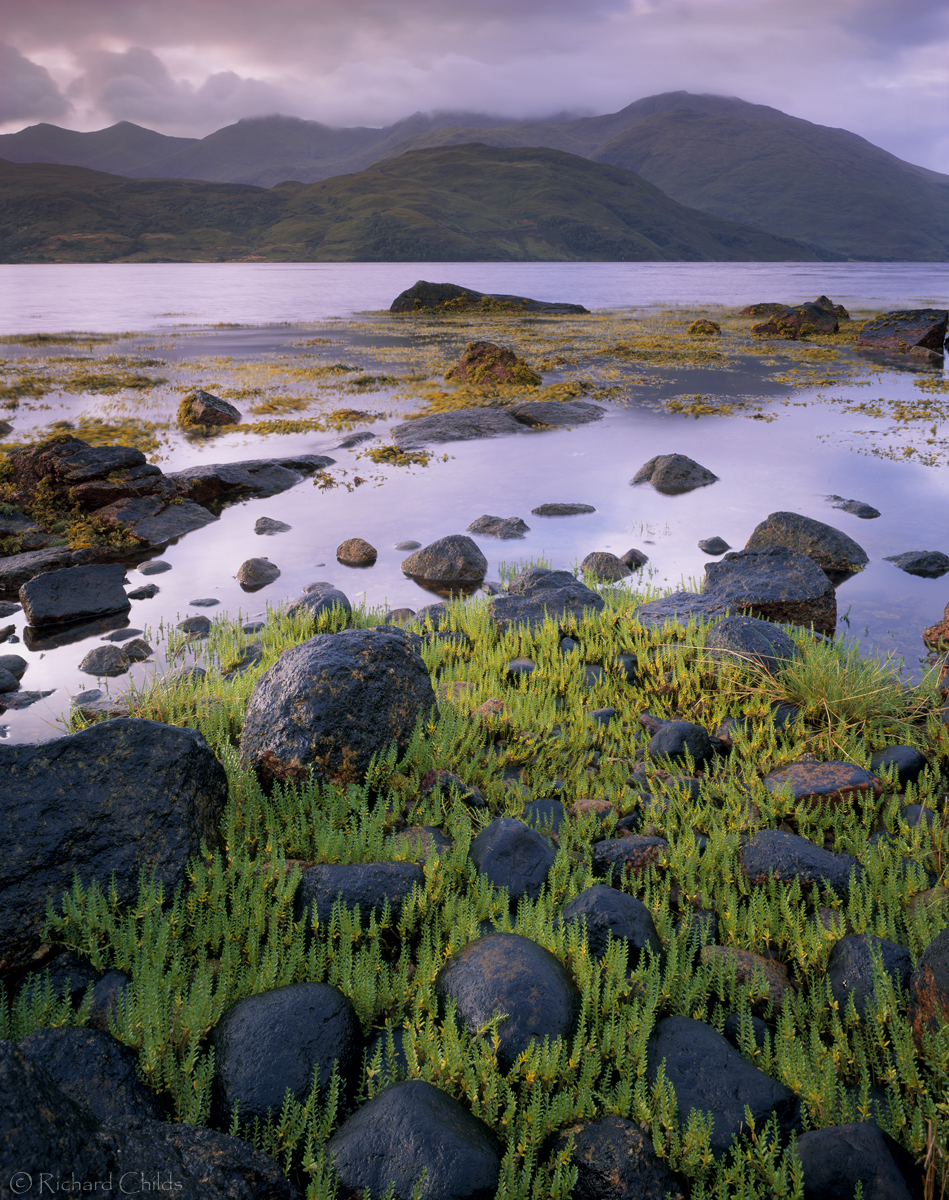
But the highlight of our stay at the Highland was the trip to Hrafntinnusker. The wild off-road journey was an adventure in its own right and we had some wonderful photo stops on the way. A particular favourite of mine was an area of black sand and stones dotted with fresh green plants. It is amazing how vegetation manages to survive in these harsh conditions and I hope that I managed to show its fragility against the black hard rocks.
Green and Black - Nikon F100 - Elite Chrome
Hrafntinnusker is rightly described as a summary of Iceland: ice and snow immediately next to active geothermal steam, scalding water vents, brilliant green mossy banks, black obsidian rock and black volcanic ash, a fumarole or two, views onto glaciers in the distance … and all in the fabulous changing light. Pure magic!
Fumarole - Nikon F100 - Elite Chrome
Hrafntinnusker - Nikon F100 - Elite Chrome
Dawn and dusk shoots were only occasionally possible, but our tour guides explained that their desire to avoid disappointment if sunrise or sunset fails and limitations with the hotel meal times, ruled against the idea. But they accepted that photographers are prepared for the possibility of such failures and hopefully future tours will factor-in more dawn and dusk shooting.
On Day 5 we drove to the Landmannalaugur region and took a short hike through the lava field and the hills behind it. Here again, the photographer is totally spoilt with colours, textures, mountain contours and plenty of opportunity for more intimate studies. On the drive out to the coast road, there was one particularly stunning location which I found quite surreal, definitely not of this world. I was mesmerised by some steep and huge furrows sculpted by water running down thick black ash. I quickly decided that I wanted to get in close rather than have a distant view and set up a composition showing the over-powering furrowed hillside and just a thin line of green grass growing by the stream at the bottom. I think that this helps to bring out the dominance of the dark, almost threatening, furrows.
Furrows - Mamiya 645 - Velvia 50
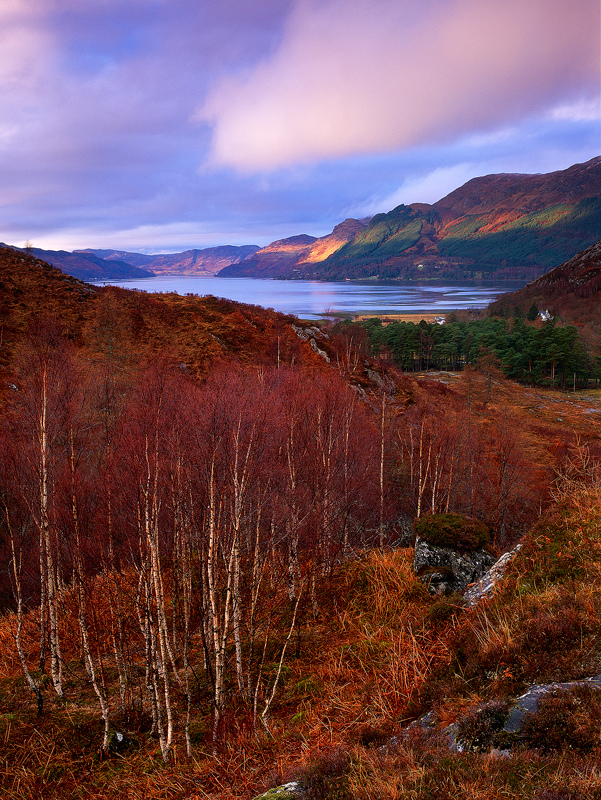
Just a little further the track suddenly gained height from where another magnificent view greeted us. The high viewpoint emphasised the meandering river at the bottom of the steep hill, while the backlit clouds and silhouetted mountains added a strong sense of drama. Whereas I might have been tempted to try HDR had I been shooting digital, by using ND grads the silhouettes retained their mystery and I believe this helps to add a punch to the image. I suspect that too much detail would have diluted the atmosphere and made it less arresting.
All too soon we were on the south ring road heading to the national park of Vatnajokull, a glacier region three times the size of Luxembourg. The next day, at the Skaftafell hotel, I and one other participant got up before dawn. It’s a short walk uphill to a good viewpoint and from here there were several other possibilities and we went in different directions. The morning broke clear but cloud quickly rolled in creating interesting fast-changing light. Just being in this other-worldly place with no soul in sight is something that I will never forget. This was something that was far removed from the alpine experiences of my younger days: unfamiliar colours and landscape structures, soft northern light, total silence apart from the soft murmur of glacier streams and only bright green lupines for company. I was very aware that I really was out in the wild, effectively on my own. Another magical moment.
Dawn - Mamiya 645 - Ektar 100
Glacier - Mamiya 645 - Ektar 100
After breakfast, we drove to Jokullsarlon, the glacier lagoon made famous in James Bond films as well as Lara Croft and various adverts. The sun broke through and for most of the day, we were in a contrasty light that saturated the blues and greens in the ice. On the black beach, I would have preferred softer light on the icebergs as the bright sunlight was really too harsh.
Icebergs - Mamiya 645 - Velvia 50
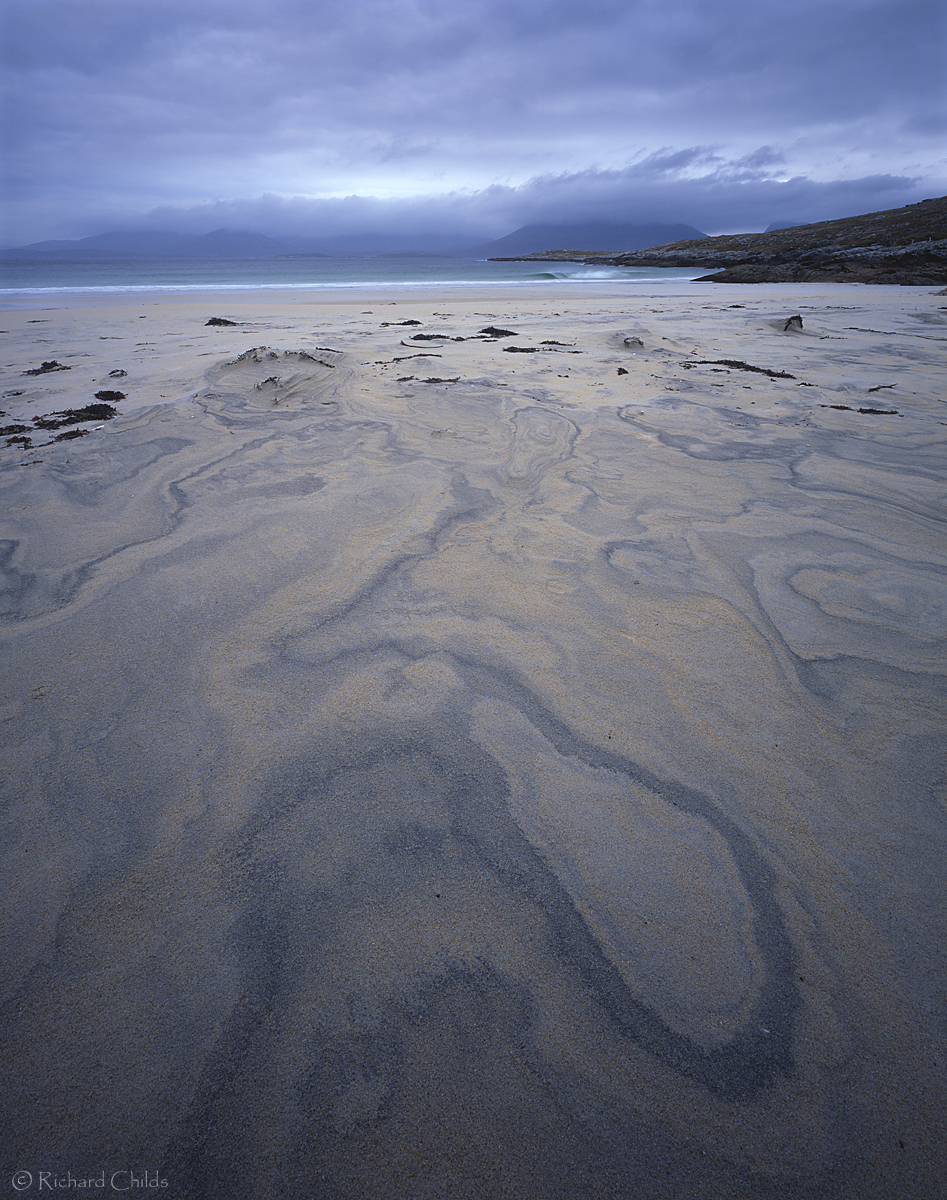
We also visited Fjallsarlon, not far from the main lagoon. Set some way off the road it is little known but offers a variety of photographic subjects. A small stream carries black sand which on the day we visited had interesting ripples. This is one of those subjects where I knew that the blue sky above would be reflected in the wet sand and it was a matter of finding the right angle…. and then setting up the camera to obtain an interesting composition. Easier said than done: the Mamiya gave me too little depth of field while the SLR with its 2:3 aspect ratio didn’t suit the subject. But after a bit of perseverance, I had the LX5 correctly set-up on my tripod and composed some pleasing frames.
Black Blue - LX5
The evening brought another surprise: fireworks on the lagoon. I have to admit that photographing fireworks doesn’t excite me at all but the locals are clearly proud of the event and I felt that I should see the show. And what a super show it was! Fireworks set-off from candle-lit icebergs against the glacial backdrop! Quite unique, especially when some icebergs serenely floated off having broken away from the bottom of the stream. The LX5 behaved impeccably even if it did look slightly odd perched on top of my tripod.
Fireworks - Panasonic LX5
Sadly our tour was almost ended and after breakfast, we set off on the long drive back to Reykjavik. In rainy weather, we drove through the huge Laki lava field to our first stop at Vik and its well known basalt sea stacks.
Reynisdrangar - Mamiya 645 - Ektar 100
I tried to avoid the compositions I had seen before and chose this view with white basalt fins in the foreground. The lack of colour adds to a sense of isolation.
On to Dyrholeay and its famous long black beach, then via a couple of iconic waterfalls (again difficult to be original) back to Reykjavik. What an amazing week we had with the rich variety of landscapes and colours, unique desolate plains and mix of snow, ice and geothermal vents. Add to that the truly remote off-road locations and I can honestly say this was one of the best, if not the best tour I have ever done. Haukur Parelius and Finn Frodason, the driver/guides at Nature Explorer are very knowledgeable and entertaining, genuinely welcoming their clients and happy to stop any time and anywhere whenever one of the clients wanted to take photographs. I can thoroughly recommend them. They have published a double book which shows their different styles and complements the photo tours they run.
Our minibus pulled quickly into the small lay-by and the doors flew open, my clients spilling out and gathering up their tripods and bags as they went. Before us lay a small Lochan behind which the pyramidal shape of Ben Stack reared, perfectly framed by a notch in the nearer hills. The whole scene was bathed in glorious late September light but the cloud was approaching fast. One client tore off at a great speed through the gate and into the field. Setting up rapidly he fired off a couple of frames before the sun slid behind the cloud and the rest of us arrived. 'I got it' he proclaimed 'and before the light went' he continued. 'But it didn't go' I said 'it just changed'. Other clients were now scouting around the area to find suitable material for their own images and with flatter light, all the autumn colour and texture of the grasses and shrubby bushes was clear to see.
Why are so many photographers convinced that a good image is flooded with sunlight? All light is good for photography as long as it is married to suitable subject matter so why do I hear and read so often of 'poor light' or 'dead light' driving photographers indoors? Mostly I suspect because many photographers have a pre-conceived idea of what makes a good image or more often what they wish to achieve at a chosen location. My facebook news feed is full of comments (usually posted late morning) along the lines of 'rubbish light this morning, hopefully better luck tomorrow' and I can't help but think 'what did you miss while waiting for that golden light and blood red sunrise'. Sometimes images are posted to illustrate how bad it was and all I see is a wealth of missed opportunity.
The common perception is that overcast days are great for detail photographs only, the uniform light helping to even out the tone and lift information out of the shadows. The latter part of this sentence is absolutely right of course but if like me you choose to set your wider views against a strong foreground then the same overcast conditions are going to help add rich textural detail. As an estimate, I would say that I now shoot ninety percent of my images under a cloudy sky, not as a friend suggested because Scotland is cloudy 90% of the time but as an artistic choice. I would never say that the light on a blue sky day wasn't worth capturing but choose not to use it very often, especially when shooting a wider view simply because it no longer appeals to me.
Cloud does feature heavily on the West Coast of Scotland and has without a doubt played an important part in my development as a photographer in recent years. Besides providing loads of shape and form at the top of my images it also plays a vital roll in lighting my chosen foreground. Winter Herald, Bla Bheinn for example has a near perfect cloudscape that has not only allowed a hint of light to play on the snowy summit but that has also bounced warm light down onto the grasses and reeds of Loch Cille Chriosd from above me. These days I always look to the sky directly overhead just prior to exposing a sheet of film to get a better idea of the colour of the light at my feet. A hole in the cloud above me will cool the foreground enormously no matter how much cloud is visible in the frame and I can choose to filter accordingly should I wish. The reality is that clouds plays an important part throughout my photographs as subject matter, reflectors and diffusers enabling me to fill the frame with detail and rich colour.
When viewing the image of the Autumn Oaks most people are surprised to learn that it was raining when the film was exposed. All the colour coming from the effect of a bright overcast sky and a canopy of leaves turning to yellow. Had the Sun actually been out this image would not have been possible, certainly on transparency film, cloud playing an important part in controlling the light.
Personally, though it's in the wider landscapes that I find cloud so satisfying. Adding drama, atmosphere, colour and detail that is often lacking in similar scenes shot in so called 'better' conditions. I think these images can provide the viewer with an image of lasting value, one that goes beyond the initial impact of strong colour and contrast to reveal something new on each revisit. One of my clients on my annual Winter Workshop on Skye posted a fantastic image of the Cuillin on Flickr. One that depicts the wonderful island and its mountains in their true Hebridean glory. Quite rightly all the comments placed were positive but I wasn't surprised to find one starting thus; "Always a blow when you get to these locations in poor weather....."!!
To adapt a famous quotation " There's no such thing as poor weather, just a mind closed to its infinite possibilities"
So called poor weather can make photography challenging but the end results certainly provide me with far more satisfaction than those for which I fought less hard. Next time you look out on venture out on a cloudy or wet day, resist that temptation to head home or to the nearest cafe, open your mind and work with the light you are given, the results should astound you, rain is after all invisible in an exposure longer than half a second.
We’re travelling back in time a bit to find one of the first true landscape photographers. Gustav Le Gray was originally a painter but moved over to photography very early in its incubation. His mastery of the craft and art of photography make him, for me at least, qualify him for this accolade. I think we can definitely say that between him and Fox Talbot, they made the first forays into representing the wilderness in photographic form.
He is also one of the first proponents of HDR, although I think we can forgive him as he only shot two exposures and manually blended them. Take for example the photograph below. This would have been impossible to capture in one photograph for decades after his death and it was his vision of separating the sky and land components and mastery in combining them to artistic ends that is one part of the whole that makes his work so fascinating.
Biography
Although apparently an incredibly clever inventor and self taught chemist (you had to make your own film in those days) Gustave wasn't the most talented of businessmen. He initially studied painting under Delaroche during which a detour to Rome - a common right of passage in that era - ended up with him meeting a young girl (rumour suggests this could have been a 'honey trap' by the girl’s parents), marrying her and returning to Paris months later. It is thought that he studied da Vinci's texts on the camera obscura when he was in Rome which would have piqued his interest in the burgeoning medium of photography.
He very quickly became a teacher of photography to Parisienne luminaries (so photographers holding workshops for other photographers has a long history) such as Maxime Du Camp - a travelling partner to Flaubert who talked about Gustave in his diaries. He moved to the outskirts of Paris when two of his daughters died of cholera. The new location was to be his home for a decade and his first business card read "Photographic Printing House and Chemistry Laboratory", indicating the importance of craft to these first photographers. Gustave went on to write one of the first treaties on paper based photography (his early work and most other photographers were using the daguerrotype process).
In common with quite a few photographers today, Gustave made a majority of his income from teaching other students, quite different to the majority who were trying to make money from portraiture. This separate income allowed him to pursue his own passions, in particular, that of photographing the forest at Fontainbleau. One of his goals at the time was to use photography as a form of simplification, allowing the Calotype process and the soft focus lenses of the time to blur a large proportion of the picture and hence to guide the eye to the main subject. His landscape/forest photography looks quite contemporary even today. He was still a great portraitist(?) and for a long time one of his photographs was held up as an example of Nadar's (one of his students) best works until attribution was discovered leading to Gustave.
The five years from 1855 to 1860 represent one of photography's golden ages. Stereoscopic photography was becoming popular and the carte de visite (a low cost way of getting multiple copies of portraits) had arrived by this point and all the world wanted portraits. Gustave, with the help of a substantial business loan of 100,000 Francs, set up a sumptuous studio in Paris which attracted a great deal of business. Although eventually a financial distaster, Gustave's working cash allowed him enough free time for his personal work back at Fontainbleua and between 1856 and 1858 he produced the epic seascapes that have made him so famous.
For me, it is his work at Fontainbleau (read our article on The Forest de Fontainebleau) that stands out. He has a passion for that forest full of boulders that shines through in his photography. Working with large collodion glass plates he was able to record scenes in exquisite detail. His studies of individual trees from this period have attracted some of the greatest prices in present day auctions with one breaking records at the time with a final value of nearly half a million dollars.
The end was nigh for this golden period and in 1860 when photography became commoditised and Le Gray's business was wound up. To add insult to injury his detested neighbour's photography business took over some of the space and his student Nadar eventually ran a successful business from it.
As an escape, Gustave left on a tour with Alexander Dumas, http://en.wikipedia.org/wiki/Alexandre_Dumas (the author of The Count of Monte Christo and The Three Musketeers). This journey was an escape from family, debts and probably the friends that had abandoned him so cruelly.
The Dumas trip was to be turned into a book covering the epic adventure "Voyage through Sicily and around the Meditteranean" illustrated by 2,000 Le Gray photographs. Sadly, Dumas became enamoured of Garibaldi and a woman and her pregnancy and Garibaldi's need for guns led to Dumas returning to France and thence back to Sicily. This left Le Gray and two others abandoned in Malta without any plan and without the future fame, the Dumas connection would have given him.
Gustave bounced back and despite a few accidents and pitfalls, he ended up covering the Druze & Turks war/massacre of Maronites (a war influenced by the manipulations of the governments of France, England and Turkey) for Le Monde illustre, becoming effectively one of the first photojournalists. He moved on after a few months to Alexandria.
He wasn't quite as successful nor had quite as romantic a career in Egypt (his final destination) where his first recorded commission was photographing camels with canons mounted to their backs** (recalling sharks with lasers - oops) which were being transported to Sudan to quell further Muslim revolts. Other commissions were occasionally forthcoming but were not enough to stop his decline into debt again. At the age of 62 he tried to remarry a Greek 19 year old with whom he had fathered a child. He was to die shortly after at the age of 64, only just having enough assets to pay his debts.
Gustave's contributions to photography should not be underestimated. He was a photographic artist at a time when photography was considered more engineering or business. He was a chemist who invented, documented and taught cutting edge techniques. He arguably invented a form of the Collodion process (although Frederick Scott Archer has a claim to this and also invented the ambrotype process). It was his devotion to the landscape, particularly that of Fontainbleau, and his incredible seascapes that give him a significant place in the history of landscape photography.
Most of this summary biography was sourced from the Excellent "Gustave Le Gray - 1820-1884" by the John Paul Getty museum (available from Beyond Words for £29.20 plus carriage) - a very enjoyable biography and summary of the photographic environment of the age. I've included photographs from a few pages of the book and can highly recommend it for those wanting to dig deeper into the history of photography.
There is an exhibition at the V&A in London where you can see some of Gustave's work and the following web page is also very informative (thanks to David Baker, milouvision, for the link) ..
This week we're featuring Michael Paynton, a Hertfordshire based photographer who has been working backwards through the camera timeline, starting with a Fuji Digital and ending on with a Mamiya twin lens reflex.
In most photographers lives there are 'epiphanic’ moments where things become clear, or new directions are formed. What were your two main moments and how did they change your photography?
In my fledgeling days learning landscape photography, I used a Fuji digital "Bridge" camera but was never entirely satisfied with the results. I was discussing this with the staff of my local camera shop when one of them suggested that "perhaps you just don't like digital". I thought about his remark and decided to change tack and try a film camera.
A short while later I purchased a Minolta Dynax 7 with a standard 24-105mm lens and a couple of rolls of Velvia 50 and I haven't looked back! I think it was the tangible element of holding a transparency and being amazed by the colour fidelity and almost 3D feel when I first viewed those early efforts on my lightbox. That feeling has never diminished.
More recently it has been the move to the 6x6 square format that is really inspiring me, using a Mamiya TLR camera. I had debated long and hard with myself about whether it was worth changing from the 645 format with my Bronica. My dilemma was finally resolved when I had the opportunity to test a "vintage" Mamiya TLR with a 55mm lens and I was blown away by the "feel" and quality of the image produced. I am now the proud owner of a Mamiya C330S Pro with 80 and 55mm lens and hopefully, my photography has improved as a result.
You only started photography in the last five or six years, what started you off? (ignore this if it’s answered the in the last question.)
I was inspired to explore landscape photography after viewing the work of a very good friend of mine, Stoo Batchelor. Stoo has been a traditional Black and White landscape photographer for many years but I had never really paid much attention to his photography until I had a chance to view his work and I was hugely impressed. I knew I didn't want to venture down the Black and White route but wondered what I could achieve in colour, hence the seeds were sown.
Tell me about why you love landscape photography?
Like most landscape photographers, I have a passion for being outside in the countryside and revel in the anticipation of discovering a fantastic vista or detail lit up by wonderful light. I usually photograph on my own and find this enables me to "connect" with the landscape I find myself in.
Additionally, landscape photography is fantastic "therapy"; when going through the process of taking a photograph no other thought enters my mind, all day to day issues and worries are forgotten.
Could you tell us a little about the cameras and lenses you typically take on a trip and how they affect your photography
As mentioned, until recently I was using a Bronica EtrSi with 50, 60, 75 and 150mm lenses for my photography, with my Minolta Dynax 7 with it's excellent 2% spot doubling up as my meter. My Bronica was my first move into medium format photography and what an amazing improvement it was over 35mm.
Currently, though the Bronica has been replaced by my Mamiya C330S Pro with 55mm and 80mm lenses. The camera is a joy to use particularly as you have no need for "mirror up" meaning you have no blacked out view finder so you can see exactly what is happening at the time the shutter is tripped, great for fast moving light! It is difficult to explain but I find composing in the square format far more natural for me than any other format I have tried.
You spent a lot of time in your youth cycling and running, do you have any urge to combine the two?
If you mean cycling and running then no, but I have often found myself literally running to a location laden with backpack and tripod to catch a fleeting moment of light.
Tell me what your favourite two or three photographs are and a little bit about them.
Ashridge 6x6, my first square format image. The light was fantastic and the feel and detail in the final print are fantastic. Unfortunately, this is somewhat lost in the web image.
Coombe Road View 4, this is one of the rare images that I had pre-visualised before taking the shot. I was over the moon that the sky and light developed just as I had hoped.
Elgol, taken on a family trip to Scotland in January earlier this year. It was a frantic drive down to Elgol with the light developing all the time with me fretting that I was going to lose it. However, I arrived just in time to be greeted with the Cuillins lit up with stunning clouds giving the impression of volcanoes. Who says landscape photography is relaxing!
What sort of post processing do you undertake on your pictures? Give me an idea of your workflow…
I scan my transparencies on an Epson V750Pro using Silverfast @ 6400dpi as a raw file. This file is imported into Photoshop and downsized to 3200dpi. A curves adjustment is then applied to remove the slight magenta cast that the Epson introduces. Levels are applied to set the black and white points. The image is then sharpened but only to bring back the original sharpness as documented by Jeff Schewe at Pixel Genius.com. Any adjustment in colour, contrast etc are then made to match the original transparency and how I remember the subject at the time it was taken. If printing, the image a final contrast adjustment is made using the gradient mask on the luminosity channel. The image is then sized to the dimensions required and then sharpened using the High Pass filter.
Tell me about the photographers that inspire you most. What books stimulated your interest in photography and who drove you forward, directly or indirectly, as you developed?
Top of the list will be Joe Cornish, he is a "legend". I have his "With Landscapes in Mind" DVD and the one thing that struck me is how calm (on the outside anyway) he seems to be in his approach to taking a photograph.
Another photographer who inspires me is Peter Watson. His work is very understated but very real.
Both photographers have produced fantastic and very approachable books from which I have learnt a great deal.
As I print all my work one book I have found invaluable and can highly recommend is George DeWolfe's Digital Photography Fine Print Workshop. Superb!
If you were told you couldn’t do anything art/photography related for a week, what would you end up doing (i.e. Do you have a hobby other than photography..)
There is only one answer to this, spending time with my wife and 2 year old son!
What sorts of things do you think might challenge you in the future or do you have any photographs or styles that you want to investigate? Where do you see your photography going in terms of subject and style?
I live in Hertfordshire which is somewhat lacking when it comes to landscapes so my challenge will be to find new and interesting viewpoints and subjects in my home county. I frequently photograph in Ashridge Forest and have recently been inspired by the work of Tim Smalley and his Ashridge Trees project.
Regarding my approach to taking photographs, I still have the bad habit of getting too excited about a shot and not taking my time to make sure I'm getting the best I possibly can from the subject be it composition, exposure etc. I am getting better though!
Who do you think we should feature as our next photographer?
Leen Hoencamp, a photographer I follow on Flickr. Lovely subtle and well presented work.
Our first book reviewed here is one I should have done alongside the interview that we did a few issues ago. Steve Gosling's video interview was very popular and you can see his book on pinhole photography below. The self-published book is a limited edition of 1000 with each numbered and signed by Steve and available directly from his website at stevegoslingphotography.co.uk. People may ask why print quality matters to a pinhole photography book but in many ways, it is more important as the smooth nature of the photographs can be easily ruined by a poor print screen (the dots you see in magazines which are finer in better printed books). Steve's duo-toned pictures are well presented here and the subject matter, although primarily typical food for the pinhole, is often pleasantly obtuse (for instance, Steve's excellent 'Exit' picture of Weymouth, Dorset). Although not a cheap book at £30 plus p&p, if you have an interest in the pinhole genre, this is highly recommended.
Ernst Schwitters - Colors of Norway 1943-1963
The second book I am reviewing today is from one of Europe's first colour landscape photographers. Ernst Schwitters was born in Hanover in 1918 and was exhibiting his landscape photographs in 1933 having moved to Norway. His work is intriguing historically and he was associated with Man Ray and László Moholy-Nagy because of his Photogram work. This book chronicles his life but concentrates on his colour landscape work, remarkably starting with photographs of the Lake District, a landscape he saw as Norway in miniature. The book is intriguing historically and the photography is often beautiful and creative but away from its excellent documentary historical abstract, the number of pictures that really make me want to linger is not enough to make me want to buy this just for a visual feast. However, if you have an interest in the history of European landscape photography, you might well justify its purchase. You can buy this book from Beyond Words at this page.
Olaf Otto - Above Zero
Our final book review this issue is a stunning production by Olaf Otto Becker documenting the melting ice sheets of Greenland. "Above Zero" saw Olaf crossing frozen plains with his large format camera searching out the sources of the many rivers carrying meltwater to the see. Black dust absorbs the suns rays and starts the melting process and Olaf found these origins and fastidiously traced the pools, streams and then rivers of ice until they eventually disappeared under the ice sheet. The photographs are not easy to consume en-masse, many people will probably get to the 20th image of a turquoise stream over an ice plain and get tired. However, I've returned to these images multiple times and as you browse through them, the compositional elements come out and the subtleties of subject choice and positioning become clearer. Some of the 'revealing' that must have taken place in Olaf's conscious as he worked in such a barren landscape seems to occur. The back of the book contains a section documenting the team that works on the ice that were his companions and after such a large treatise of images devoid of anything but dirt, ice and water, the colours come as quite a shock. This book and Ernst Schwitters were supplied by Beyond Words who loan me books in order to review them and I can decide to pay for them or to send them back. I think I'll be keeping the Olaf book, it's worked it's way into my head and seems to reward repeat visits to consume the series rather than the return trips I make to other books where I pick out individual images. You can buy Olaf's book at this page.
To mark the launch of the new Canon 1Dx camera, we are delighted to invite you to join our one-day photography workshops at a Wildfowl & Wetlands Trust venue near you FREE OF CHARGE – an inspirational day with top class speakers normally worth £85 but now free! Canon will have cameras at these events for you to try out as well.
Obviously, places are strictly limited at each venue and will be allocated on a first come, first served basis. You need to book a place to join a workshop.
Be inspired by top photographers and speakers Charlie Hamilton James, Danny Green, David Ward and Phil Malpas
Create stunning images of nature and landscape at a beautiful Wildfowl & Wetland Trust site with workshops from our speakers
Check out the latest kit innovations and seek advice from key photography and nature exhibitors - including the new Canon 1Dx!
Dates & venues
At each venue, the morning will be devoted to exploring wildlife subjects with Charlie Hamilton James and Danny Green, the afternoon for inspiration on landscapes with David Ward and Phil Malpas – plus there’ll be plenty of practical hands on opportunities too.
Choose between:
Monday 31st October 2011 - Martin Mere, Lancashire
Wednesday 2nd November 2011 - Welney, Norfolk
Thursday 3rd November 2011 - Slimbridge, Gloucestershire
The days run from 9.00am until 5pm - you can either purchase lunch at the centre or alternatively bring a packed lunch to enjoy outside.
Itinerary
Itinerary
09.00
Arrival & registration
09.15 – 09.30
Welcome briefing
09.30 – 10.30
Seminar 1 Danny Green (The Long Journey North)
10.30 – 10.45
Interval
10.45 – 11.45
Seminar 2 Phil Malpas (Finding the Picture)
11.45 – 12.45
Lunch break
12.45 – 14.30
Choice of practical sessions with the experts.
14.30 -15.30
Seminar 3 Charlie Hamilton James (Thinking Differently)
15.30 – 15.45
Interval
15.45 – 16.45
Seminar 4 David Ward (Inner Landscapes)
16.45 – 17.00
Question time & Close
Optional practical sessions
Guided walk & talk
David Southard – getting started with D-SLR video for nature
Wildlife Watching Supplies – Field craft and camouflage
Exhibitors
We have lined up some great exhibitors to ensure everyone gets the chance to see and handle some of the products and equipment that can help photography of the natural world:
Canon
Páramo Directional Clothing Systems
Wild Arena
Wildlife Watching Supplies
Warehouse Express
Lowepro
Giottos
Traxwatch
How to book your free place
For more details click here and to book, visit this link or give the team a ring on 01962 793383. Book now to be sure of your space! You must have a confirmed registration to join a workshop.
Quite recently, Luminous Landscape ran an article by Markus Zuber discussing a comparison between the new IQ180 Phase One medium format camera back and a 10x8 film camera. The results surprised quite a few people because the IQ180 outresolved the 10x8 by quite a large margin.
The critics were quick to call the test biased and pile insults onto the creator. However, knowing how difficult it is to make accurate tests and having seen some 10x8 results, I had the impression that there were a few different complicating factors that made the results less than clear cut. Whilst myself and a few others were discussing the results on the Large Format Photograph forum, Markus (who helped with the original tests) expressed his interest in getting someone to scan his 8x10 transparencies from the test and I offered.
This article follows my thinking as I looked into the test and I hope to explain what may be needed if you are planning your own tests. We will touch on topics such as diffraction, depth of field and equivalent focal lengths and apertures across camera formats along the way.
But first, a bit of background, the comparison used the following equipment
IQ180 80 megapixel back (sensor size 53.7mm x 40.4mm = 10328 x 7760 pixels)
Phase 645 camera
– Schneider Kreuznach f2.8 / 55 mm
– Schneider Kreuznach f2.8 / 110 mm
Alpa SWA
– Alpa APO-Helvetar f5.6/60 mm
– Schneider APO-Digitar f5.6/120 mm
The 8x10 was an Arca Swiss using Ektachrome film (I haven’t looked the the black and white film but it was very grainy in comparison with the Ektachrome)
– Schneider Apo-Symmar 5.6/240 mm
– Rodenstock Apo Ronar 9.0/480 mm
The photographs taken were at f/32 for the large format and at f/16 for the Phase
I won’t reproduce a lot of the test here so wander on over to Luminous Landscape and read the original article to catch up.
Assessing the Test Conditions
Focal Length
Well the first thing I looked at was the lens equivalents and calculating these is not immediately straightforward. However, after a little thinking (and having done similar conversions before). I had to presume that the shots will be cropped to the same size. In this case it means cropping the IQ180 image, which is naturally 4x3, to almost 4x5 (the 8x10 large format film is actually 196mm x 246mm).
So what we end up comparing are the short edges of the sensors. Well the ratio of the two short edges is 4.85 and this can be used to work out lens equivalents. So, what should the lenses be for the 8x10 given the 55mm/60mm and 110mm/120mm lenses used.
55/60 is equivalent to 267/291
110/120 is equivalent to 533/582
So, given that the actual lenses used are 240mm and 480mm, we have an advantage to the IQ180 results as follows (in terms of linear resolution or pixels across the width or height)
55 = +11%
60 = +22%
110 = +11%
120 = +22%
A not insignificant advantage but one we can now allow for in the following calculations.
Aperture, Depth of Field and Diffraction
The next step is to look at the chosen apertures and to work out what implications these have on depth of field and diffraction. For great articles on both of these issues, take a look at Cambridge in Colour which has a very nice article on diffraction (http://www.cambridgeincolour.com/tutorials/diffraction-photography.htm) and depth of field.
We will look at the chosen aperture for the Phase and work out what the equivalent should be for the 8x10. Interestingly, the multiplication factor for this is exactly the same for that of focal length. So here are the aperture settings that should have been.
f/11 on IQ180 should be f/53 (or f/45⅔)
f/16 on IQ180 should be f/77 (or f/64⅔)
But we actually used f/32 on the 8x10 and so this has a large impact on depth of field.
To work out any depth of field, we need a good estimate of the distances involved. I’ll save you some maths here but in short I looked up the exact height of the Renault van, calculated how far away it would need to be to cover the same angle as shown in the pictures and Bob’s your uncle (as they say). The Van turns out to be about 25-30m away.
Talking to Markus, he said that they were focusing on the front of the second row of oil drums which I estimated to be about 15m away.
So, what depth of field can we get? Well, the first thing we should think about is how can we measure depth of field? I personally think it would be good to measure it in terms of number of pixels we could get in relation to the maximum resolution of the IQ180 (actually we’ll measure circle of confusion for these but that’s far too technical and not as simple to scan read). So the IQ 180 has 100% resolution on the focal plane when using an optimum aperture.
How much resolution can the IQ180 get at f/16? Skip the next paragraph if you don't care about the maths.
Well at f/16 the circle of confusion (based on airy disk = 21.3um and 2.5x factor as mentioned in Cambridge in Colour) is 8.5um so for a 40.4mm sensor we have 40,400um divided by 8.5um which gives 4741 so the Phase should render this number of pixels which works out at 61% of the maximum possible.
I won’t go through the rest of the figures like this but at f/16 you can get 61% of max and at f/11 you can get 88% of max.
At f/32 for the 8x10 we have a potential 150% of max IQ180 resolution [circle of confusion (CoC) of 17um which means a potential number of pixels of 196,000um (film size) divided by 17um = 11,500 pixels which works out as 150% of max IQ180]
In summary
f/11 on Phase gives 88% of max
f/16 on Phase gives 61% of max
f/32 on 8x10 gives 150% of max
Now this presumes we are working on the exact focal plane but in actual fact, the number plate test is 15m away from the focal plane.
What we need to work out now is what the circle of confusion is at the number plate based on depth of field calculations. I’ve leave the maths of this one alone for a bit but you can use a website such as this (http://www.dofmaster.com/dofjs.html) and change the circle of confusion value in the first drop down (below all of the cameras) until the you get the right far limit of focus.
This turns out to be about 80um for the 8x10 at f/32 which means that instead of the 150% of max resolution, we have 31% of max resolution - quite a difference.
If we do the same for the Phase we get
55mm at f/16 the CoC is 6um which is less than the diffraction limit of 8.5um and so the resolution is still 61% of max.
60mm at f/16 the CoC is 9um and so the resolution is 57% of max
You’ll notice I’m only working on the wider view test of the barrels and van at the moment as I haven’t worked out the figures for this yet.
So, given these figures, the 8x10 can resolve 31% of max and the IQ180 can resolve 66% of max.
And then we have to take into account the focal length multipliers and so the 8x10 can resolve 20% less than that figure (because it is effectively using a wider lens) which makes it aprrox 26% of max resolution.
So, in conclusion the maths tells us that the 8x10 should be 42% of the resolution that the IQ180 is getting at the number plate.
Did we actually focus on the right place?
The final test is to see if the camera was actually focused on the right place. Markus fortunately took photographs at various apertures and if we take a look at the f/5.6 aperture on the 60mm lens, it is easy to see that the actual focal point is somewhere between the last oil drum at the back and the number plate (see attached image). In reality, this made little difference as the number plate was diffraction limited anyway.
The 10x8, as far as we can tell, was focused almost exactly in the right place (worked out by finding out where resolution dropped off either side and splitting the difference).
Was the scan at an appropriate resolution?
Given the 8x10 was only working at 26% of IQ180 resolution, for a pin sharp picture it only needed 2000 pixels across the height of the frame which works out as 2000px/8 inches = 252 pixels per inch. Hence the 745 dpi was over sampling and more than enough in theory.
We did run a 4000dpi scan however and using deconvolution sharpening we got the following results as a comparison. We also took a photograph of of the transparency through a stereo microscope and included the results here. Ignore the bottom left result for the moment, we'll come back to that one later.
Interestingly it looks like the 8x10 is almost equal to the IQ180? How can this be? Well I would guess that the oversampling of the 8x10 image, even though out of focus, allows the sharpening algorithm to bring the contrast up at higher frequency. Sharpening to remove out of focus effects is arguably cheating as we end up oversharpening more in-focus areas.
It’s worth mentioning that most talk about resolution has to incorporate contrast and this is why most resolution figures state the contrast at which the resolution can be seen. If we look at 50% contrast resolution (often termed 50% MTF) it will be a lot less than 10% contrast resolution.
I would assume that even though the resolution of the 8x10 has been reduced dramatically, somewhere in there we can still get some higher resolution although at a very low contrast. Sharpening algorithms can increase that contrast and also refocus the blurred image to some extent. In addition to this, because of the Bayer array, it has been estimated that the actual resolution of a digital camera is a small amount less than 100% (I can’t show sources for this at the moment though - does anybody have links for this?).
What can we do to fix the test
Using a different aperture for the IQ180.
Markus fortunately took multiple photographs using the IQ180 at different apertures and so we have an f/8 shot on the 55mm lens which was focussed almost on the right place. f/8 is not quite the f/6.6 we really needed but we get a better test out of this.
The f/8 shot is not diffraction limited and should potentially be able to render the full maximum resolution of the sensor at the focal plane. Working out how this is reduced by the depth of field gives us a 16um CoC at the number plate and hence a value of 25% of maximum resolution.
The 8x10 was managing 31% of resolution but if we include the 10% advantage to the 55mm lens this works out as 28%. In other words we should get almost an exact match. However, given the fact that the 8x10 can resolve slightly more at lower contrasts we might expect a little advantage.
Here is the comparison.
The top result shows the IQ180 with 55mm lens at f/8, the bottom shows the 8x10 f/32 result scanned at 4000dpi and sharpened
It should also be noted that another factor came into play with the 60mm IQ180 test. That is the difference in lighting between the 8x10, 55mm and 60mm shots. The 8x10 and 55mm were taken at approimately the same time and at that point, the sun was not directly illuminating the number plate (although there was a small highlight on the embossed numbers).
Top is the 55mm with little direct sunshine. Bottom is 60mm with direct sunshine (and focal point shift). These are both at f/8
However, when the 60mm test was shot the sun had moved around enough to directly illiuminate the number plate and at an almost 90 degree angle, sidelighting the embossed numbers and creating a large contrast difference betweem the numeral and it’s right hand edge. This contrast difference could easily double resolution/contrast figures (i.e. perceived resolution).
What next?
We’ve also taken a look at the longer lens tests and again the IQ180 results are just about diffraction limited and at an estimated 50m to the subject, we can choose anywhere between 40m and 70m away for our comparison as it will all be at approx the same resolution. Looking at our comparison of diffraction limits for 8x10 at f/32 and IQ180 at f/11 we should have 88% of max for the IQ180 and 150% of max for the 8x10 (or 62 megapixels for IQ180 and 180 megapixels for the 8x10 - if you want the calculations, just let me know).
We have taken an area that we think is the maximum resolution for the 8x10 and reproduced the comparison here.
The two images above compare the 8x10 480mm f/32 on the left with the IQ180 110mm f/11 on the right. The 8x10 images have been transformed to align them and you can drag the green slider left and right to compare the two shots.
I don't think this is the end of the matter as the IQ180 should really have been shot at f/6.5 which would have allowed more resolution but less depth of field.
What next then
Well Markus and I both think a retest would be a good idea and we have spent the last week putting it together with help from Linhof Studio, Mr CAD, Phase One, IMATEST, Joe Cornish, Dav Thomas and many people at the large format photography forum. By the next issue we will have completed the initial test and will have gone a long way to some initial results which we will document. It will probably take a while to prepare a full set of results but we will pull all of the stops out for this.
Why?!
Because photography is a combination of art and craft and this is a test that it would be difficult for most people to make. We'll also be throwing 4x5, medium format film, the P45+ and a range of full frame DSLRs to give a full range of cameras types and costs. The best answer is probably "So you don't have to...".
Conclusions
The original test had a few different issues. The first was that the focal lengths tested were not equivalents which gave between 10% and 20% advantage to the IQ180. The second was that the apertures tested were not equivalent and that the IQ180 had much more depth of field than the 8x10 and because the test areas were not on the plane of sharp focus, this depth of field was more important than system resolution. The 60mm test (which gave a 20% advantage already) was also shot with direct sunlight cross lighting the number plate, giving a significant contrast advantage to the IQ180 and was also focussed on a point a lot closer to the number plate than the 8x10.
Finally, with the help of Markus, we compared the 10x8 on the long lens with an IQ180 shot at a different aperture and were able to show some results that may be more accurate. There has been a lot of criticism of Markus in the forums but he at least made the effort and motivated a discussion and we should applaud him for that.
Thank you for your patience with the maths in this article. If any of the terms or maths was not clear and you want to know more, I am happy to extend this with some extra 'detail boxes' that go into each part.
Have you ever considered placing your images with an image agency? Perhaps you have had work accepted by a library and are waiting for the money to start coming in. Or maybe you have already realised that the financial reward for your hard work, minus commission, comes to little more than a few pounds per photograph. Every photographer has at some stage pondered the advantages of being represented by an image library and many, including myself, have gone down this route as a means of bringing my work to a wider market.
My own experience started six years ago and even in that time there have been rapid changes. Starting with a couple of hundred of shots with one agency, I was pleased to make a few decent sales including three figure sums. Spurred on, I sent work to other libraries and eventually had around 500 images with one company and was happy with the quarterly returns they made. This situation lasted a couple of years before the first contract change, which now meant supplying images exclusively and taking forty, rather than fifty, percent of the sale price. The issue of exclusivity did make me stop and think, however the consistent sales and the fact that they were willing to allow some flexibility over this clause in certain instances outweighed my initial reservations. Naturally I was far less keen about the money split, which prompted me to look around at all the other options and unsurprisingly this revealed that many had already been assimilated into this same library. Grudgingly, I signed up.
For a while it was good, unexpectedly so given the general prices paid for images and the state of the market. However, the library was becoming increasingly choosy, and while sometimes this made sense because they already had an area well represented, at other times they were turning away good images for no obvious reason. Then sales began to decline a little bit more as the financial climate got even gloomier. Moving forward in time another year or so this library was itself bought out by an even bigger fish. The new contract that came with this upheaval had totally unworkable terms that controlled the use of images to an unreasonable extent and for poor returns, and although the image library in question is perfectly within their rights to argue that this is what the market dictates, I ask who created that market? It has become an all out race to see who can offer the most for the least. Needless to say I did not sign on the dotted line and although libraries have only ever brought me a small percentage of total turnover, it was still a painful moment.
The ‘sell them cheap and in quantity' approach to marketing photographs can only ever work from the agencies point of view. While this business model recognises that photography has become a mass produced item in one sense, it ignores the fact that images are not made on a conveyor belt by a machine, they are made by individuals who are expected to produce work for less than the cost of production. With the phenomenal numbers available to license no single image is capable of selling in the quantity necessary to actually constitute an income. Landscape photography takes a great deal of time and resources, and I am left working out how often an image would have to sell before reaching the break even point?
The sad reality of it is that everyone benefits apart from the photographer, the companies that are making millions and the happy customers buying images at knockdown prices. This encourages the idea that photography is in some way cheap and denigrates the hard work that people put in. There has never been a greater demand for imagery but the true value has been tarnished by the sheer quantity to be had through libraries and other means. These days it is not unusual for a potential customer to come to me quoting absurdly low prices as some kind of bargaining tool. It is galling to be undercut by libraries, as I simply cannot compete.
So why do photographers let libraries market their images under such adverse terms? Just as with supermarkets and food producers, big companies use their buying power to get the best deals regardless of a fair price. It is as well to remember that when we feel indignant about this treatment, without our photographs then ultimately they have nothing to sell. Only by saying ‘no thanks’ to unreasonable contracts can the cycle be broken. This is not such a radical position to take if you consider how little you are likely to be walking away from. Just how much money would it take for you to sign away the rights to your work?
The Cutting Edge, Sheaf Square
Taken at home in Sheffield this is my most frequently sold library image, which after the commission has netted me £191.50. Whether or not you consider this reward enough for three hours work, it needs to be offset against all the images that have made less and that have often been more costly to produce.
Tarn Hows Estate, Cumbria
This was turned down by one library only to go on to be one of my more profitable photographs. Possibly it was because they already had shots from the area, a situation that occurs all too often now that so many smaller image collections have merged into one.
Personally speaking, I could never sign a contract that prevented me from licensing my images directly to editorial clients. In the case of this photograph, it would have meant losing out as although it has been with a library for about two years it has not sold, meanwhile it has earned £500 in editorial fees.
Guy Tal is writing an article for us in a couple of issues time but we thought it would be good to have a chat and record it as a podcast so you have something to listen to whilst you are out on location or just travelling to work. We recorded this using Skype which worked very well although but the different levels meant that my voice was quieter than I would have liked, please let me know if it is too quiet and I will try to fix using post processing. You can see some of Guy Tal's photography at http://guytal.com/.
In our second post processing instalment, we take a closer look at curves for contrast adjustments and targeted brightening and darkening of the image.
Many people have learned to use various Photoshop blending modes to make contrast or brightness changes but there are a couple of reasons that curves *may* be a better solution.
The first is that duplicating the picture layer - in order to use as a blending mode - doubles the size of the Photoshop file (and hence doubles the memory requirement). A global curves adjustment layer does not increase the file size by any significant amount (we’re talking less than 1% increase). The other advantage of curves is that it is easy to work out what adjustments to make (once you learn a few guidelines) and it is also less likely to destroy information in an image as you saw in the previous article.
Having learned to make some simple adjustments in the last article, we will now try to limit the effect of these adjustments so they only affect the areas needed. In order to do this, we will have to talk about masks.
Masks in Photoshop are simply layers that control where to apply adjustments. A mask is a black and white layer where white parts allow 100% of the adjustment to be applied and black areas block the adjustment completely.
Let’s take a look at one of the simplest ways of creating a masked adjustment layer. The following short video shows a selection is made (using the ‘polygonal lasso’ tool) and then an adjustment layer is added. These two steps automatically create a masked selection and this technique works for any adjustment layer, not just curves.
Obviously, this mask is going to be useless for nearly all of our photography post processing because we have a hard edge. Nearly all masks used in post processing will be soft and the next step is to show you a few ways to create a soft edge.
The first method is to apply the edge softness when you make the selection. When you are in a selection mode (either square, ellipse, lasso or polygonal lasso) there will be an option in the tool options bar for ‘feather’. Feathering is a term in woodwork which means ‘to thin an edge’. In Photoshop's case it is the equivalent to blurring the edge of the section so that a 100px feather will make the selection softer such that instead of going from full selection to no selection over a single pixel, it does so over 100px with the area under the selection edge ending up 50% selected. With a value in the feather box, as soon as you complete a selection, the feather is applied.
The other way to do this is to manually add a feather after making the selection using ‘refine edge’ (this tool has changed slightly in each version of Photoshop since CS2 I believe). The refine edge has a ‘feather’ slider.
Finally, you can apply the feather to the adjustment mask directly. Click on the mask icon that sits alongside the adjustment icon in the layers panel use the blur tool to feather the edges. If you want to see what you are doing, just ‘alt+click’ on the mask and you should get a black and white view of the mask or you can ‘alt+shift+click’ on the layer to get a ‘rubylith’ (a red overlay showing the selection). repeat the alt+click or alt+shift+click to get back to normal.
The following video shows some of these techniques and a couple of extra tricks.
If you already have a curves layer that you have added and want to mask separately, you can use the ‘Layer > Layer Mask >’ menu options. This allows you to create a new mask that ‘reveals all’ which means it allows the adjustment layer to affect the whole picture; ‘hide all’ which hides the adjustment layer and then there are ‘reveal selection’ which only applies the adjustment layers to the selection or ‘hide selection’ which hides the adjustment layer for those areas that are selected.
To save confusion, I tend to only use ‘reveal all’ and ‘reveal selection’ because these make the most sense. I can then click on the layer and ‘apple+i’ or ‘ctrl+i’ to invert it.
So I hope you’ve realised now that a layer mask is just another picture that you can apply effects too directly. For instance, I find myself wanting a fairly hard transition on one side of a mask but a soft transition on the other side sometimes. This isn’t straightforward to do in photoshop directly, but knowing that masks can be treated just as images themselves allows us to apply some local changes to the mask itself by using selections.
For instance, in the Bamburgh picture above I might want to make a selection that targets just the castle but with a hard edge around the castle but a soft graduated edge at the bottom. I can do in a few different ways and the following video shows two of them. The first just uses a large paint brush with a very soft edge to paint black over the bottom of the mask. The second uses a feathered selection on the mask itself which can then be used to cut away the excess. You might also selectively blur only one side of the mask.
Our final mask for this introductory session is the graduated mask. This short video shows how to apply graduations so that you can easily see the effect.
So that concludes our article on an introduction to masks, for the next article on the series we'll look at some real world uses. As always, thank you for your time reading this and if you have any sections you would like expanding or explaining in more detail, please let me know. The pace will probably be too slow for some people and too fast for others. Also, apologies for the video quality in the first few videos - the ambient light was changing dramatically at the time. Hopefully, the final video will show how I was supposed to do it! If the quality isn't good enough, please let me know and I'll be happy to rerecord.
This issue features photographer David Mould who lives on the top edge of Glasgow with amazing access to Loch Lomond and Glencoe amongst others. David has had quite a profile recently with pictures selected by various websites for honourable mention. We asked him the usual and he supplied us with some great answers.
In most photographers lives there are 'epiphanic’ moments where things become clear, or new directions are formed. What were your two main moments and how did they change your photography?
From a technical point of view, it was upon the discovery of hyperfocal distance... I had not long had my first DSLR and when I eventually got off auto mode I was unhappy with the results and despondent until I discovered a website that allowed me to calculate the hyperfocal distance for my Sigma 10-20 and it all became very clear, literally.
The other significant moment in my short photography journey was when I was approached at Loch Ard, (my second home), by a young couple who were on the loch for the first time and said that they had been enthusiastic to come after reading an online blog about Loch Ard written by this guy David Mould.... (I think I blushed)
This was a massive boost as the chance to promote Scotland's beauty has always been high on the list of photography objectives... even and although sometimes I feel a bit precious about some of my locations...
You started photography in your teenage years in Stornoway, how did you end up picking it back up again and did you have any other creative or outdoors outlets before then? And why landscape?
Prior to taking up photography again, I had returned to landscape watercolour painting... not dissimilar in process of looking for the light, the line and developing the textures and mood of a scenic view... this combined with walking and fishing fulfilled the artistic and outdoor need to be in the landscape in some form... I think landscape photography allowed me to tick many of the boxes that several of my activities encompassed...
The other aspect was the amount of control that I now had, due to digital, over my creativity with the advent of superb processing and not relying on another to ‘develop’ your style... although ironically, the more I learn about processing , the more I try to get it right in camera and less time on the computer... and equally, the more advanced the hardware , the more it allows you to get back to basics... (backwardly capable Pentax K5) a far cry from the Nikkormat and Yashica fumblings of my teenage years, but now with the added 20th century option to replicate the 70s experience.
You use a Pentax K5 camera because of its weather sealing - do you do much photography in the rain and could you tell us a bit about how the landscape changes during wet weather?
If, in Scotland, you did not like doing landscape photography in the rain, you are scuppered. If you discount, as most photographers do, the summer months, the rest of the year is predominately the rainy season. I never go out if it is sunny and you will rarely find a midday shot from me, although the recent articles on shooting at any time of day and my move to more challenging styles, has allowed me to explore a longer session...
I feel that I am an advocate for people who are either too lazy , or unaware of the beauty of Scotland in the ‘strange’ hours that landscape photographers inhabit... I think that the outdoors, and particularly Scotland, even in the rain, has a strange sense of calm between about 4 and 8 in the morning... the time of noisy Osprey families and the last grunts of the retreating stags... and when the clouds break or the mist forms... and that peculiar blue of moonlight gives way to the gloaming light and the prolific opportunities that are rarely seen or felt other than by the most dedicated fishermen, or the most insomniac photographers...
Could you tell us a little about the cameras and lenses you typically take on a trip and how they affect your photography
For the first couple of years, until they both drowned in a swollen burn on the campuses, I generally had a Sigma10-20 permanently connected to my Samsung GX10 which was permanently connected to my tripod...
With the settings at 12mm 0.46m 100iso in AV mode, this could account for about 80% of my first couple of years work.
I use a Sigma 17-70 for medium work and my trusty Tamron 70-300 to cover the longer needs
With the purchase recently of a new Pentax k5 and its backwards comparability for old Pentax lenses, I purchased a 50mm Pentax 1.4 in order to investigate the use of a prime very shallow depth of field in landscape work... This is a stunning little lens, a load of fun and a great learning experience with it being completely manual...
The choice of a Pentax K5 was down to this ability and the fact that it, in line with the Samsung before, had 77 seals and puts up with the typical four seasons in one Scottish day...
What sort of post processing do you undertake on your pictures? Give me an idea of your workflow..
I import and embed my details directly in Aperture, which I use to catalogue my images... open and view my images in Adobe Camera Raw... and do most of my processing there...
A typical process would be a crop, (if needed) white balance, exposure balance, saturation... export to PS CS4... levels, curves, any cosmetic work... Imagenomics noise reduction/sharpening, export as DNG, make 72dpi jpg copy for web use and store original Raw and processed copy on separate external media... keep everything... I have found some of my best images returning with a fresh set of eyes.
How do you approach the many photographic icons you live nearby when so many people have already been there before you? Is there a way of working that helps you be more creative in these locations.
I have done all the ‘iconic’ shots in my part of Scotland... and because I love this area, I tend to go back and look for that different angle, to do this, I will park half a mile before or after the iconic view and walk that little bit further into the moor... or, probably more peculiar to me, get there at a time that no one else sees, and shoot it in differing light and conditions. I also like to get intimate with the scenery, making the geology the subject of the image rather than the view.
Strangely, I have been shooting a view from Rannoch Moor that I had not seen on any sites and I named it ‘The Cauldron’ due to its waterfall noise and appearance... and after doing several shoots at this location, I saw a shot by another photographer where she used the title ‘The Cauldron’ when describing the location... I was torn between being delighted and annoyed... more delighted I think.
The other trick if you find yourself in these locations, and I usually do with visitors... is to just turn round and take the opposite view, chances are, because of where you are that that view is equally spectacular.
Some of my best shots from the Buachalle Etive Mor site are of Sron na Creise!
I notice that you are reprocessing a lot of your old HDR work. Can you tell us a little why you worked them with HDR to begin with, what stimulated the change and what your approach is now?
My initial need in landscape shooting was to replicate what I saw, and more importantly, what I felt when I was in the location taking the shot.
I felt that initially HDR gave me that option, and even and although I tried to be subtle, when I look back now at my early work, I still remember every shot and the emotion of the day, time, and a moment is equally clear to me... in a somewhat exaggerated and memorable way.
The beauty of HDR was the ability to replicate that with a little knowledge, and within a timeframe that allowed little time to be spent on processing. I also liked the effect that ND filters in combination with HDR produced in the sky... I think the romantic watercolour artist in me wanted the drama that I was previously used to creating in paint.
I think what stimulated the change was the fact that I was trying to be more and more subtle with HDR to the extent that I was using it less and less and refining my technique in ACR that became a workflow that suited the time and effort that I was prepared to put in processing.
I tend to blend more now, and bracket shots for that ... but I am not averse to the occasional HDR as and when it is needed or a bit of drama is required.
You are very successful in the amount of online networking and great feedback and followers you get on Flickr and elsewhere. What are the advantages and disadvantages of this success?
I think that the advantages outweigh the disadvantages... I have met and become friends with several people on the various online sites that I use...
I had the pleasure to meet and spend a couple of days with two guys I talked to online from Australia last year and spent an enjoyable couple of days shooting in the Trossachs and Argyll...
I have, in the year on Flickr amassed over 2400 contacts in the four years I have been on there and it is a great place to test your work... as there are genuinely good and worthy critique groups capable of support and encouraging young and upcoming photographers...
I have recently joined 500px, noted for the quality of the work of its members and its modern and stimulating interface akin to a lot of the social media online... and the new kid on the block, Google+, now joined for about a month I have amassed over 100 contacts, with the emphasis on photography , this is a very interesting and vibrant community, packed with stunning and new talent... and only now realising the potential of the effect on the photographic community...
The only disadvantage that I find is the time that you have to dedicate to build up this presence online, but generally, even this is educational and positive... the other advantages would be the wealth of exciting photography, learning new techniques, joining several online webinar lectures by some of the best landscape photographers...
From a purely selfish point of view, it increases the hits to my own website, and also allows me to promote Scotland to a very wide audience.. but what I have enjoyed most is the amount of friends that I have made whilst doing it...
Tell me about the photographers that inspire you most. What books stimulated your interest in photography and who drove you forward, directly or indirectly, as you developed?
My initial inspiration was my good friend and journalist David Gordon, who, in my teenage years introduced me to the works of Paul Strand (Tir a'Mhurain) and Gus Wylie (images of the Hebrides) both of whom made a pilgrimage to the Outer Hebrides , where I lived and, not only captured the essence of the landscape but also of the people... Through my friend, I had access to decent camera equipment, and these were my first journeys into photography... we mostly shot black and white, due to the cheap availability through army surplus... and the expense of colour processing and film...
When I moved away from the islands in the early 80s I had no further access to cameras processing so gave up until pixels caught up with film and purchased my first DSLR in 2007... since then I have learned most of what I needed online and through trial and error, mostly error, but the beauty of digital is its forgiving amount of memory...
If you were told you couldn’t do anything art/photography related for a week, what would you end up doing (i.e. Do you have a hobby other than photography..)
I think I would go back to fishing and watercolour painting... the next best thing to being by a loch in Scotland making an image would be being beside a loch in Scotland, doing anything else...
You mentioned TTL on the phone (triangle, texture, light), tell us a little bit more about this.
I had often wondered if I thought much about the process that I went through for each landscape image, until I recently had feedback from a talk I had delivered to a camera club, where the secretary, in summing up referred to the production of the images that I had detailed as my ‘TTL’ style...
This was, in his words, my passionate and detailed description of each image with regard to the Triangle... or the apparent triangular aspect of most of my images with leading and convergent lines from the corners... the Textural aspects of the image , whether it be water, rock of trees... and the specific and vital Lighting aspects of the subjects within the image..hence...T.T.L... he remarked upon the passion with which I insisted that the best landscapes, with few exceptions, contain this TTL combination... and with the benefit of his observation and recounting the presentation, I realised that it was an instinctive mantra that I invariably follow before every shot... I just hadn't recognised it...
What sorts of things do you think might challenge you in the future or do you have any photographs or styles that you want to investigate? Where do you see your photography going in terms of subject and style?
I have always been interested in doing more intimate landscapes, looking at the combination of smaller subject areas combined with a range of depth of fields... the recent purchase of my Pentax K5, its backward capability for old lenses and the fortuitous purchase of a second hand Pentax 50mm 1.4, has allowed me to do that.
Not only has it opened up a whole new style and endless possibilities with regard to intimate landscapes, but it has forced me to look at the technical and compositional aspects of moving back to a manual, ‘set up everything’ camera (albeit that the Pentax K5 is like a small PC)... the fact that it cost only £60 makes the sharpness of the images and the fun I am having with it all the better...
I now find myself about 50/50 between my Sigma 10-20 and my new 50mm... and on occasion leaving the 50mm on for the day in order to embed the learning and my new ‘view’ of composition through necessity.
Tell me what your favourite two or three photographs are and a little bit about them.
It is difficult to pick out favourite images as each one has a weighting beyond the final photograph, I was once asked about an image, and realised I remembered every image in my portfolio, what kind of day it was, why I had chosen these images and the thought process behind them... amazing, because I usually cannot remember what I had for dinner yesterday... that is the power of the image... similar, I feel to hearing music from your past.
Sometimes in Scotland, It rains...
I have shot these boats on several occasions, seasons, weathers, positions, but the combination of the position, mist, calm and amount of rain made this composition unique... the longer exposure captured the serenity of the moment and the muted tones and mood of the dire weather
Sometimes... Scotland is just beautiful...
Taken less than 50m from the previous image, the contrast is stark... with a warm morning with the promise of sun as the mist rises on Loch Ard... taken from one of the few positions that remain unknown on the Loch, this, I feel, highlights the attraction of the triangular aspect of an image, that, along with the colour and the symmetry , I feel, retains enough appeal to make this image a favourite, at the moment.
Etive Flow...
I have always loved sitting by the River Etive, mostly when it is calm, but on occasion, when it is in full spate... it gives you a sense of fear and excitement when you set up your tripod as close as you dare to the edge without feeling vulnerable... This image I feel encompasses my Texture , Triangle and Light philosophy, it has a leading line, a triangular aspect to the image and several textures to interest the eye within the clouds, rocks and the water... all these together, along with the light on the rocks and the hillside are the perfect composition combination... giving it appeal, despite its simplicity...
Who do you think we should feature as our next photographer?
As you have mentioned I am getting an increased following on the various websites and social networks and it is to them that I turn for a couple of fresh faces...
A very talented all round photographer, but I was struck by the landscape work that he has done... worth a visit to google+ just for this.
Another site I have been using is 500PX, and I would encourage even a look at some of the top landscape work on this stunning and very modern site.
In particular, I would recommend Gary McParland, and his work in Northern Ireland and Scotland hopefully meaning his inclusion in this site recommendation. His stunning use of composition and light is second to none.
Last Friday I went to see Joe Cornish's new exhibition alongside Kane Cunningham at the Scarborough Art Gallery.
What was the exhibition like? Well the premise was to look at some of the landscape art that the museum currently holds and to interpret these in a new way. Kane and Joe worked together on occasion and discussed the project at length - it sounds to me like they just went to the pub, but far from me to second guess things :-)
Ably assisted by Andrew Nadolski (with whom I was recording an interview about his End of the Land book) we produced a short video interview with Joe and Kane as they walked us around the event. We lost one of the microphones half way through (a bad battery) but the quality is mostly good enough I think.
I thought the exhibition was very well presented and both Kane and Joe had worked hard not just to present their own work but to make the work unique to the event. The work was produced over the last two years and coincided with Joe's work with the Phase camera and many of the pictures are panoramic stitches, some nearly 180 degrees and over two meters wide in print.
My favourite works were a massive print of the Hole of Horcum in Winter and also a panoramic of Kane's back garden (although garden might not be the best word to describe it) taken as a panorama with multiple LX5 photographs stitched together and decorated by pencil sketchwork and writing. I was also very impressed by a black and white picture of a tree root and the rock detail photographs.
Hole of Horcum - Winter
I have also included small photographs of many of the pictures at the exhibition (although not all). I hope you get the time to visit this exhibition and also the geology museum next door.