

A look at lens 'shift' with DSLR cameras

Tim Parkin
Tim Parkin is a landscape photographer living in Scotland who co-founded On Landscape magazine. Alongside his photography and writing he also co-founded the Natural Landscape Photography Awards, runs a film scanning business and is a judge for other international landscape and nature competitions.
Most people are familiar with the way that a shift lens can ‘fix’ the perspective (verticals) in buildings or trees, even if they haven’t tried these lenses themselves. How these lenses work is often not completely clear and even those with experience typically don’t know how to make the most of them. Hopefully this article can make things a bit clearer.
The first thing that most people learn about creating pictures with ‘correct’ verticals is that the camera shouldn’t be pointed up or down but straight ahead. Let’s imagine we are working with a 24mm lens and that we’re taking a picture of a tower block. The only way we can get the tower block in is to point the camera upwards but that gives us a distorted view as shown below..

In order to get the verticals correct, we need to point the camera horizontally, but then the angle of view of the 45mm lens won’t get the top of the tower block in.

So without shift lenses, the only way we could get this shot (without photoshop) would be to use a wider lens, shoot straight ahead and then crop to the required format.


The disadvantage of this is that the crop we make loses over half of our resolution and so in order to get 35mm quality, we would have to use a bigger sensor. A medium format sensor would do, 6x7 is two times larger than 35mm and so a digital 6x7 camera would do the job! However, not only do they not make 6x7 digital cameras yet, you'd be throwing away so much information that it would be uneconomical. How about if we just use a 6x7 camera lens and then just put a 35mm sensor behind it in just the right position to crop the bit we want? Well yes, that is exactly what tilt shift lenses are - they are effectively medium format lenses adapted for use on 35mm and able to be moved around relative to the sensor.
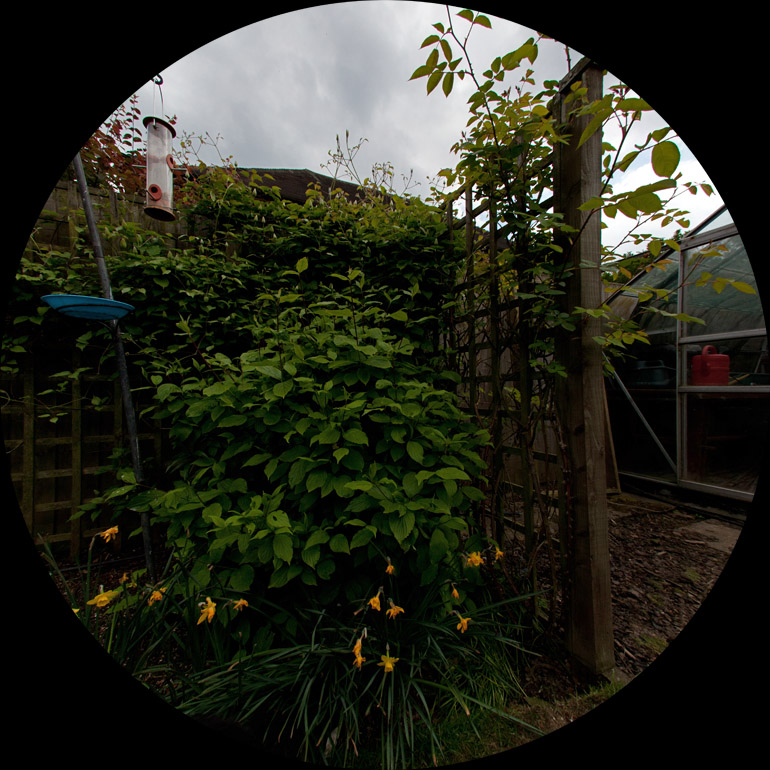
One thing to remember is that a 24mm lens on medium format is equivalent to 12mm on a full frame DSLR. That's pretty damn wide! Just to show you how wide this is, here’s a view from a 12mm rectilinear lens.. (rectilinear just means not a fisheye lens, i.e. it has no unnatural distortions). We'll use a real example this time - a shot from my back garden.

This is very wide (it's actually a 15mm fisheye lens that has been defished which works out about 12mm). So a tilt shift lens would show a cropped view as shown in the image above (shifted up = red lines, shifted down = blue lines).
Here are the shifted up and shifted down views..


Well what does this allow us to do? Beyond the simple ‘fix the verticals’ as discussed above, it also allows us to play with the distorted persepective that the lens gives us.
Our next example shows how this can be used. I've taken a few pictures with the 12mm lens, the first with the subject at the very top edge of the frame, the second with the subject on the very bottom edge of the frame.

A 24mm tilt shift lens shifted fully up would show the red square image and a 24mm tilt shift lens shifted fully down would show the blue square image. And in fact that is what we get (I checked with a Canon 24mm T-SE mk2).


The thing that is really weird here is that the bottom picture looks like it was taken on a very wide angle lens and the top picture looks like it was taken on a standard lens.
In another example, let’s say we want to shoot a wide angle photograph of a person but the composition we have chosen happens to have them on the very edge of the picture.

With a standard 24mm wide angle lens, the persons head will be ‘stretched’ giving an unflattering appearance. However, if we think in terms of the 12mm lens from which we can crop, we can place the persons head in the centre of the frame (where it won’t be distorted much) and then crop from there to the edge of the frame. This will make the 24mm lens look more like a standard lens (as long as the other side of the frame didn’t contain anything recognisably shaped - for instance rocks or grass don’t “give away” distortion as much as a persons head).

Conversely, we can use very edge of the image circle* in order to get as much ‘distortion as possible. This can make the 24mm lens look more like a 12mm lens. Have a look at the example below..

So, using the two extremes we can make a single lens have two very different look.
*Image Circle means the circular area that the lens covers - usually given as a diameter at a certain focussing distance
** Of course I should have used some fall on the lens as well to get rid of those converging verticals in the fence - interesting how the converge differently in each frame though!
*** apologies for having to look at your editor for too long..
One thing to be wary of is that the lens quality will inevitably get worse as you get close to the edge of the ‘image circle’. Canon’s old 24 tilt shift was pretty bad in this respect but the new one work very well up until right over to one edge (although you can see it starting to distort in the bottom picture of the camera and lenses). I would back off a little from the point where you can see the photo vignetting.
So - thanks for reading this far and if you have any questions about this article, please add them to the comments below. Finally, the camera you saw in the middle of this article is our new Olympus OM1 which we'll be testing against our Canon 5Dmk2 in the next couple of issues.