State of the Art Film Scanning?

Tim Parkin
Tim Parkin is a landscape photographer living in Scotland who co-founded On Landscape magazine. Alongside his photography and writing he also co-founded the Natural Landscape Photography Awards, runs a film scanning business and is a judge for other international landscape and nature competitions.
In the world of scanning, there are three categories: the flatbed, the dedicated film scanner and the drum scanner. In recent years the only ‘pro’ scanner that you could buy new at a reasonable cost was the Epson V750: a flatbed that is capable of handling 35mm to 10x8 film. However, it has always been the dedicated film scanner that has been the master at scanning medium format and 35mm film. The ‘gold standard’ is the Nikon 9000 (or 8000) but with no warranties or repair in sight these are becoming much rarer and good second hand units are now costing more than the original retail (the same is true of the Minolta Dimage Multi Pro).
Plustek announced a new competitor in this arena over a year ago, but it was only at the start of the year that units were getting into people’s hands. There is a decent thread on the scanner on the rangefinder forum.
I received the scanner last week and I won’t go into a box unpacking video as people have already done this. I also won’t be going through how Silverfast works as what people are really interested are the results - and again other people have looked at these in depth.
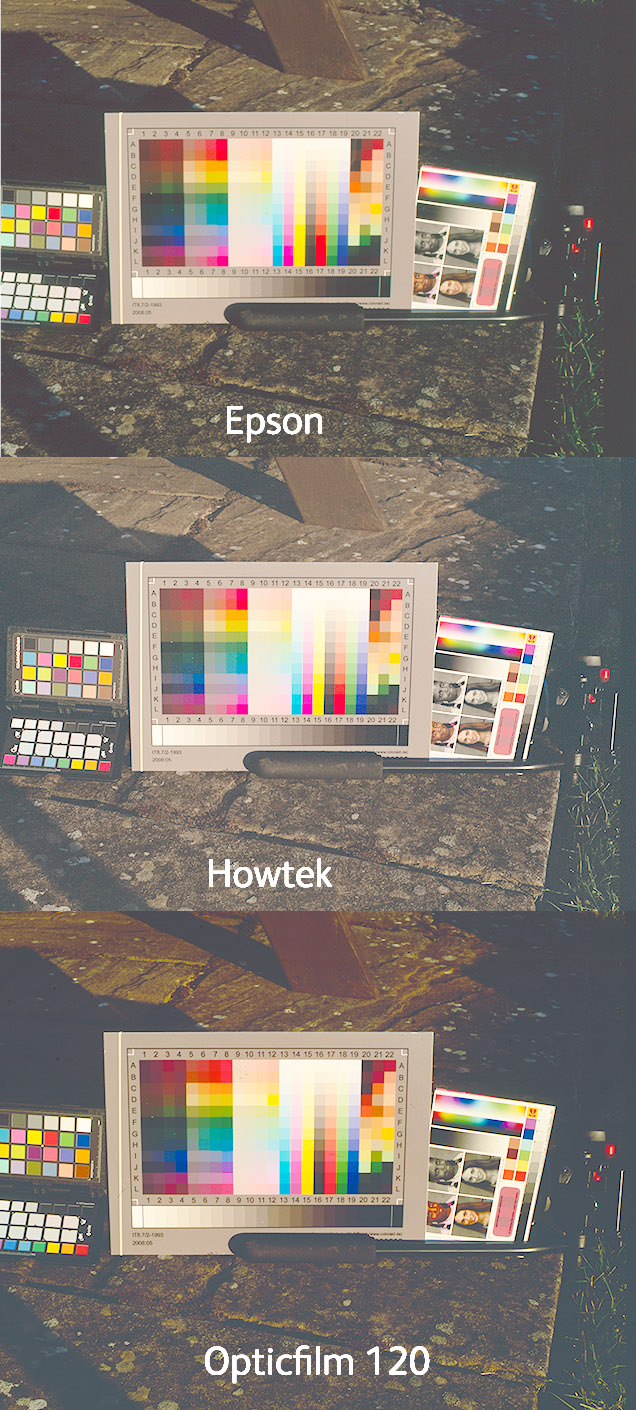
What I will be looking at is resolution, highlight and shadow quality, negative scanning, the film holders and speed of operation. Now most people wouldn’t be able to look at a single image of a scan and place the image quality’s place compared with other scanners. The only way to give a good indication of scanner quality is to show the same film scanned across a few different scanners. To this end we’ve scanned a range of film on a well calibrated Epson V750 and a Howtek 4500 drum scanner.
Resolution
Most people are interested in how much resolution can be extracted from their film originals. This is the equivalent to the megapixel race (the only difference being that you can always get your film original scanned on a better scanner sometime in the future). So how good is the Opticfilm 120?
This first comparison shows a straight scan on the Opticfilm compared with the Epson V750

Epson V750
Opticfilm 120
Pretty bad isn’t it? Before the Plustek PR team jump down our throats, this isn’t really the scanners fault. It’s the classic bendy film problem. Scanners have lenses, just like cameras, and they have a depth of field within which the film must sit to get the best sharpness. Move away from this depth of field and the sharpness drops off. Nikon scanners were sold with an accessory glass holder that provided a lot more uniform film flatness.
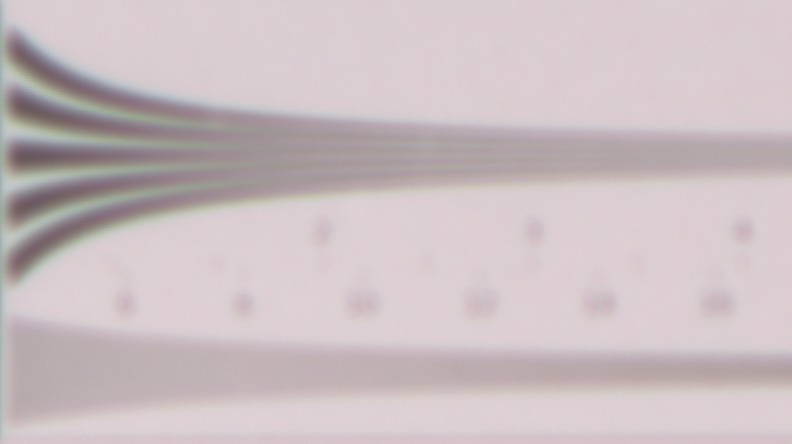
Testing the scanner using the stock holders was going to be a hit and miss affair and so we looked at an alternative way of testing. After a bit of digging around I found an old slide holder that included the anti-newton glass in it. I used one of my sharpest films (An Adox CMS20 medium format image from a Mamiya 7), mounted the film between the two bits of glass (now removed from the slide holder) and taped the resulting package into the slide film holder that came with the scanner - see below for details.
Playing with this and a few spacers we ascertained that simply resting my ad-hoc holder inside the slide carrier brought the film into perfect focus. Lets take a look at the results now.

Wow! A massive improvement. You can see just how important film height is from this demonstration. Most unexpectedly soft results in scanners are related to this so it's a first port of call if you're having issues.
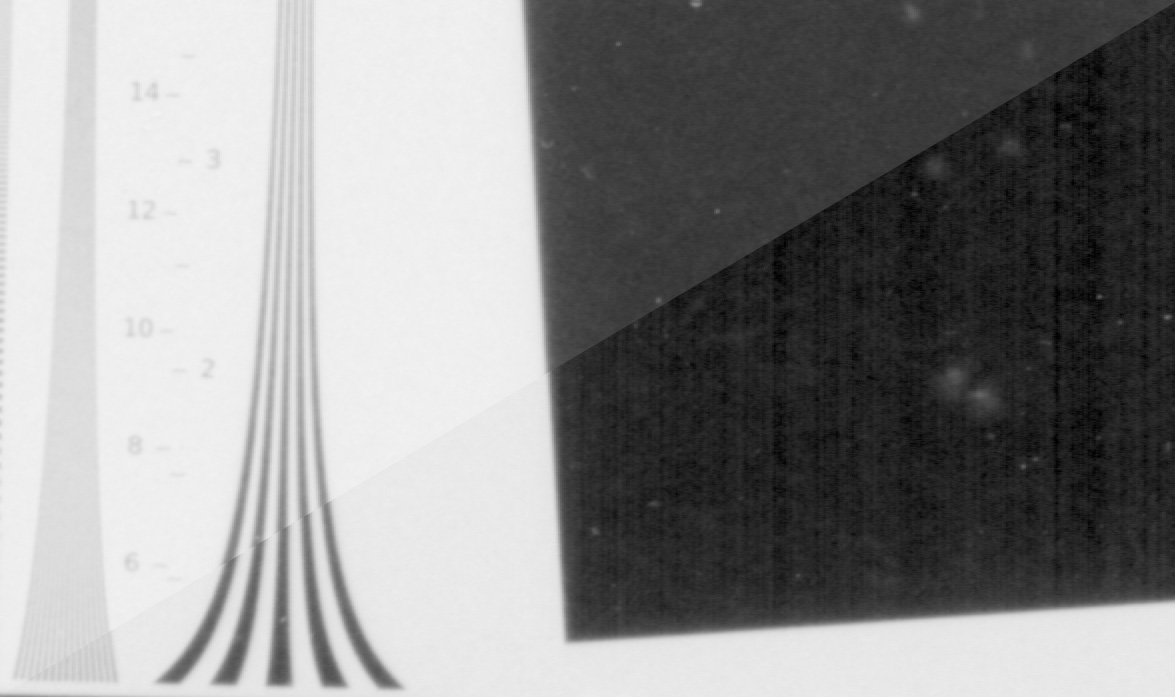
What's quite surprising is how good the Opticfilm 120 is compared with the Howtek. That’s a really good show from the Plustek and about the best results from a dedicated film scanner I’ve seen. Now bear in mind that this is scanned at 10,600 dpi so you don’t get pixel level sharpness. However, from this image I can see that each line at the finest level of detail takes two pixels and hence the scanner is achieving the advertised 5,300dpi! We checked this at some length by measuring the detail on a microscope and counting pixels across the resulting scan and are happy to within about a 5% accuracy.
"optimum sharpening"
Just like normal digital photography. Digital scanners need different amounts of sharpening because of different aspects such as lens issues, post processing issues, movement, etc. We've "optimally" sharpened each scanner using photoshop smart sharpen in order to counteract that without creating halos or other artefactsWe scanned the same test target at 5,300 dpi and the results came in at about 4,600dpi. This isn’t completely surprising, as if the lines weren’t lined up perfectly with the pixels in the sensor then the contrast of those lines will be reduced, potentially to zero. So you can rescan the same film at 5300dpi and get resolution results from 4,200dpi to 5,300dpi depending on the alignment of the test chart.
In theory if you want the best resolution then use 10,600dpi and downsize but in practice, you’d be hard pushed to tell the difference in a print unless you’re making massive enlargements of fine text.
Shadows
The next challenge for many scanners is dynamic range. This affects the shadow rendering when scanning transparencies and the highlight rendering for some black and white film. First of all, we’ll take a look at a set of Velvia 50 transparencies that I made some time back. Each frame is separated by a whole stop.
The colours are a good match which was helped by building a scanner icc profile using a Hutch colour target (a high end version of the IT8 target that is commonly used).
The interesting differences will happen in the shadow and highlight areas so first the shadows.
This is the area where drum scans excel and it's clear here that the Howtek has done a very good job for areas that are up to four or five stops underexposed.
The Opticfim has one a reasonably good job and the shadow detail is significantly better than the Epson. However, the main thing is that it has less shadow pattern noise, something that can quickly ruin underexposed images. The Epson suffers from this, as do most consumer scanners including the Imacon. This is a reasonably good result for the Opticfilm. Here's a scan with the shadows boosted a very large amount (more than you would do in reality unless you were working on a very good drum scan). This is done to show the kind of pattern noise that occurs, not to show how much as all flatbeds will show some noise if the shadows are lightened and increased on contrast enough. This is the far left image in the comparison above.
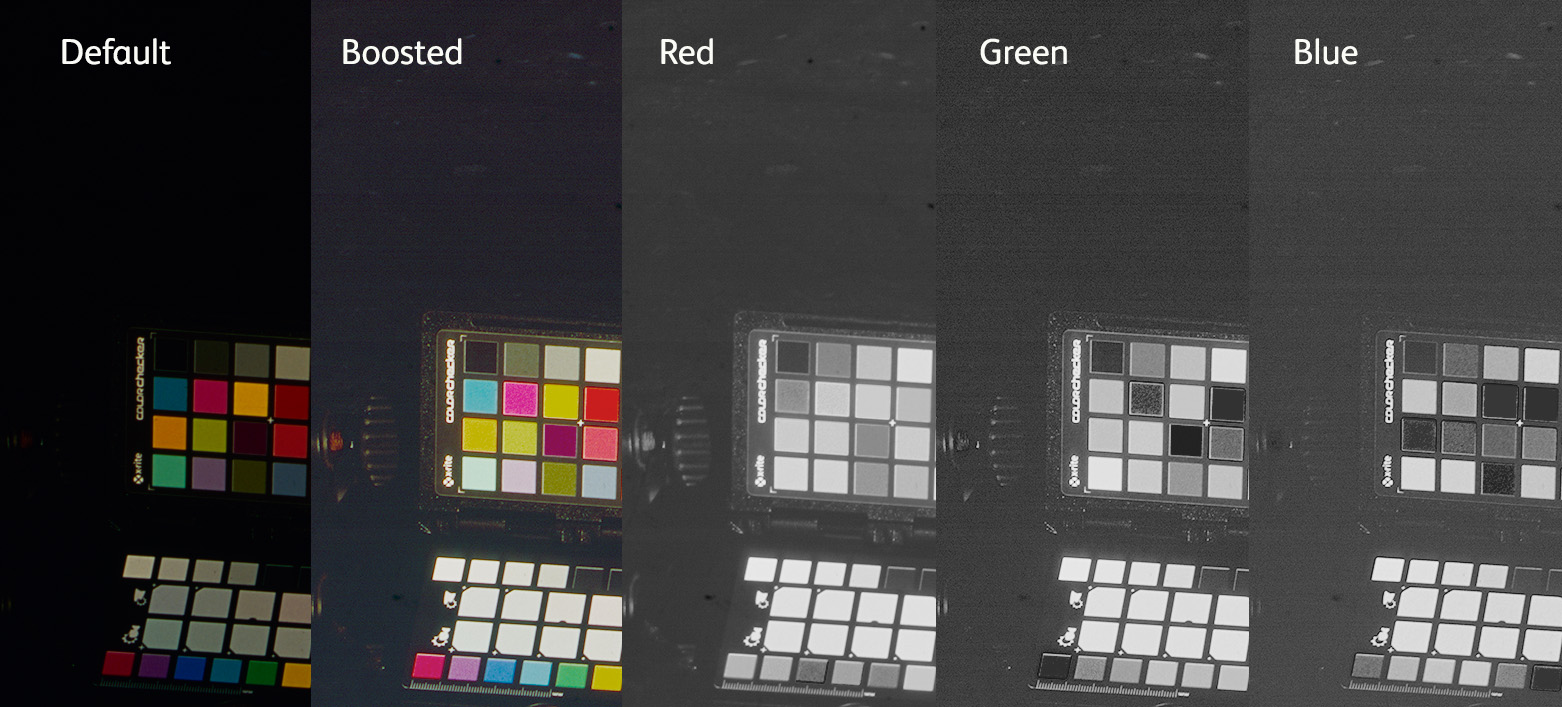
The weakness in the Opticfilm is good colour in the very deep shadows. The raw scans before applying the profile show reduced saturation but consistent colour. Getting a good profile made will be essential to getting the best colour out of the deep shadows.
Still, this is a good result for a flatbed scanner.
Highlights
Highlights are normally better handled by CCD scanners and so the results here are not surprising. It is interesting that the Drum Scanner results have some moire patterns (you can't really see them unless you really darken these images) - these are caused by variations in thickness between the overlay mylar and the film. These only show up when using thinner Kami fluid and to some extent are a by-product of most wet mounting processes. However, the Howtek is showing a little more headroom so it's swings and roundabouts.
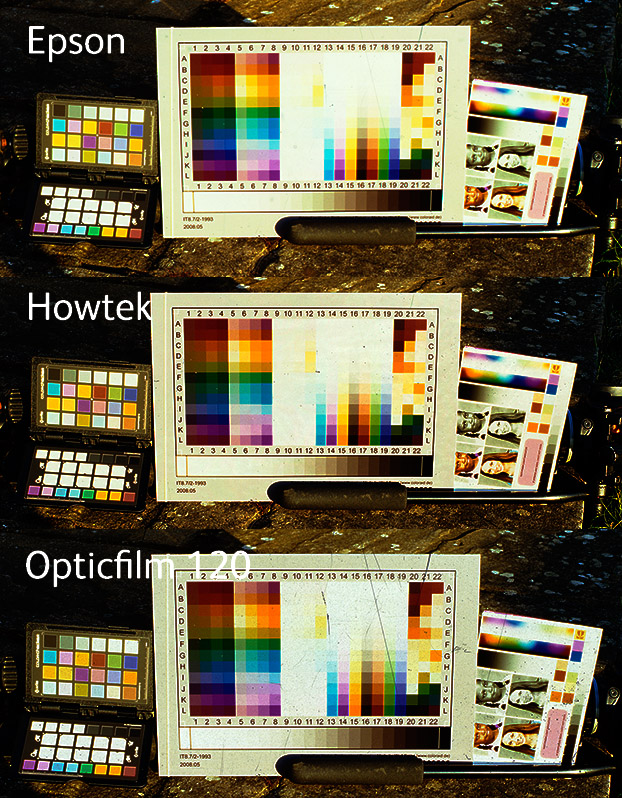
'Normal' Black and White Film Results
Our previous resolution test was made using a very high resolution specialist film. We also have some results from Pan F which you can see below.
Howtek 4500
Opticfilm 120
Epson V750
Real Pictures?
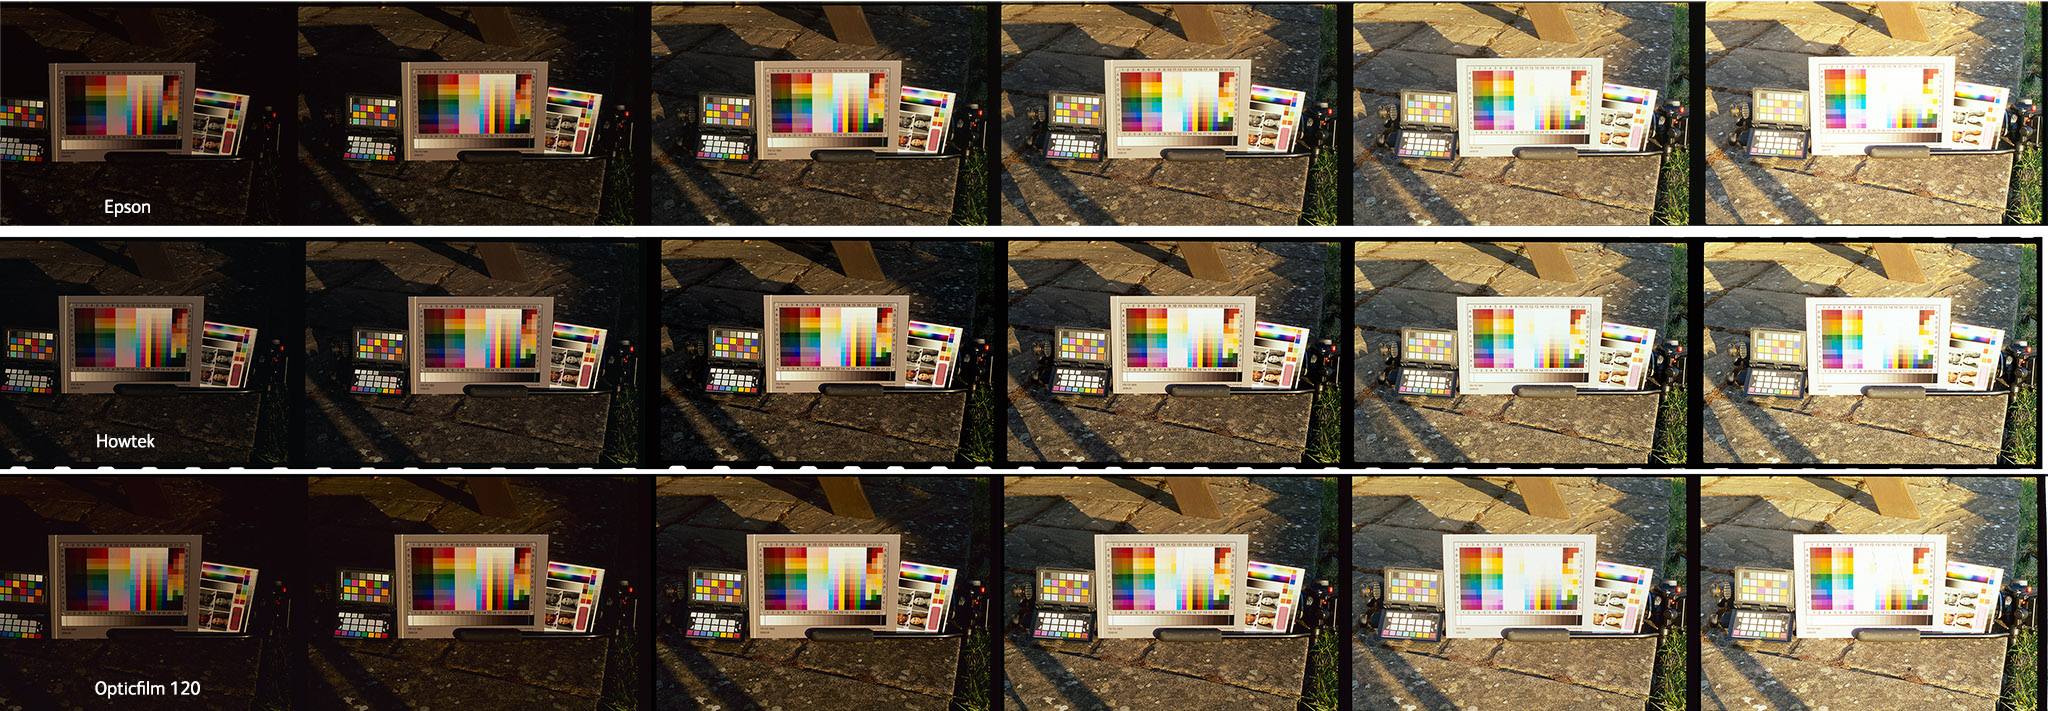
OK, enough of the test pictures, how about some real stuff. First of all here's a Velvia transparency scanned in different ways. It's of the test target but we're more interested in how it looks than how many angels can dance on it's little sensor.
Studio Velvia Comparison
Choose Which Films to Compare
Before side
|
After side
|
Things to look out for in this comparison
1) Look at the round viewfinder on the camera on the right. The Epson is very bad, showing a glow that bleeds into the black area of the viewfinder. This is a classic problem with flatbed scanners. Even Imacon 'virtual drum' scanners suffer from this. A drum scanner is the best in this case as each pixel is recorded one by one. The Opticfilm is surprisingly good though, showing very little bleed. The wet mounted opticfilm shows a little more bleed than dry mounting - I think this is due to the extra surfaces from the anti newton glass. Differences in black level may hide or exacerbate the issue.
2) The good film holder result is excellent in terms of clarity and the only problem when compared to the wet scan is the 'pepper grain'. There are a few different supposed reasons for this but the best explanation I have seen is that the film base anti-halation layer is rough and because the depth of field of scanners is so deep this roughness shows up. When you wet mount the film, the oil (naptha) flows into the roughness and it disappears (rather like getting tracing paper wet). Wet mounting also reduces scratches.
3) The noise in the Opticfilm 120 shadows is fairly uniform which means it's easier to reduce using typical noise reduction software; The Epson was far worse and showed diagonal banding and blotchiness when pushing the shadows significantly.
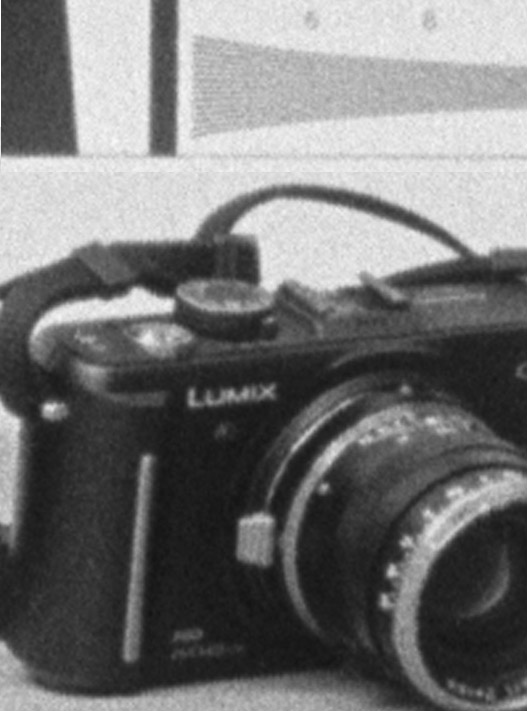
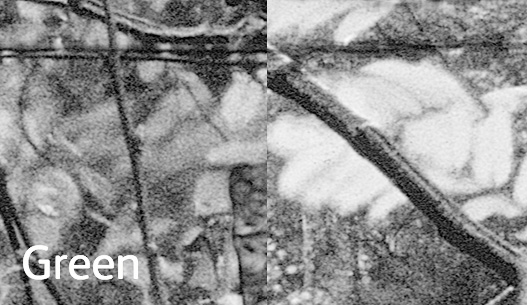
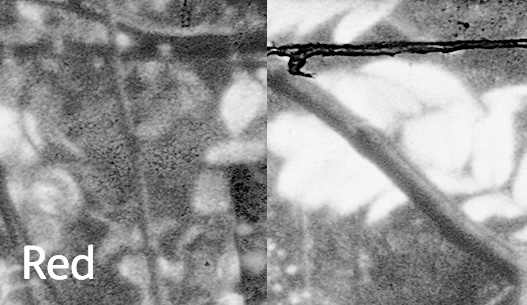
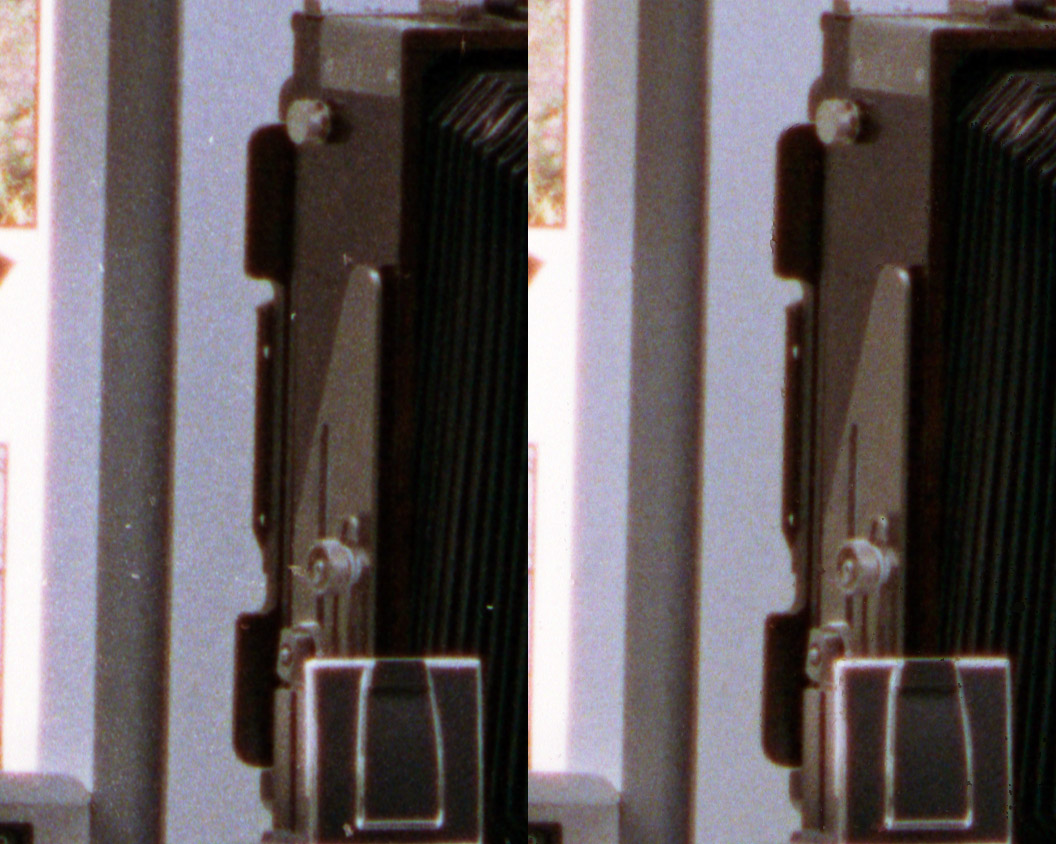
Alignment of Red, Green and Blue sensors
When I'm looking at scanner output, it's often quite enlightening to separate the red, green and blue channels to see how they behave. In the case of the Opticfilm 120 I was surprised to see quite a soft result in the red channel. Upon further analysis it looks like the red channel is out of focus slightly. The image below when I've included some of the tape used to mount the transparency shows some of the detritus on top of the tape in focus on the red channel whereas the edge of the tape is only in focus on the green and blue channels.
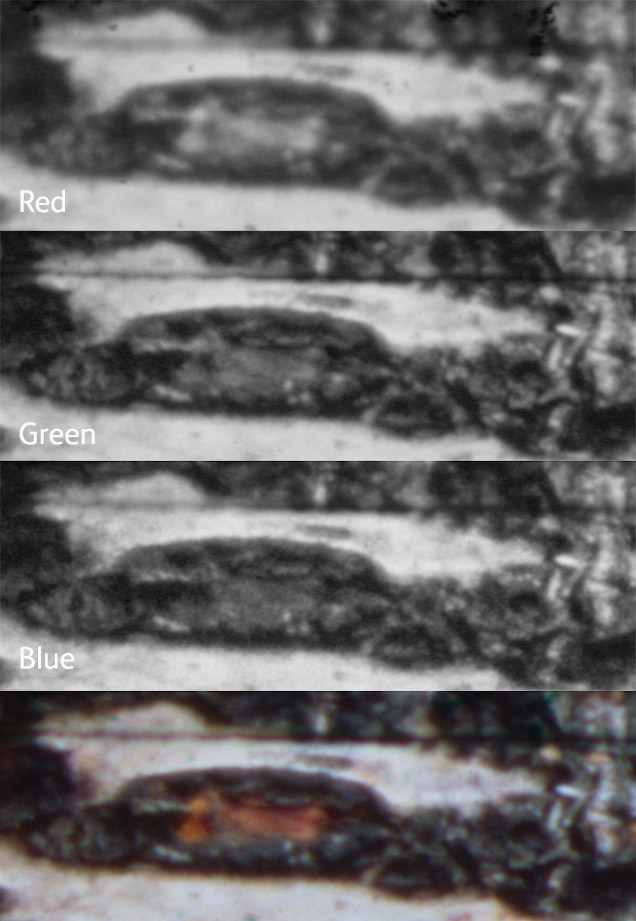
Further testing would need to be made to work out whether this is just a problem with my scanner or a more universal issue. I'll be raising this issue on a couple of forums to ask other people about their results and asking Plustek themselves if the new components are aimed at fixing it.
The following image shows the focus differences more clearly. Because of the way the tape sits on the film, it is higher in some places than others. I have copied a part where it is in focus on the green layer and placed it next to another location where it is in focus on the red layer. In other words you can see that in the green image the tape on left side is in focus, as is the film itself and on the red image the film has gone out of focus a little but the thicker tape is in focus.
Issues
Well this is a bit of a mixed bag really. We've a scanner that is clearly capable of very high resolutions but is marred by a few major issues.
Film Holders
Without the prospect of an improved film holder, the unit is not really capable of holding the film flat and there isn't enough depth of field to cope with more than a tiny amount of bowing before critical loss of resolution. The scanner doesn't auto focus either so the slide holder will only work perfectly if you have just the right thickness of slides (from what I've seen you need quite thin ones).
Effectively, unless Plustek or a third party sell an improved holder the scanner is quite a hit and miss affair. It would be possible to buy a couple of spare holders and hack your own together using one of Better Scanning's anti newton inserts but if you're spending this much on a scanner you don't want to have to fiddle around like this.
RGB Channel Alignment
There are a few issues with the colour channel alignment.
1) The red channel appears to be focussing at a different height to the blue and green channels
2) The blue channel appears to be shifted about a single pixel at 5300dpi
3) The green and blue channel have a small amount of pattern noise in the deep shadows
4) The blue channel has a small amount of pattern noise in the extreme highlights
The last point is shown in this scan of Adox CMS20 which has a completely clear base. Obviously the clear base becomes the blacks in the final scan and a significant curve had to be applied to pull detail out of the shadows.
Conclusion
The Opticfilm 120 is undoubtedly a very good scanner and if the filmholder and focus issues can be addressed this should give results that are dramatically better than the Epson V750 and potentially on a par with the Nikon 9000. We're getting some Nikon scans over the next couple of weeks and will add them as soon as they arrive.
Would I buy it? Not at the moment. You'd be better off with a second hand Nikon 9000 for most uses. That may change as the modifications and third party accessories arrive..
Update iSRD
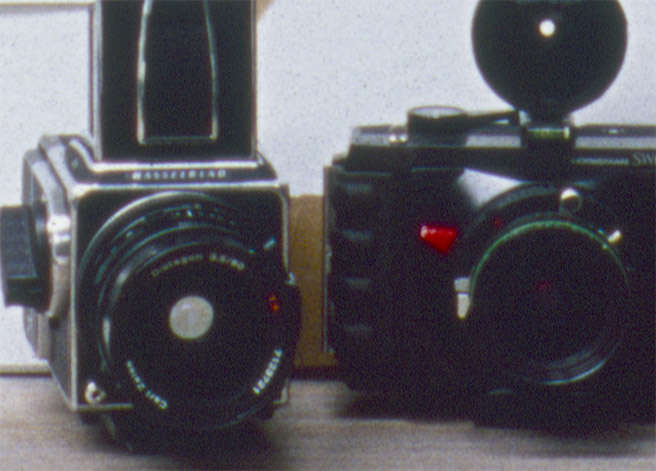
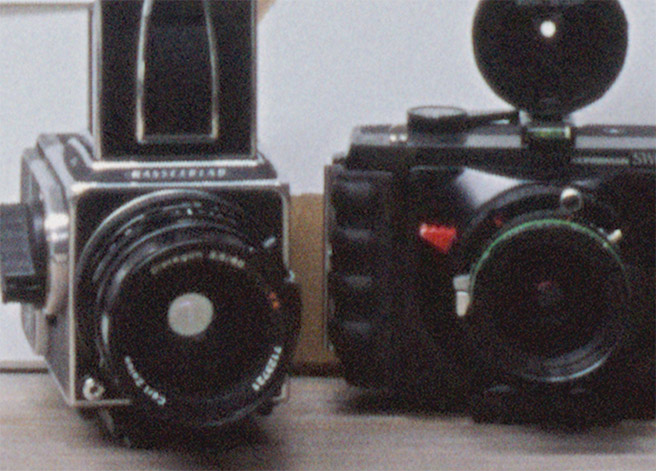
We didn't look into the iSRD feature at any length but did make a few tests to see how well it worked. Well it was both impressive and a little dangerous in my opinion. If you're not after big prints then it seems to do a great job but, and it's a big but, it does leave artefacts - and not just where the dust is either which I find peculiar (pay attention to the chrome fittings around the Hasselblad chimney finder). Anyway, I have no experience with this sort of dust reduction but it does seem to work and you can tweak the settings etc. This test was 5300dpi scan of Portra 400.
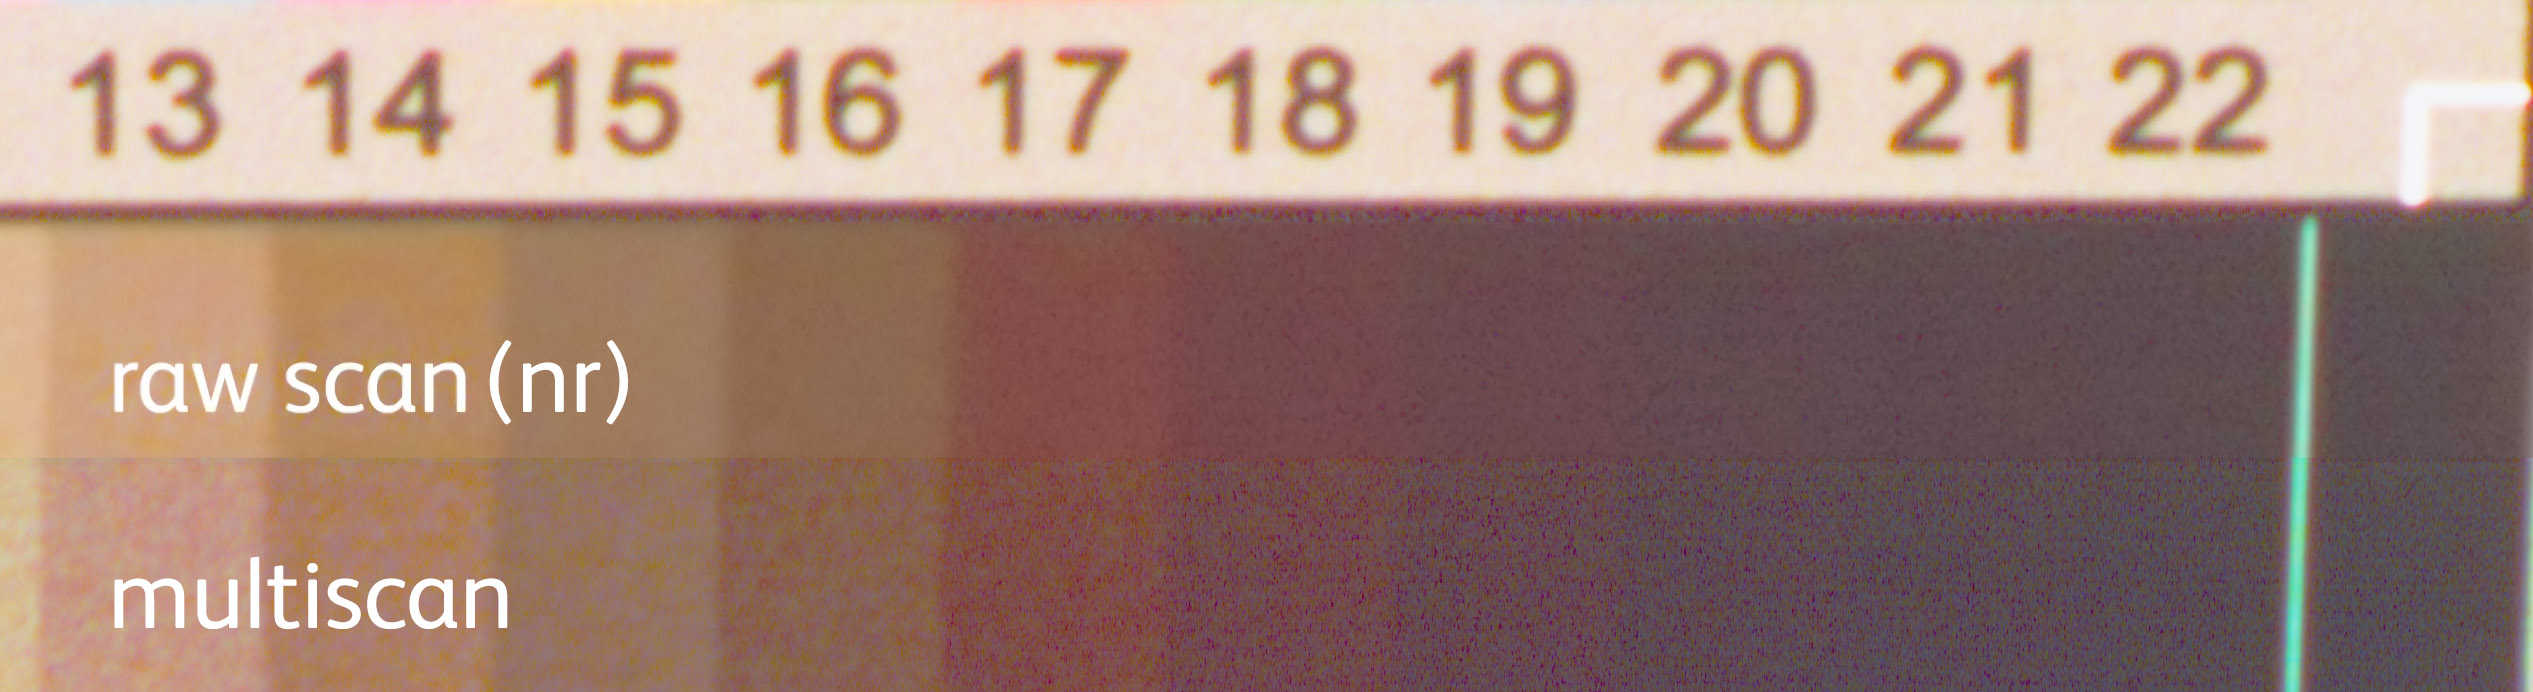
Update Multiscan
We did a couple of tests on multiscan to see if we could really get more dynamic range out of the scanner and the results were mostly inconclusive. Here is the example scan below taken from the shadows of a Velvia transparency (about the darkest thing you'll want to scan in my opinion).
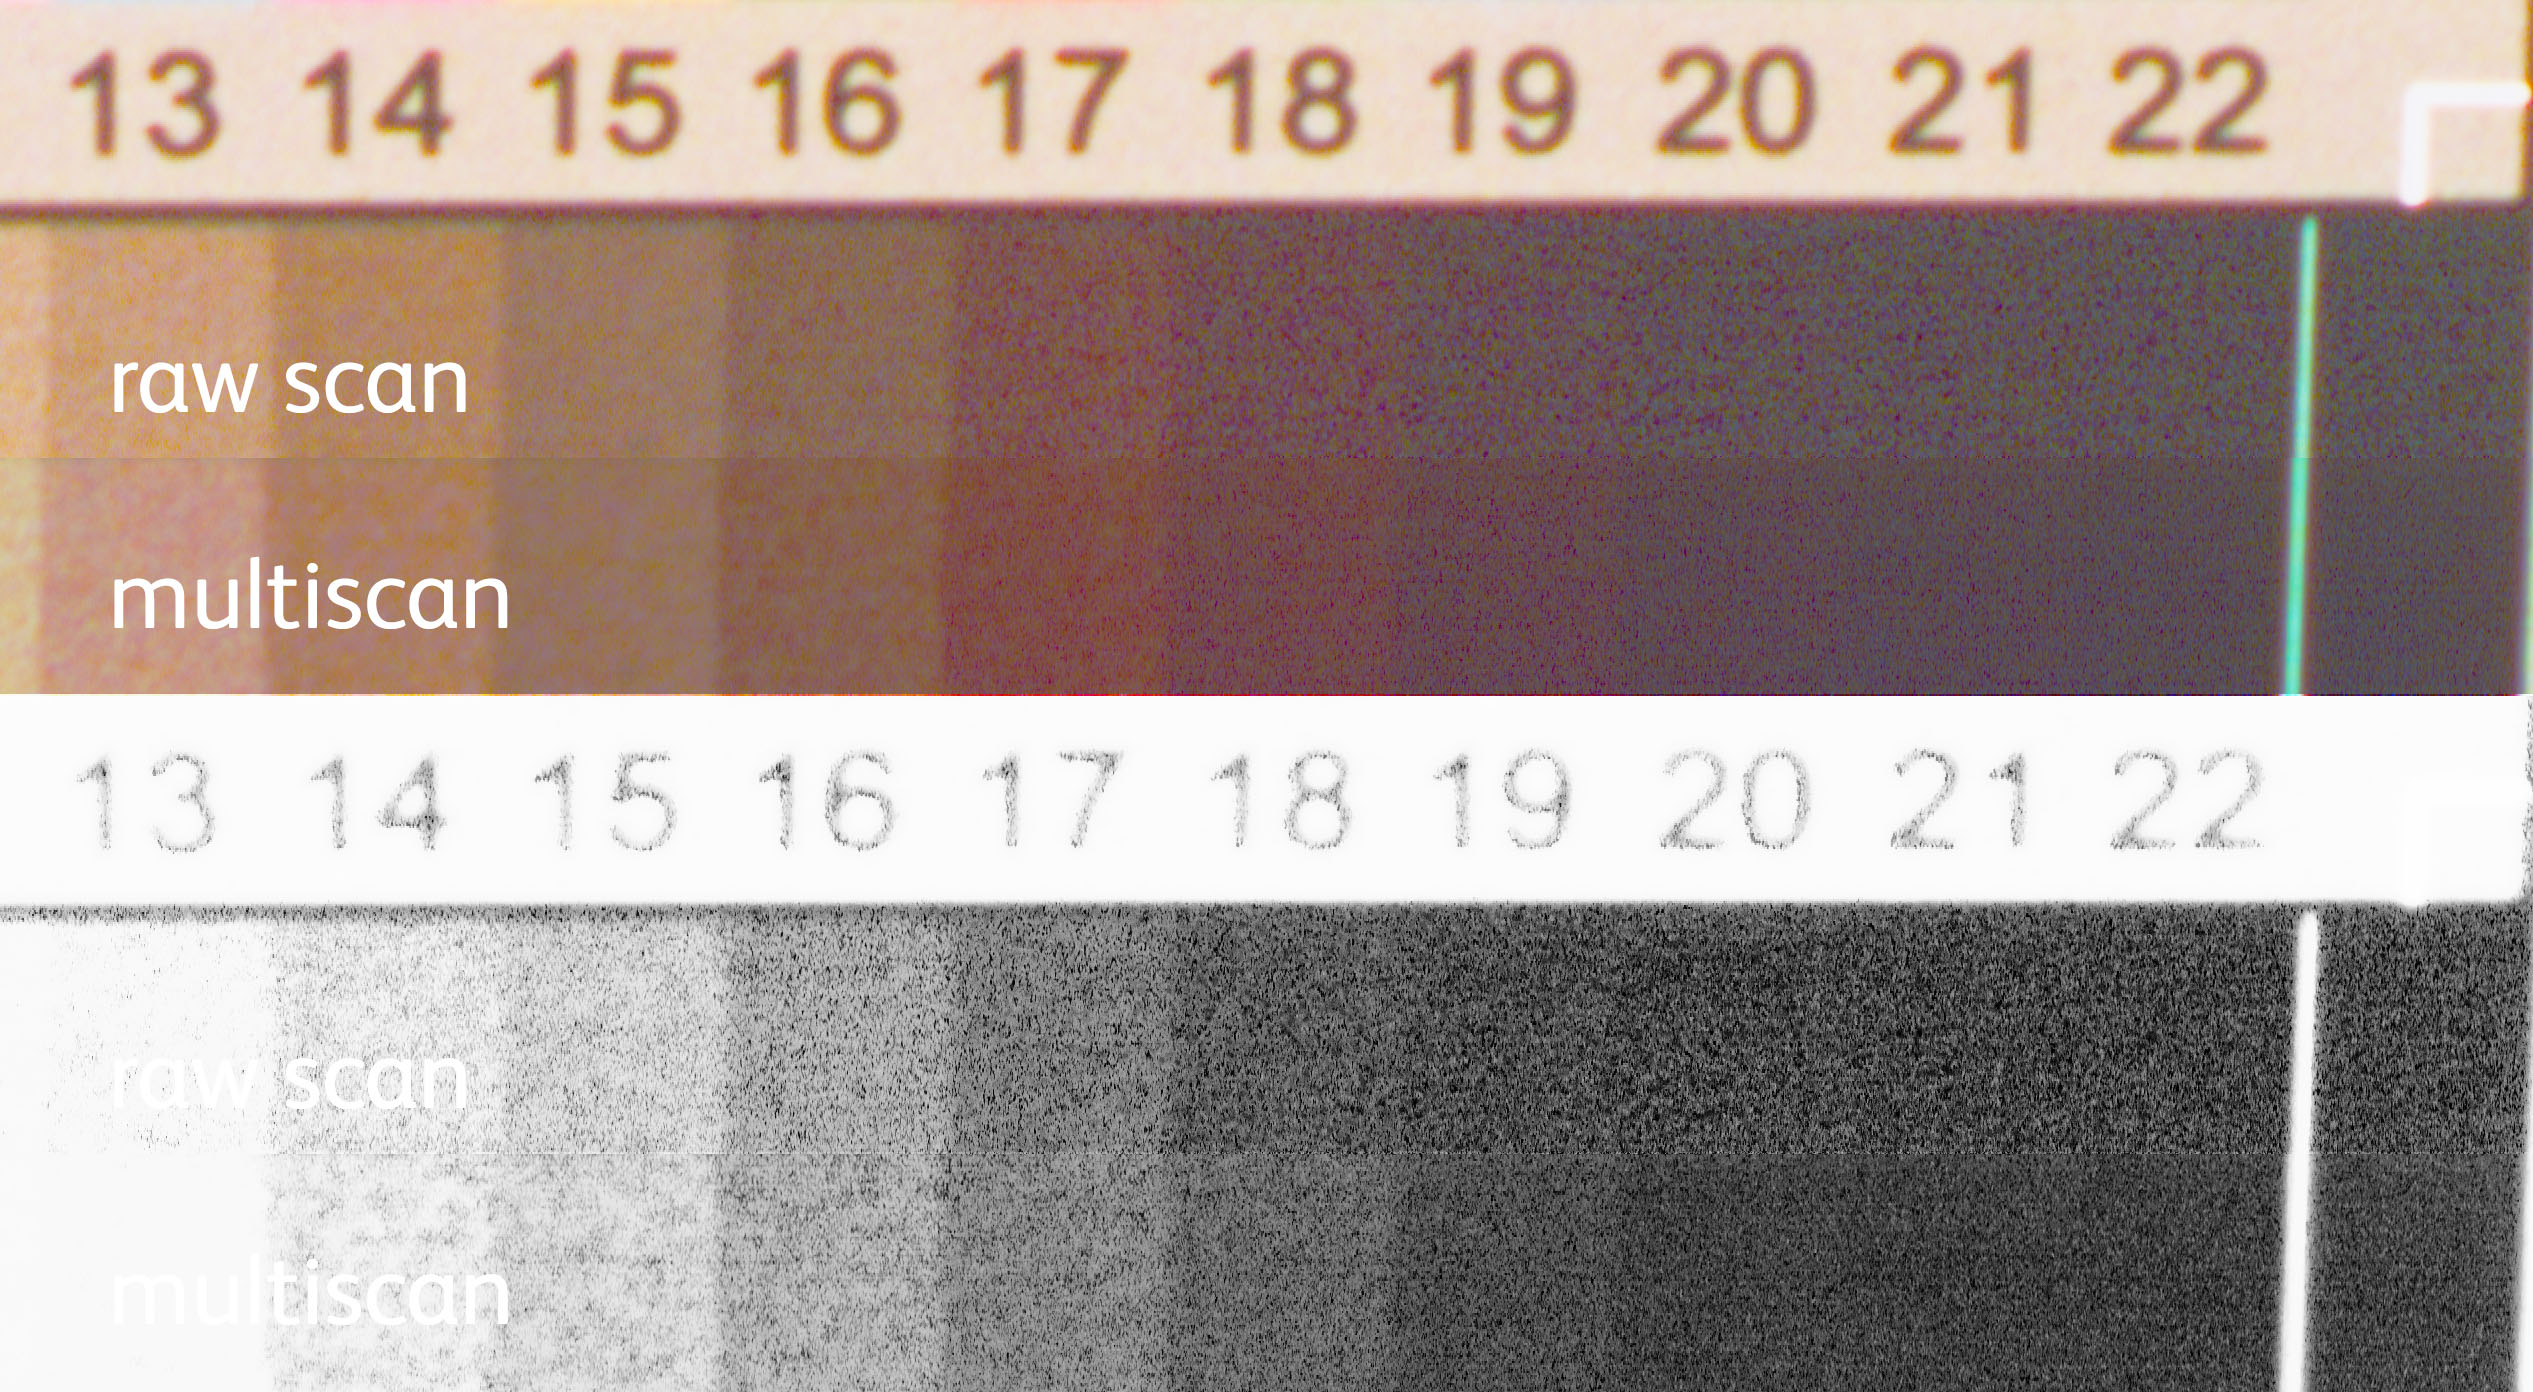
As you can see the multiscan looks better but this is mostly due to a reduction in the overall noise/grain and has come at the expense of some fine detail and some blockiness in noise/grain. If you do plan to use multiscan I would recommend making a separate colour profile as the shadows seem to change colour slightly - this could be my testing but it would be worth checking. I've converted the scan to black and white and pushed the shadow contrast hard to see just how many extra bars you can see and whilst it's true that you may be able to see an extra bar (1/3 of a stop or less) it's marginal at most and I would consider noise reduction as an alternative - Here's an image using Imagenomic's Noiseware noise reduction plugin (one of the best that keeps a natural grain structure and can target different frequencies and colours of grain).