
First Steps

Tim Parkin
Tim Parkin is a landscape photographer living in Scotland who co-founded On Landscape magazine. Alongside his photography and writing he also co-founded the Natural Landscape Photography Awards, runs a film scanning business and is a judge for other international landscape and nature competitions.
In the last episode of our metering series, we talked about what type of meters were available (excluding in camera matrix style metering) and how they work. We also covered the basic ideas behind the subject brightness range.
In summary, we have spot meters that take a reading of a specific small area of a scene and incident meters that measure the light falling on a scene. The typical subject brightness range (SBR) of a non reflective scene is from -3 to +3 stops.
Now we’ll take a look at how you would use each type of meter to measure the brightness of a scene and how you would choose an aperture and shutter speed based on this.
Firstly, to make this simpler, we’re going to work in EVs (actually LV but we’ll explain that in a bit).
An EV translates as an ‘exposure value’. It’s an arbitrary unit that is 1 when the aperture is 1, the shutter speed is 1 and the ISO is 100. Real EV values vary when you change the ISO but most light meters that read EV’s don’t change when you change the ISO and for correctness we should say that these are measuring LV (light value). The advantage of LV is that if you have a given value of LV it defines the intensity of light and hence becomes a single value that you can remember in the future (after some time working with meters you’ll know what the LV of a white cloud is on a sunny day for instance).
NB: Modern light meters like the Sekonic use EV instead of LV. If you want to work in EV then change the ISO to 100.
OK, now we know we’re working with absolute light levels in units of one f/stop we can look at how each type of light meter works.
Incident Meter
The incident meter should be considered your go to meter for typical photography. It is more likely to produce a well exposed picture than any other form of metering. This is because, as we have learned earlier, the typical brightness range of a non-reflective subject is +/- 3 stops and nearly all film is capable of recording +/- 3 stops of light; hence if an incident meter is placed next to a non-reflective object and in the light that that object is illuminated by, then you will get an exposure reading that will give good exposure from shadows to highlights.
The problem starts when your subject matter is sitting in a different light than that in which you are currently standing. This is why you should walk up to the subject and place the incident meter as close as possible to the subject with the meter pointing back at the camera. This is what you will typically see in most portrait photography - the photographer will walk up to the model and place the meter in front of their face with the meter pointing back at the camera.
In many situations you have a problem that you can’t walk up to the subject and perhaps the subject is being lit by point light source or sources. Let’s take these one at a time
You can’t walk up to the subject
In this case you have a couple of options.
If your subject in the distance is in the same light as you
You can just take an incident reading where you are.
If your subject is in direct sunlight
Then find a bit of direct sunlight and place your incident meter in it (pointing back at the camera)
If your subject is in the shade
You can just cast a shadow on your meter (try to cast a shadow with your hand at a distance from the meter - we’ll come back to why in a bit). This should work as long as the type of shade is the same.
How do I know if the type of shade is the same?
Well, you need to work out in your head where the majority of the light is coming from.
For instance, on a cloudy day, the main light will be coming from all parts of the sky and so you need to make sure your light meter sees all of the sky (apart from the direct light).
However on a blue sky day in desert canyons (for a somewhat forced example) the majority of light for shaded areas is probably reflected from the ground around you; the blue sky won’t be contributing much at all.
Your subject is lit by point light source(s)
This could be problematical, especially if the the lighting is point source based which falls in intensity as you get further away. Your best bet is to find a light nearby which you can place your meter under to get close to the values. This is where you could do with a spot meter..
The biggest problem with incident meters
As landscape photographers, the biggest issue with incident metering is that you can’t take a reading of the sky (or part thereof). There are heuristic workarounds for this but they’re not simple and will be part of a future instalment.
In reality, if you’re taking pictures that include the sky and you want to be accurate then you really need a spot meter.
NB If you’re using colour negative film, you probably don’t need to worry about the sky readings as colour negative has such a large dynamic range. As long as you get the shadows right you should be fine and so it’s best to take a shadow reading. If you’re worried about underexposing, shade your incident meter and use that reading.
The Spot Meter
The spot meter is undoubtedly the best way to take readings of scene luminosity. A one degree meter can accurately place tones throughout the range of your scene and you can look around for the darkest and lightest parts of your scene and place them according to your film or sensor.
The biggest problem with spot meters
The main problem with spot meters is working out a good exposure point. It’s easy to measure highlights and shadows but to work out where mid-grey is can be very difficult. This is because there are rarely nice grey areas in a landscape and our eyes/brain are notoriously bad at working out the relative luminosity of different colours. Even if you have a grey, people are notoriously bad at guessing a 12% (or should it be 15% or 18%) grey (more on that later).
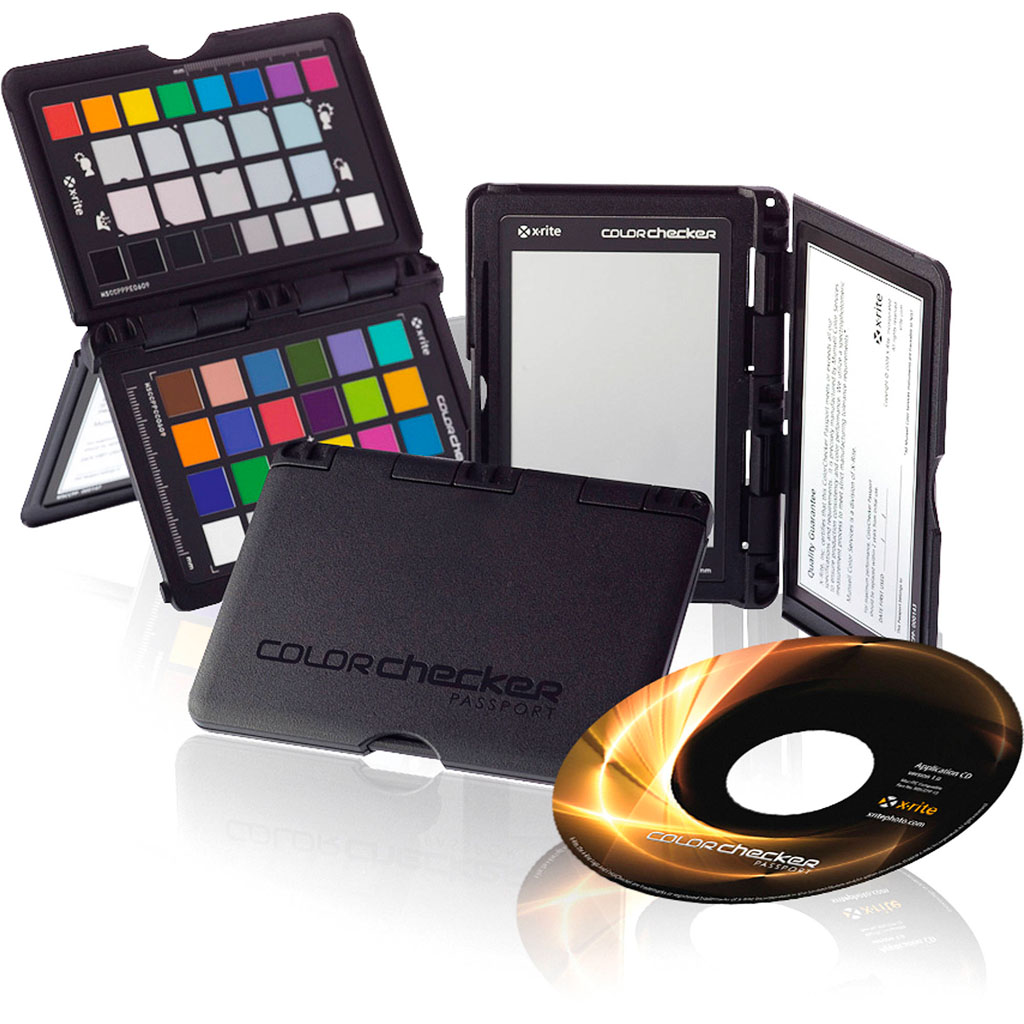
The main way to resolve this is to carry your own middle grey with you. This doesn’t need to be amazingly accurate but if you can easily afford one, an X-Rite Colorchecker Passport is useful in many other ways. Otherwise you can pick up a grey card set from ebay for 99p.
If you hold this facing the camera and take a spot meter reading from it, it’s a good substitute for an incident meter reading.
A Good Workflow for Exposure Metering
After speaking to a range of photographers, we would highly recommend that you purchase a spot meter and, if possible, buy one that has an incident meter built in as well. If not it’s not the end of the world as you can always use a grey card as mentioned above.
Using both incident and spot metering your workflow would go like this.
- Take an incident reading in the same light as the subject you want to be normally exposed.
- Measure the brightest highlight and work out whether it will end up overexposed on your film/sensor or not. If so, modify your exposure or use a graduated filter.
- Measure the darkest shadow that you don’t want to be black. Work out whether it will be underexposed based on the meter reading from step 2
And there you have it. The real world often doesn't behave and we'll come back to some of those problems in future installments. In the meantime the best way to describe the process is by showing example photos and the steps I took to get them onto film.
Example Photos
Stokksnes
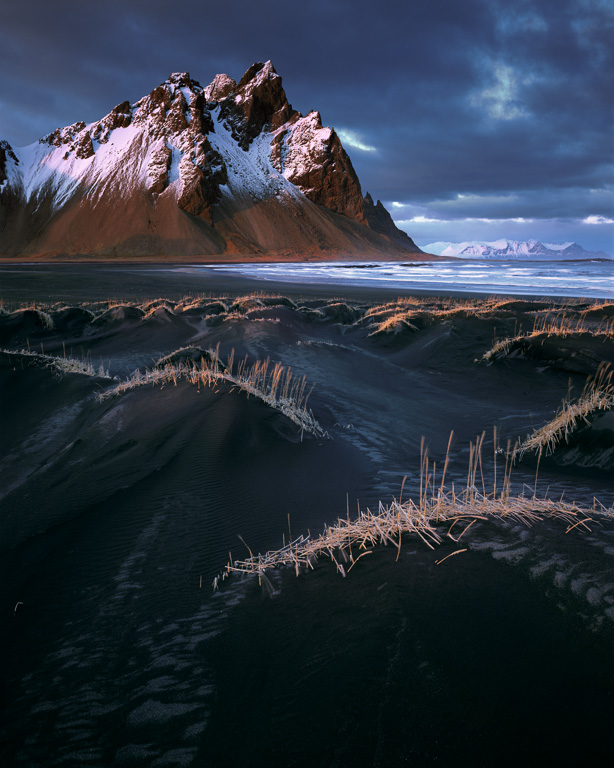
This was taken using a 5x4 camera on Fuji Velvia so not much dynamic range to play with - for most uses we would say between -4 EV and +2 EV
As I was waiting for the best light for about an hour, I was mostly keeping an eye on which graduated filter I was going to need.
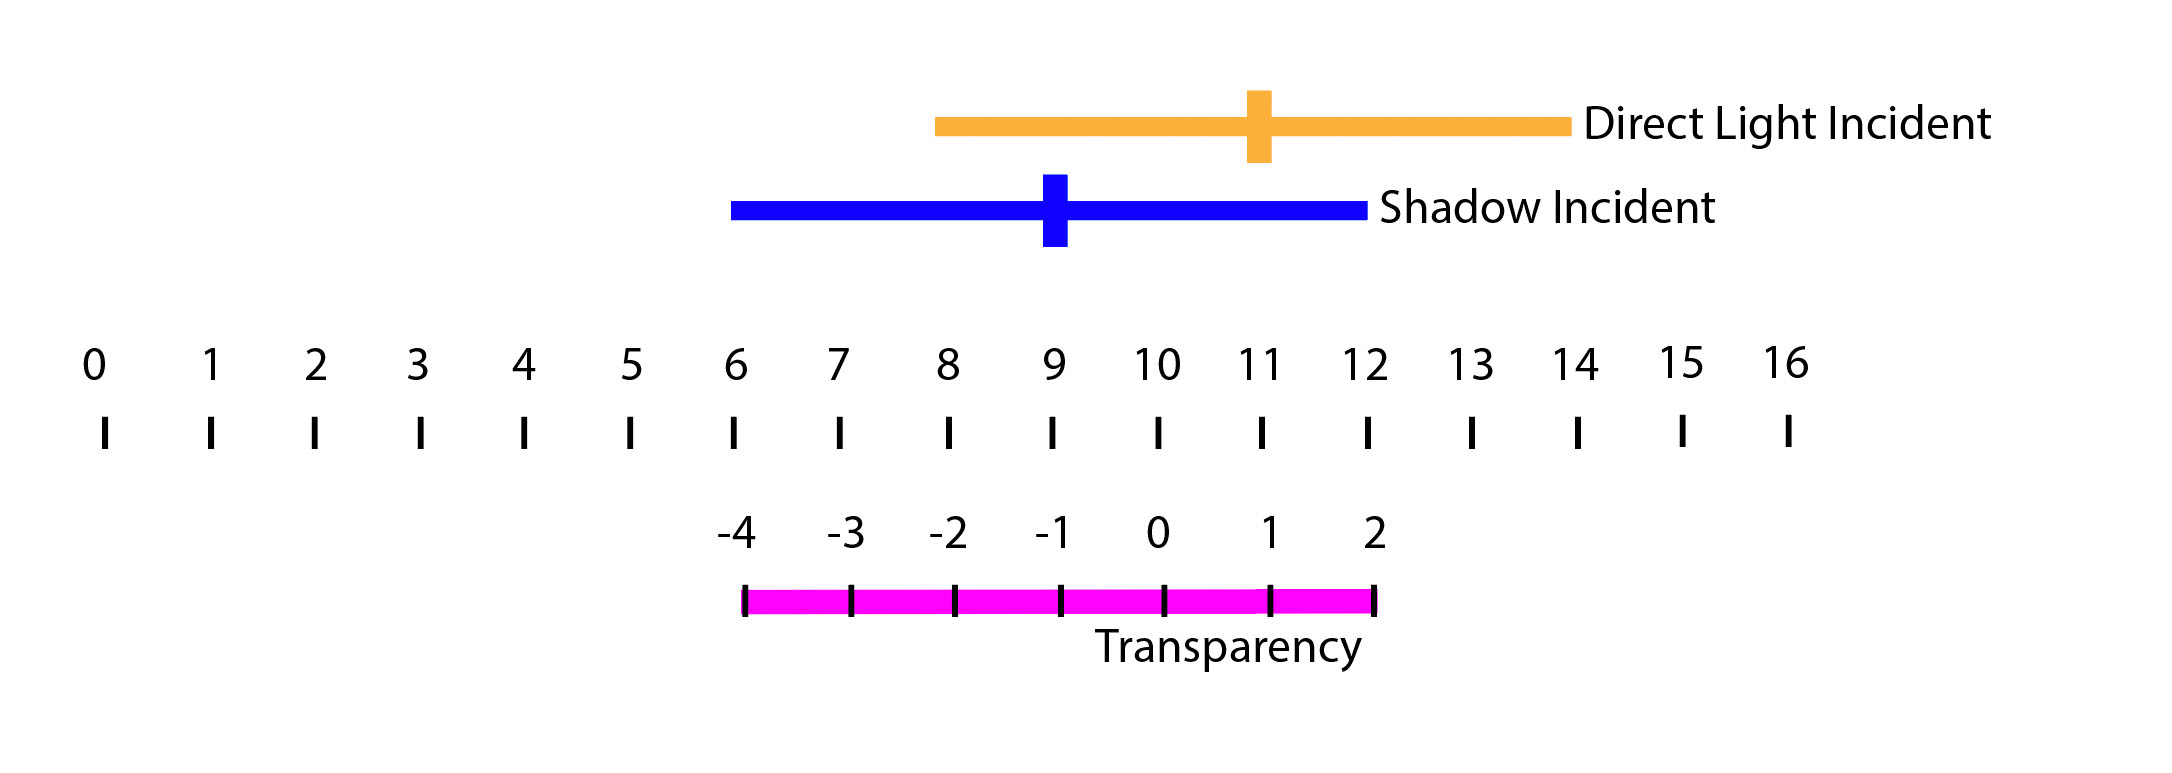
Firstly I took an incident reading with the meter held in the air so it caught the direct sunlight. This gave me a reading of 11 EV
Then I took a reading whilst shaded by the dunes behind me. This gave me a reading of 9 EV
This suggests a brightness range from 6 to 14
How?
The dark area in the shadow is 9 EV and the darkest part of that will be 3 EV below so will be 6 EV
The brightest reflected area in sunlight is 11EV +3EV which gives 14EV
This gives a total dynamic range of 8 stops (EV6 to EV14) and it suggests that a 2 stop graduated neutral density filter is needed.
If we look at the spread of these values on our exposure scale it may make more sense.
Spot Metering
Now we can make some spot meter readings to check the darkest and lightest values and also see what value the sand and grass has.
- Darkest (Sand in corners) = 6 EV
- Brightest (Light patch in sky) = 15 EV
- Grass = 12 EV
So if we put these on our chart we can see that we need to have at least a two stop filter.
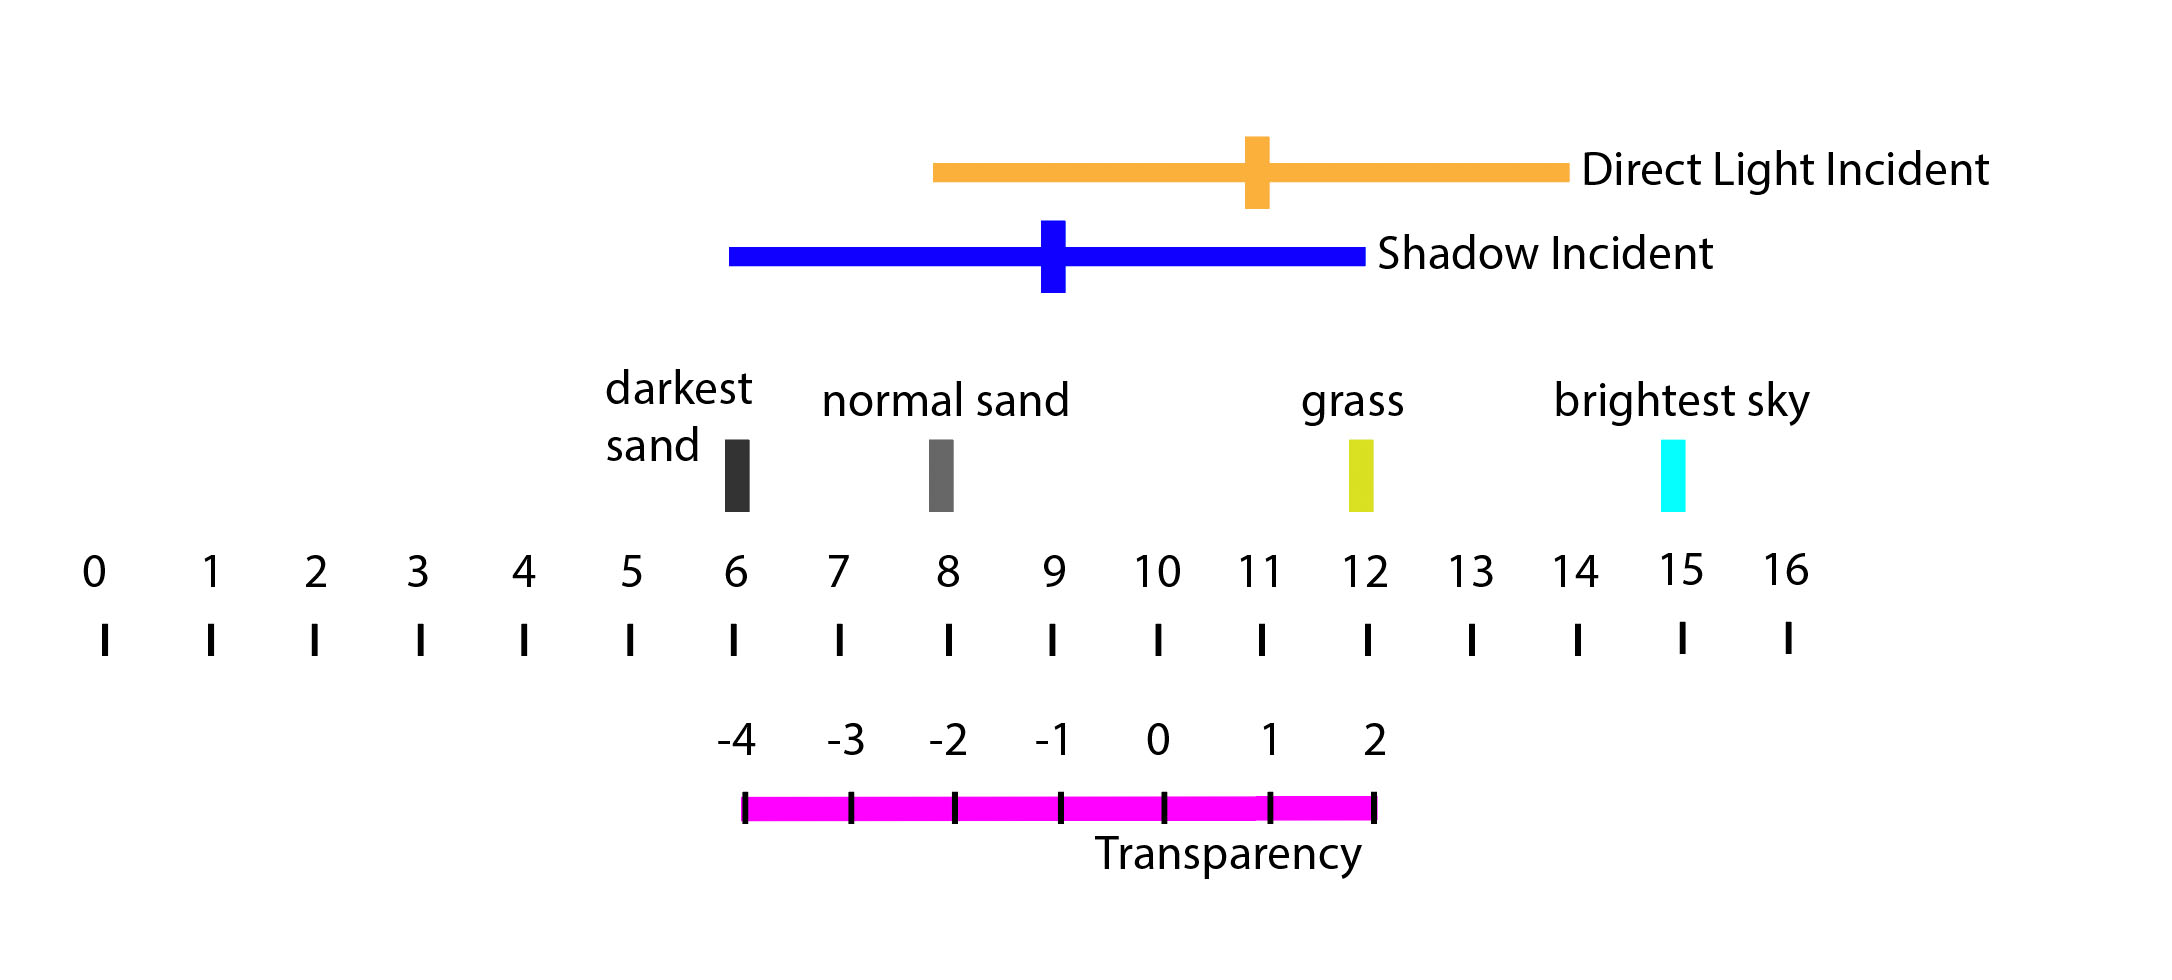
In my case I used a two stop and adjusted the exposure down another stop to catch the light in the sky as I knew blue over exposes easily on Velvia 50 (and looks ugly when it does). I also knew that I have a drum scanner and should get away with -5 stops on Velvia 50.
Rannoch Moor
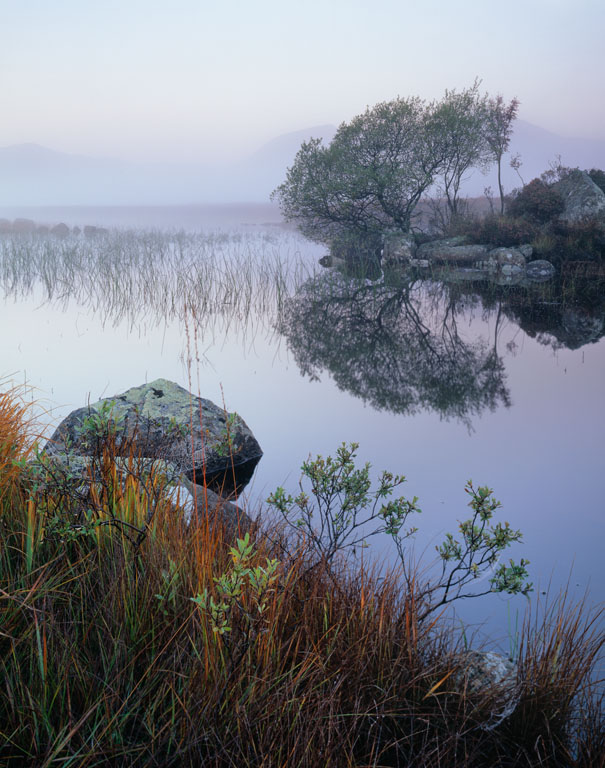
In this case I only had one type of light to deal with and this was the dawn glow about half an hour before sunrise. The incident reading gave me a value of 6 EV. This suggests that the dynamic range of the normal parts of the scene range from 3 EV to 9 EV.
Using my spot meter I read the following values from the scene.
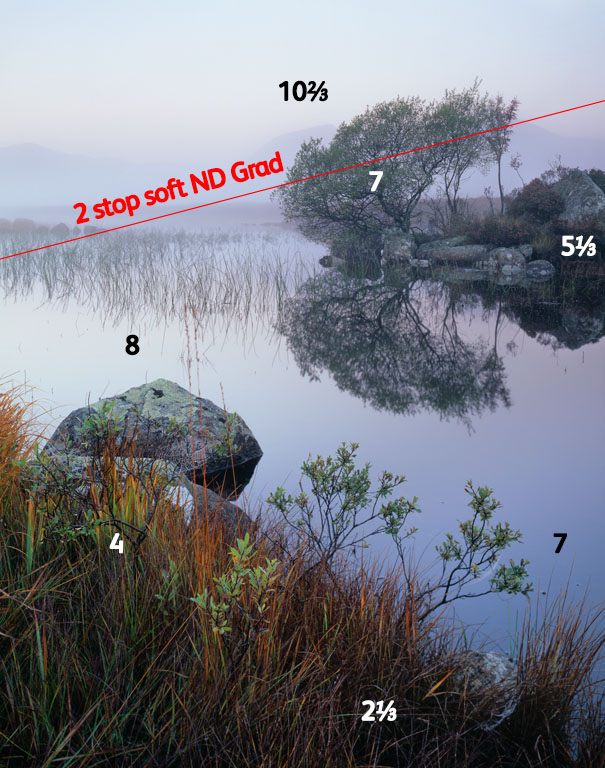
This gave a couple of values outside that range, although not by much. I think the 2⅓ EV in the bottom right is because it's totally shaded from the light (i.e. it's both dark AND shaded).
The big problem is the direct source of light with 10⅔ EV. Here are the values placed on our Velvia 50 range.
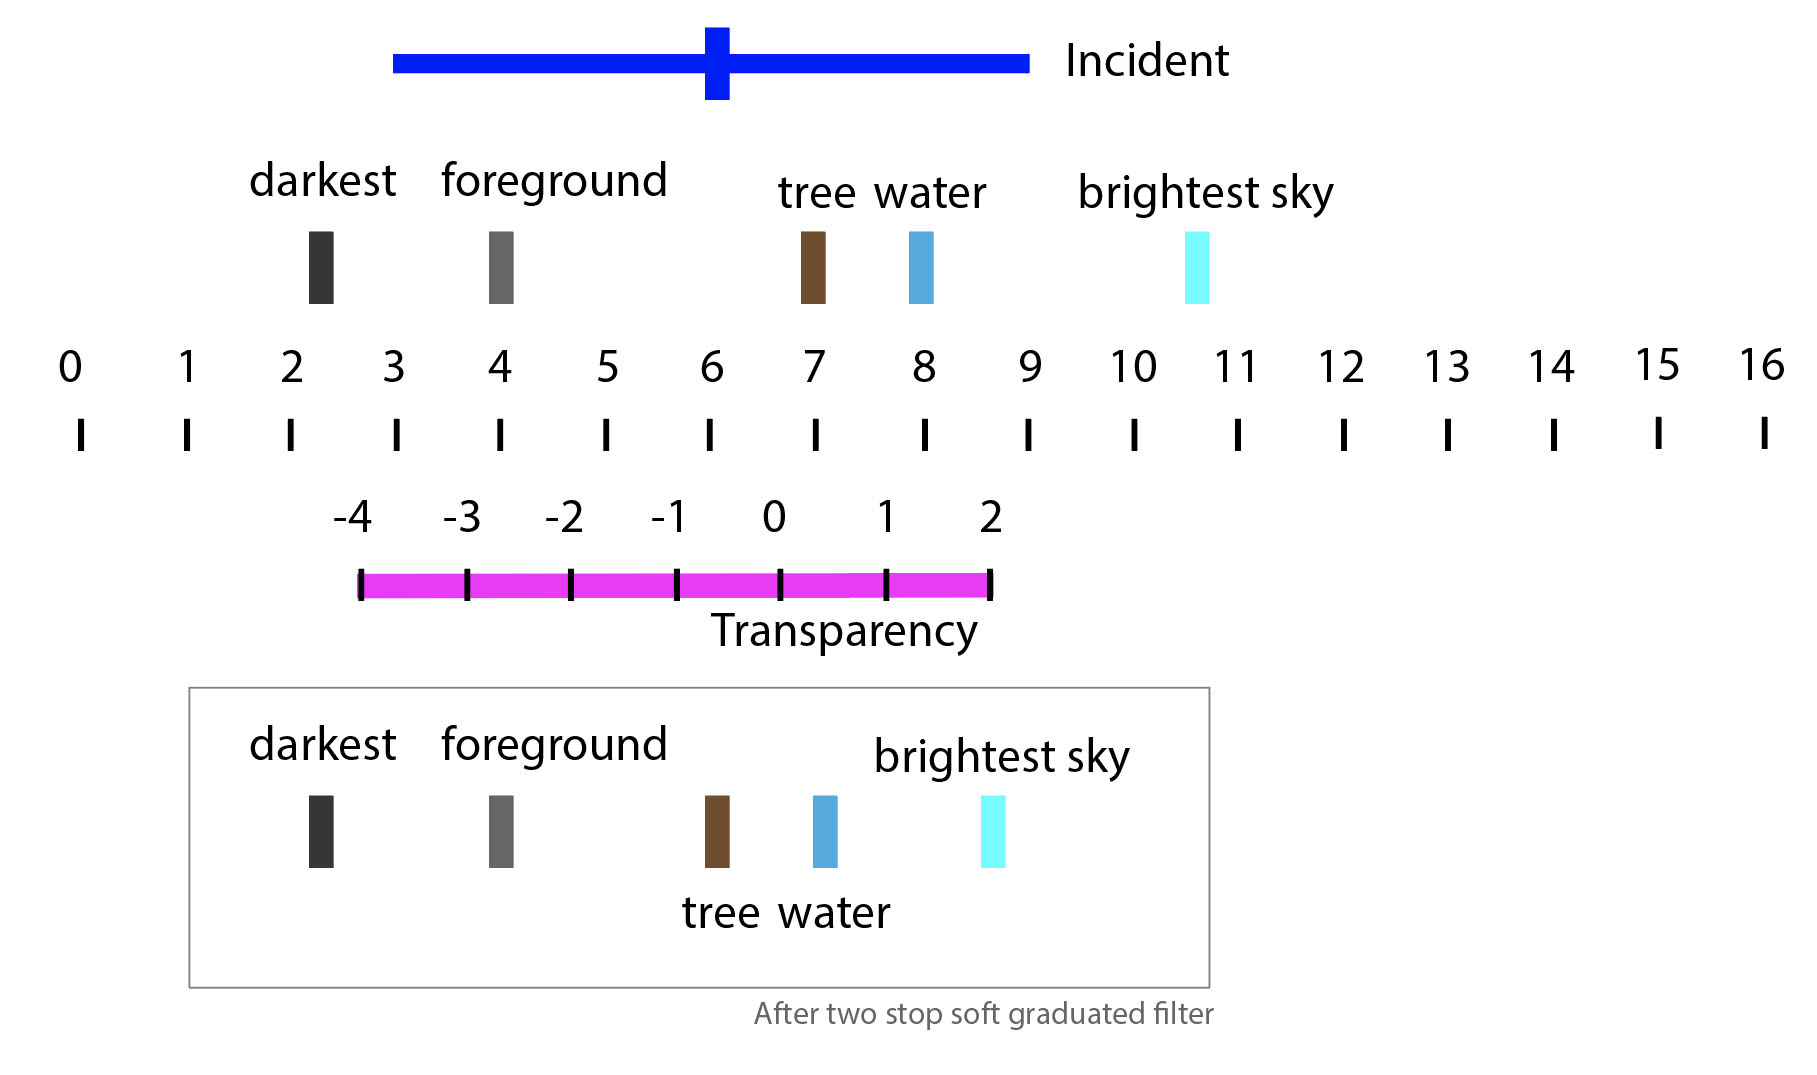
In order to bring the brightest part of the sky down to within the Velvia 50 range, we've had to use a two stop graduated ND. This brings the 10⅔ EV value down to 8⅔ EV and given this we just lose the very darkest parts of picture black by ⅓ of a stop (which actually turned out OK on a drum scanner).
Conclusion
I could have forgotten about the incident reading for these tests but next issue I'll show some situations where having an incident reading gives extra information about where to place your tones. Mostly, in these cases, the incident reading gives you good feedback on whether your overall exposure will look 'correct'.
You may have noticed that in both examples you could have almost gotten away with just the incident reading, using a two stop graduated filter and underexposing slightly. For many cases where you aren't looking directly into the sun or you have bright sunlight on white clouds, this quite often works. These sorts of 'heuristics' are something we plan to look at in future articles.