The Basics of the View Camera

Tim Parkin
Tim Parkin is a landscape photographer living in Scotland who co-founded On Landscape magazine. Alongside his photography and writing he also co-founded the Natural Landscape Photography Awards, runs a film scanning business and is a judge for other international landscape and nature competitions.

Richard Childs
Richard trained as an Orchestral Percussionist in the 1980's but his true love has always been the outdoors and particularly mountain environments. Throwing in his drumsticks to become a full-time photographer in 2004 he continues to work with a large format camera alongside digital equipment and exhibits his work in solo and group exhibitions as well as at his own gallery in the Ironbridge Gorge. Links to Website and Facebook
For the uninitiated, the different types of large format cameras available can be daunting. Between rail camera, folders, non-folders, clamshells, sliding boxes and the different movements, front or rear standard; base, axis or asymmetric tilts, etc. can all seem a bit like gobbledegook. The first thing that I should state to reassure people is that the quality of every large format camera is not dictated by the camera itself. I know this is weird, but you should think about the camera features primarily as relating to rigidity and flexibility of camera movements and ease of use. This is why it is possible to make top quality images with a cheap or handmade camera.
So this instalment of our Introduction to Large Format series discusses all the variations and features that a large format camera can have and what they mean to the end user.
What does the Large Format camera do?
The basic function of the large format camera is to stop the light going where it’s not supposed to and to position the lens and film in relation to each other to get the correct focus and ‘camera movements’.
In reality, you could connect a lens to one end of a black bag and a dark slide to the other and then hold the lens in one hand and the dark slide in the other and this would achieve the very minimum definite of ‘camera’ according to the above. As long as you could hold them still enough (and you have an extra three hands, one to fire the shutter, one to stop the ‘bag’ getting in the way of the light and one to pull the darkslide) you would get a perfect image - as good as any expensive Ebony or Linhof camera. This isn’t particularly useful but it does show that you don’t need an expensive camera to produce the standard of image quality that large format is renowned for.
What the camera tries to achieve beyond being an expensive black bin liner is to provide a rigid framework with the appropriate gears, levers and clamps to allow you to focus, by changing the distance between lens and film, make the desired tilts and shifts and finally to attach a lens and film holder.
If you don’t want tilts or shifts then the minimum functional camera could be a plain wooden box with a lens at one end, a film holder at the other and a way of changing the distance between the two - which could be two boxes sliding inside each other (know as a sliding box camera) or a ‘helical’ attached to the lens (like the expensive Linhof version - http://linhof.com/en/o-platte-einstellschnecke/ or a cheaper Fotoman one).
However, most cameras come with the ability to at least tilt the lens and/or film and also to shift the lens or film to correct perspective and a geared rack for focusing. Let’s take a look at how some of these features are implemented and what it means in use.
Focusing
The focus of a simple lens camera is dictated by the distance from the lens to the film plane. In large format cameras, instead of turning a focusing sleeve/helical, you simply move the whole lens closer or further away from the film either by hand or more usually with some form of geared rack or screw. On some cameras, the gearing is used for the finer focusing and the front standard is placed roughly by sliding it backwards and forwards or by locking it into one of a range of fixed positions (i.e. the Philips design Chamonix large format cameras). If you want to use longer lenses, the distance from the film plane to the lens gets larger*. In order to avoid very large cameras, there are sometimes multiple collapsing rails inside one another. This is known as either a ‘double extension’ or a ‘triple extensions’ camera. The double just refers to the front standard and rear standard moving separately and the triple adds an extra slide on the front standard to get a bit of extra extension.
* For infinity the distance is the same as the focal length and for ‘closer’ distance it can get range from 1.5 to 2x the focal length - or you have to use telephoto lenses, that’s for another instalment though.
Front Standard
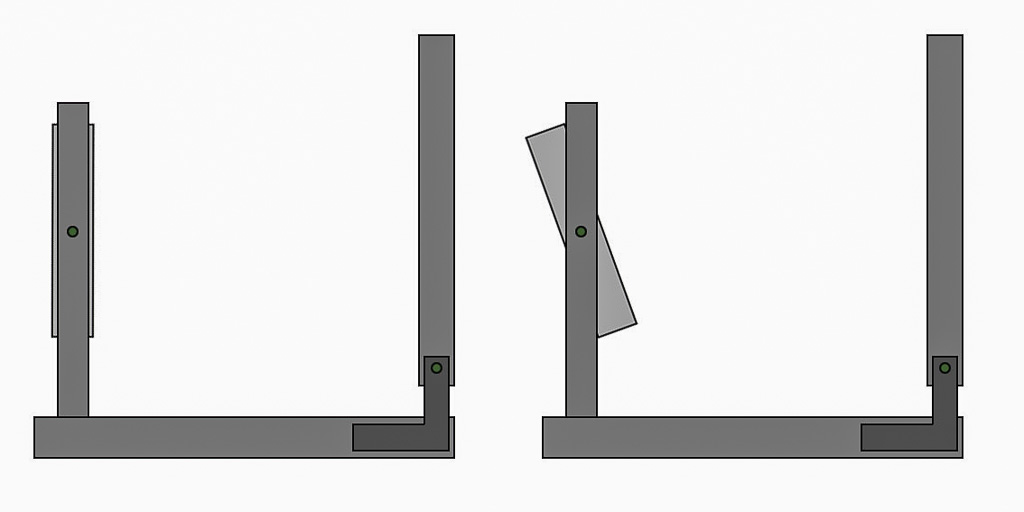
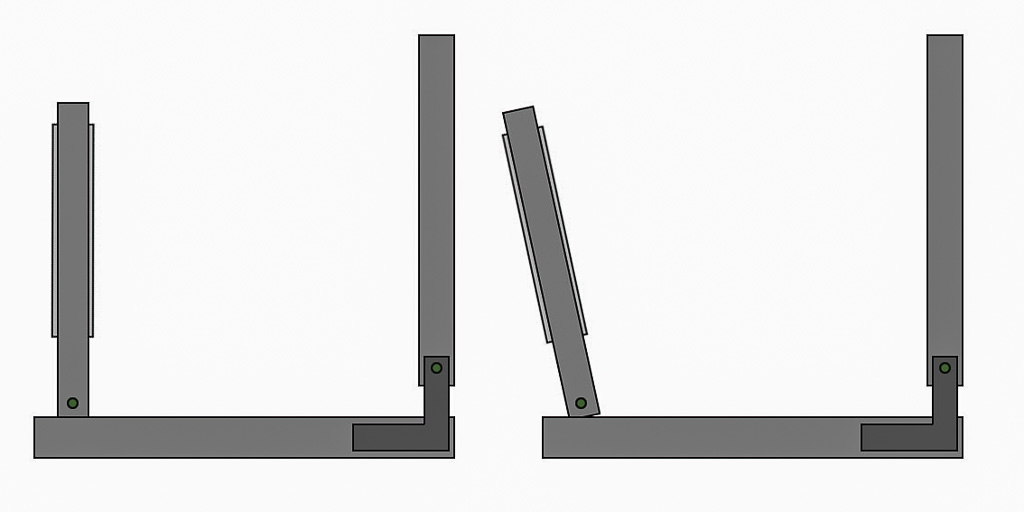
Front Axis Tilt (the usual)
The most common way of changing the tilt on the front standard is called “centre tilt” or “axis tilt”. This just means that the axis on which the front standard tilts is along the centre of the lens (or close to it). Here’s a diagram showing the front standard tilting.
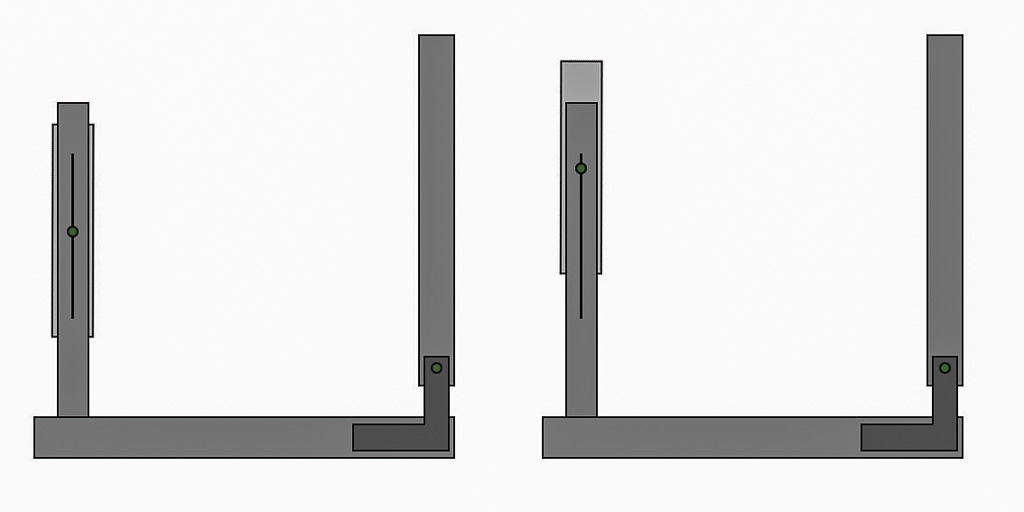
Front Rise and Fall
The front standard also typically allows rise and fall just by sliding the front standard up and down. Some cameras have separate locks on the front standard so you can keep rise and fall locked whilst tilting (or vice versa) however many cameras just have a tension control for both movements which typically allows you enough tension to keep the rise and fall position whilst allowing you to tilt.
Front Base Tilt (the work of the devil)
However, some cameras have the axis of tilt at the bottom of the front standard. This has the disadvantage that putting tilt on also changes the focus (because the whole lens gets closer or further away from the film) forcing you to refocus every time you make a change. The only way to efficiently work with front base tilt is to have one hand on the focus and one hand on the tilt at the same time - not a technique for beginners!
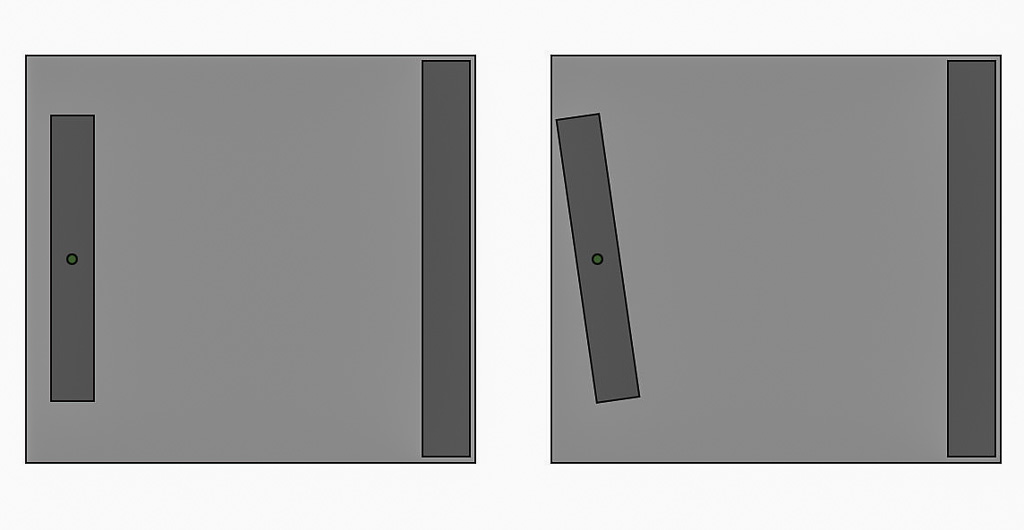
Front Swing
The front standard also typically allows you to apply swing as shown in the following diagram showing a top down view.
Rear Standard
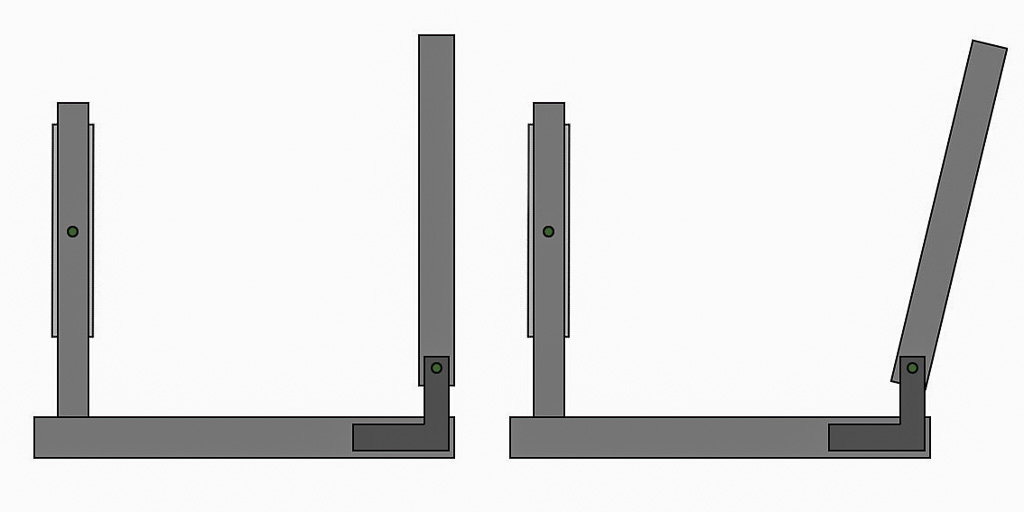
Rear Base Tilt (the usual)
On the rear standard, the usual format for tilt is ‘base tilt’. This means that the standard rotates at a position just above the bed of the camera as shown in the following diagram.
This isn’t completely ideal as there are no parts of the scene that stay in focus apart from in some cases a little bit at the top of the scene (i.e. the bottom of the standard). However, because the axis of rotation is near to ground glass, the focus shift isn’t as much as that you get using front base tilt and only small adjustments are needed to bring things back into focus.
Rear Axis Tilt
Few cameras have axis tilts on the rear of the camera. Because of the mechanics needed, these are usually confined to studio rail cameras.
Rear Asymmetric Tilt
When the axis of tilt is in between the centre of the ground glass and the base of the ground glass, this is termed ‘asymmetric tilt’ and some people refer to this configuration as the ‘autofocus’ of tilt movements. Although they do make things a lot simpler, for the experienced large format user they don’t save a lot of time.
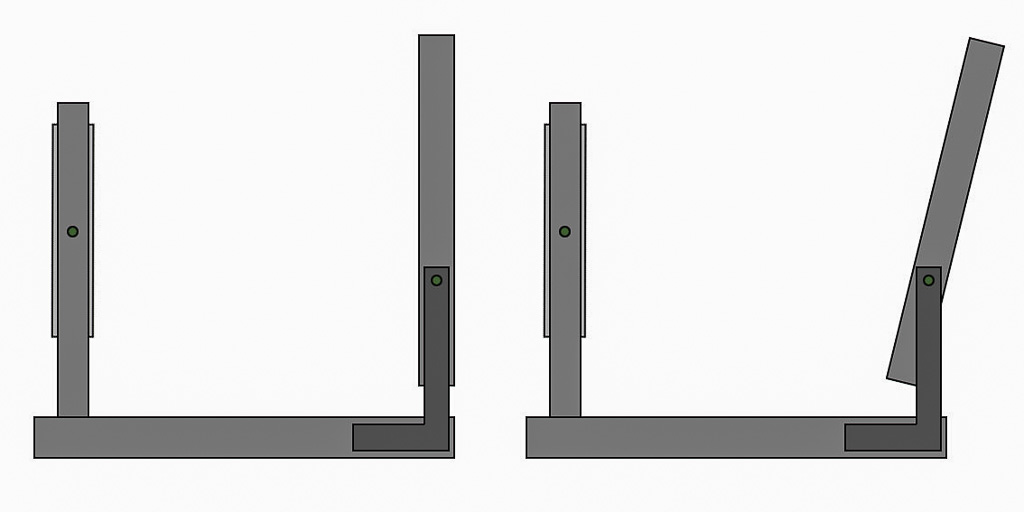
The reason they make things simpler is that because of the axis of rotation goes through the ground glass position when you tilt the rear standard a line across the scene stays in focus. If this line is toward the top of the scene, all you need to do is to tilt the rear standard until the bottom of the scene comes into focus. In many cases, this means you only have to make a single, obvious movement to get the correct amount of tilt for your composition.
These cover the main movements that you might encounter on a large format camera. Now let’s look at some examples of different camera designs.
Types of Camera
Sliding Box Camera
One of the oldest designs of camera, this consists of two boxes, one slightly smaller than the other, inserted into each other to make a closed box whose length can be adjusted. Put a lens at one end and a film holder at the other and you have a basic camera.

Sliding Box Camera (photo courtesy Wet Plate Supplies)
Tail Board Camera
This camera introduces a bellows and has a fold down ‘bed’ that the rear standard can slide along. Tail board cameras can get quite complex and often include rise and fall on the front standard and sometimes have tilt movements on the rear standard. These are quite popular with wet plate photographers and there are a few individuals who still hand make these cameras (for example Mark Voce)
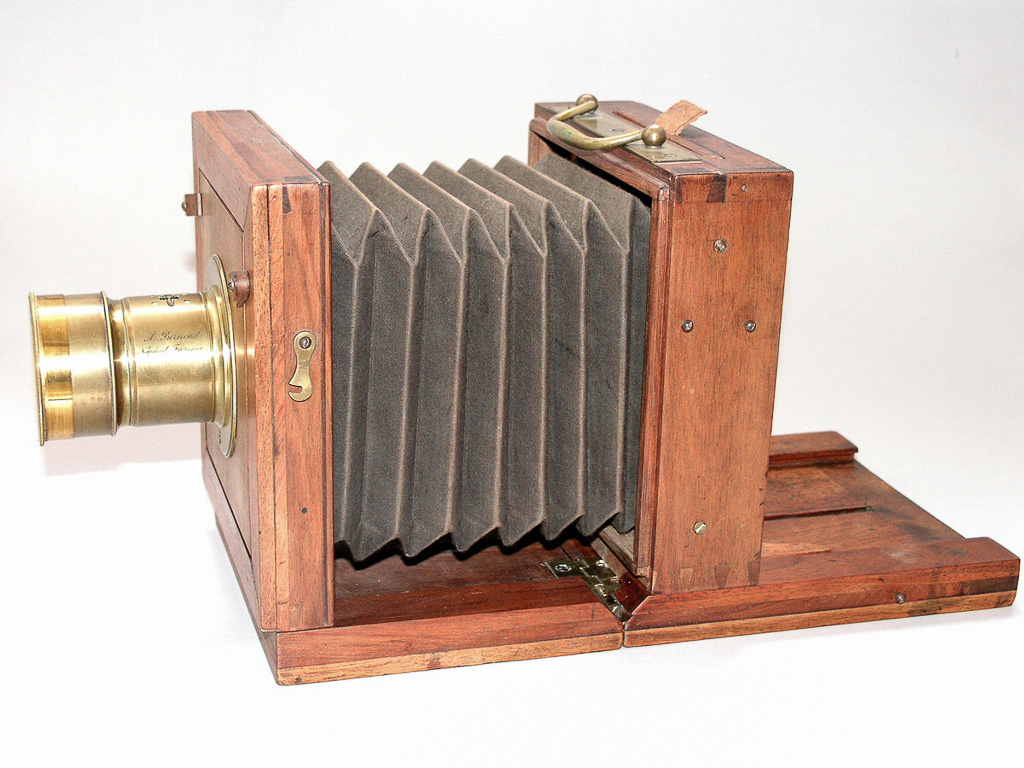
Tail Board Camera (photo courtesy Wet Plate Supplies)
Classic Folding Wooden Camera
The camera most people are familiar with from seeing photos of historic photographers is probably the classic ‘folder’. This camera allows the front standard to collapse down and then the rear standard collapses over it to form a closed box. One of the most famous examples of this sort of camera is the Deardorff 8x10. Most manufacturers have a camera of this type.
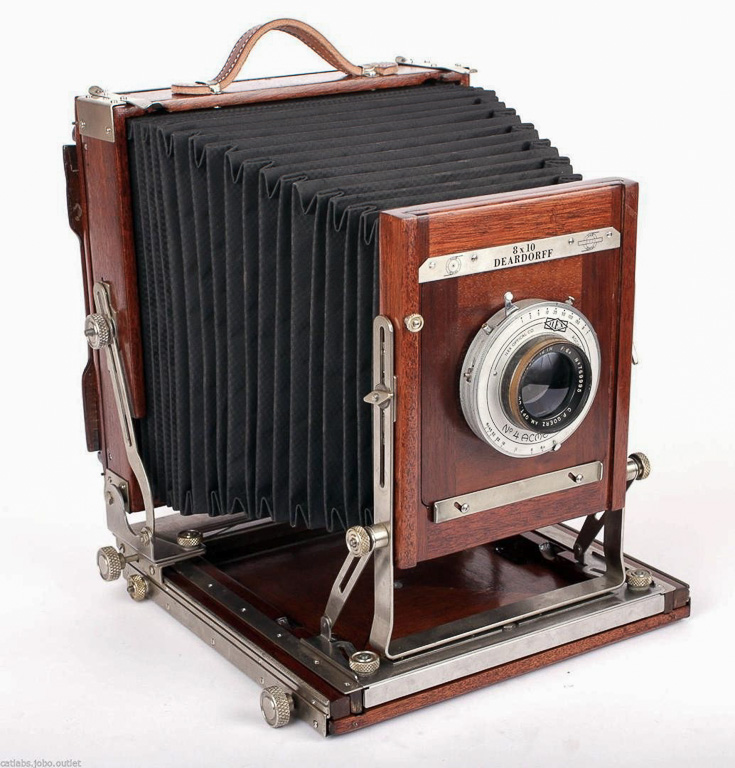
Deardorff 8x10
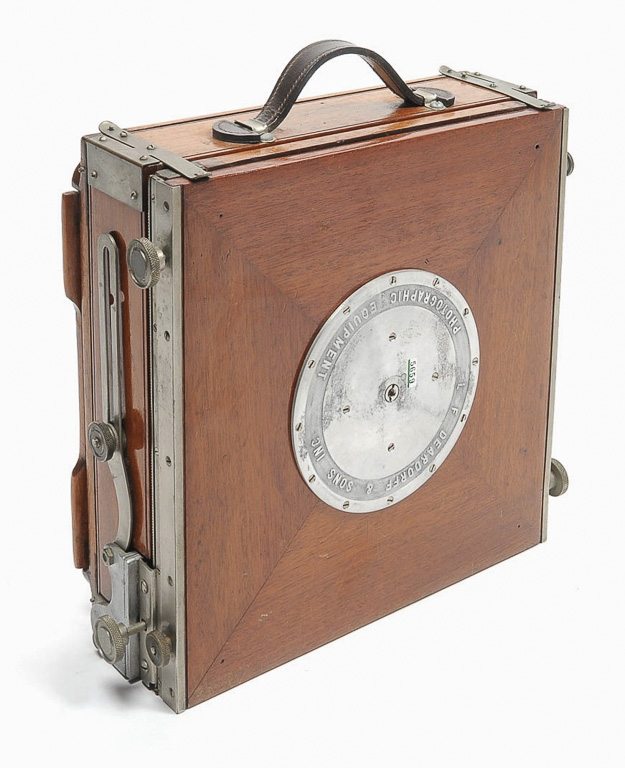
Deardorff 8x10 (folded)
Rail Camera
Most commonly used as a studio camera, these are based on a long rail, either tubular or square, along which are attached the front and rear standard. These are usually quite heavy and often have geared movements allowing a fine control of composition.
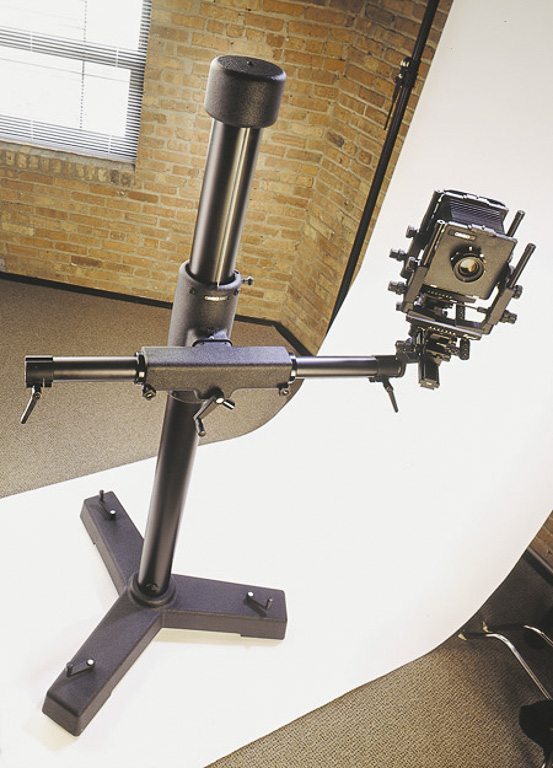
Cambo Rail Camera on Studio Stand
There are a couple of smaller and lighter rail cameras that can be used in the field, the most well-known of which are the Linhof Technikardan and the Arca Swiss cameras.
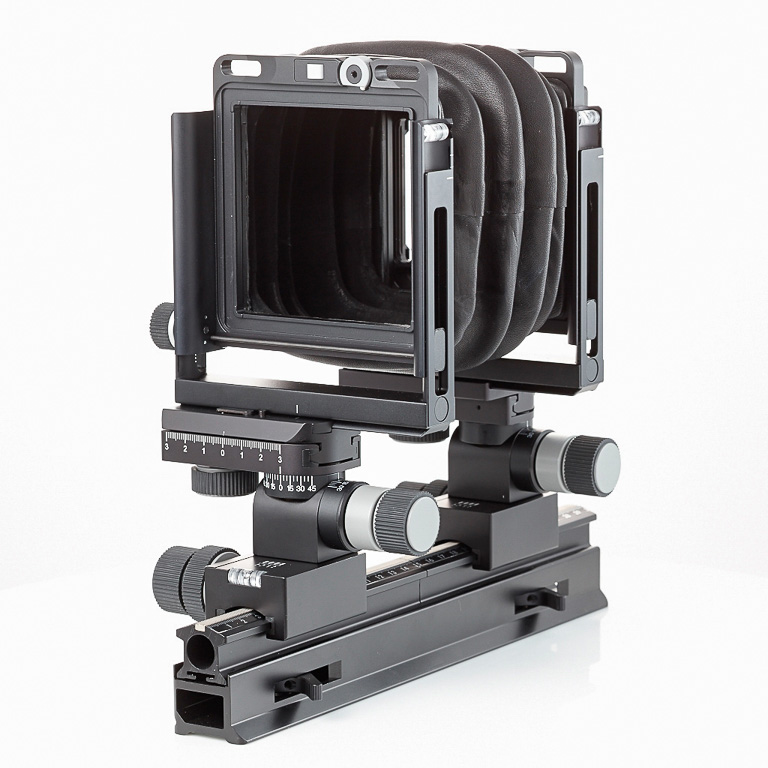
Arca Swiss F Field
Clamshell
Some of these are referred to as press cameras because of their ubiquity in the hands of photojournalists like Weegee, they are very similar to the classic folding wooden camera but instead made of metal and hence are a lot more robust. The most common example of these cameras is probably the Speed Graphic, first produced in 1912, and the Linhof Technika, introduced in 1934. The Linhof Technika was still being made in the 21st century and new stock is still available.
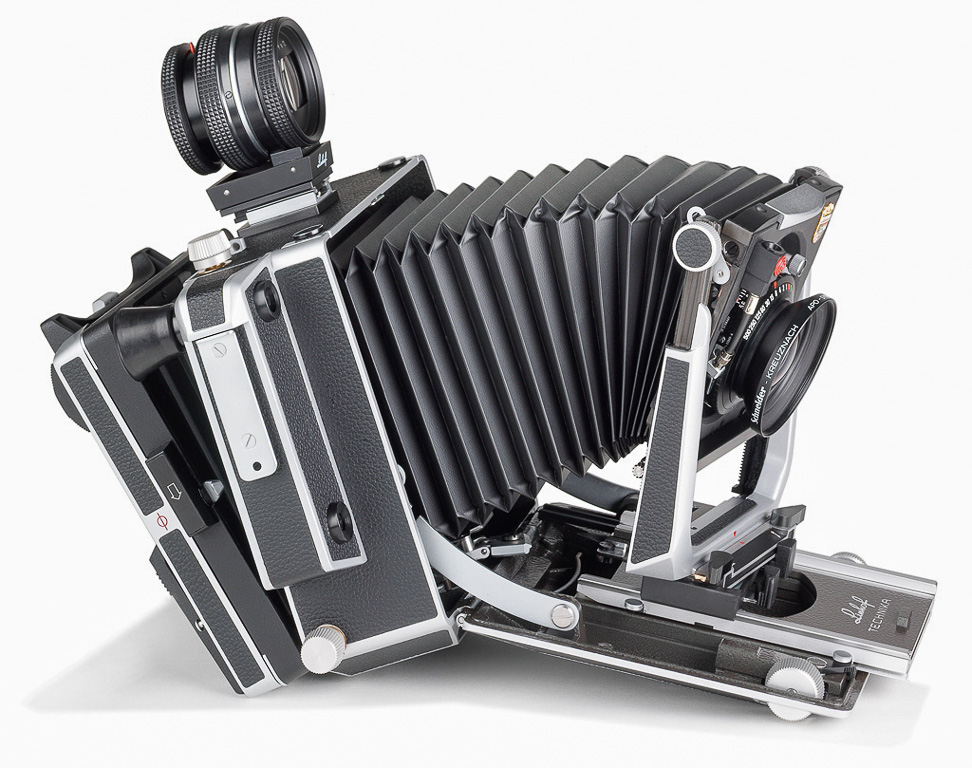
Linhof Master Technika
The Film End of the Camera
At one end of the camera, you will have a ground glass and a sprung mechanism to allow you to slide a darkslide under it so that the film ends up at the same point as the ground glass (i.e. where you focussed!). This sprung back sometimes has a lever to help you open it (especially on larger formats like 8x10) which is called a ‘bail arm’.
Graflok Back
As well as this, you may wish to attach other systems for holding film. There is a fairly well-accepted standard for the attachment of film backs and dark slides to large format cameras and that is the ‘Graflok Back’ or ‘International Back’. Typically you can remove your sprung groundglass and then there is a standard sized gap into which you can insert roll film holders, glass plate holders, graphmatic backs (multi-sheet holders) and more. The ‘***lok’ bit of Graflok simply refers to two sliding clamps that can be pressed down onto the inserted device to hold it in place. Be wary of looking for Graflok and not Graflex backs.
Ground Glass
The ground glass is one of the most important parts of a large format camera. Without it, you wouldn’t be able to see the picture to compose and you wouldn’t be able to see the image to get it in focus and apply the right movements. Ground glasses were originally just a piece of float glass which has been ‘ground’ on one side in order to provide a semi-transparent surface onto which the image is cast. Grind the glass too much and the image is dark, grind it too little and you can only see the image if you’re in line with the lens (you get a ‘hot spot’ in the middle of the ground glass if you are directly behind the camera and you have to move your head around to see the corners). The ground glass is often marked with lines showing different framing options for roll film backs etc.
If you use wide angle lenses or want a ‘brighter’ image on your ground glass, you can use a ‘fresnel’ lens. This is a flat lens like you may have seen used to magnify the text in books or used on studio lights or even on lighthouse lights. This flat lens helps to bend the light from the corners of the ground glass back towards your eyes, meaning you don’t have to move your head around to check the corners when using a wide angle lens. Fresnels, like any other lens, can be cheap and cheerful or accurate and expensive. We’ll talk more about ground glasses in a future instalment.
Lens Attachment (The Pointy End)
The lens on a large format camera typically contains the shutter and aperture and is mounted onto a piece of metal or wood called a ‘lens board’ which is then typically attached to the front of a camera with a sliding clamp. The most widely used standard for lens boards is called a Technika board. The hole in the board has standard sizes too, Copal 0, Copal 1 or Copal 3 with the latter being the biggest. The hole matches the shutter used on the lens.
There are other types of lens board, Sinar have their own standard as do Toyo. Replacing the lens board on a lens you may have bought isn’t difficult though.
Our Recommendations
First things to avoid is anything limited to base tilt on the front standard. I don’t know a single photographer who would choose a camera limitation such as this. At a minimum, you want a camera that allows you to tilt the lens on its axis and to use rise and fall on the front standard. Rear tilt is a nice to have but not essential - there are a few cameras that are dedicated to wider lenses that use a fixed rear standard to ensure ‘squareness’. Asymmetric tilt is a bonus but you can live without it.
You should probably look for a camera with a bellows extension ability from about 65mm to 320mm. This would allow you to focus with lenses from 72mm to 400mm (telephoto) - enough for most typical uses. Some cameras limit the maximum extension but there are telephoto lenses that don’t need as much extension to focus at infinity so even with a limited bellows extension you should still manage to use a 270mm telephoto lens (for which you only really need about 190mm of bellows to focus at infinity).
We'll talk more about all of these aspects in more details in future instalments. Our next instalment will look at large format lenses.
Experiences
Tim Parkin
After my revelatory experiences in the Outer Hebrides, I splashed out and bought an Ebony 45SU camera. This is probably considered the Rolls Royce of cameras and the reason for such an expense for me was that I didn’t want the camera to get in the way of my learning to work with large format. A few years later, me and Dav Thomas ran a few introductory large format workshops and needed some extra cameras for participants. A new manufacturer called Chamonix and we ended up with a camera each. The camera was an excellent choice in many ways. Far, far lighter than the Ebony 45SU (for the 045N1 it is 1.4Kg instead of 3Kg) and yet could still be used with all of my lenses. And despite not having the asymmetric tilts, it was straightforward to focus.
Now that I own two large format cameras (I actually own six but don't tell Charlotte!), I’m in a position to be able to choose the camera for the type of photography I want to do. The Chamonix gets used when I’m travelling light or in the rain (The Ebony’s wood has a tendency to swell when used in the rain for a long period, potentially temporarily seizing up the focusing) and the Ebony gets used for shorter and less hilly walks. I can use the Ebony faster definitely because I don’t have to unfold it and it is an absolute pleasure to operate but I don’t remember losing a shot because of the way the Chamonix works.
Having used quite a few large format cameras since I first started (either owned by me or whilst teaching attendees on one of my workshops), I have to say that the only cameras that prevented me from making a picture were ones that were too unstable, the Shen Hao being the prime example. I can even cope with that front base tilt thing at a push.
The biggest change in the landscape of large format in recent times is the introduction of very cheap large format cameras from small manufacturers, the most well-known of which is probably the Intrepid 5x4. Intrepid Cameras are a small company based out of Brighton that have run a couple of Kickstarter campaigns to raise money to create large format cameras. The first generation 5x4 camera was a little rough around the edges, but the second generation camera is a very functional device that can be purchased for £250. We’ll be reviewing the camera in a future instalment but if you would like to read a review, take a look here. From the feedback I’ve seen, I think it would be worth a purchase for anyone who is intrigued by the thought of large format. Keep an eye out for
-

- River Coe, Glencoe – Chamonix 045N1, 150mm
-

- Three Cliffs, Gower – Ebony 45SU 80mm

-

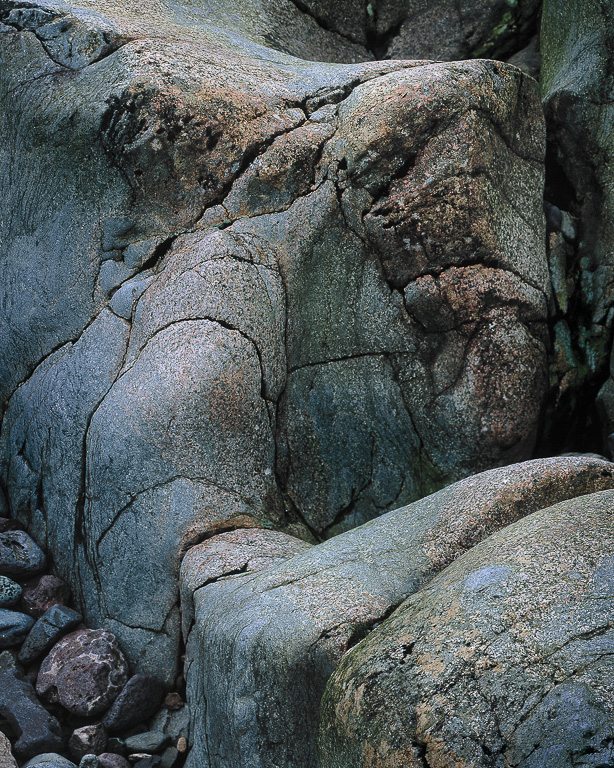
- Stonecrop, Strangles, Cornwall – Ebony 45SU 150mm

-

- Worms Head, Gower – Ebony 45SU 110mm

-

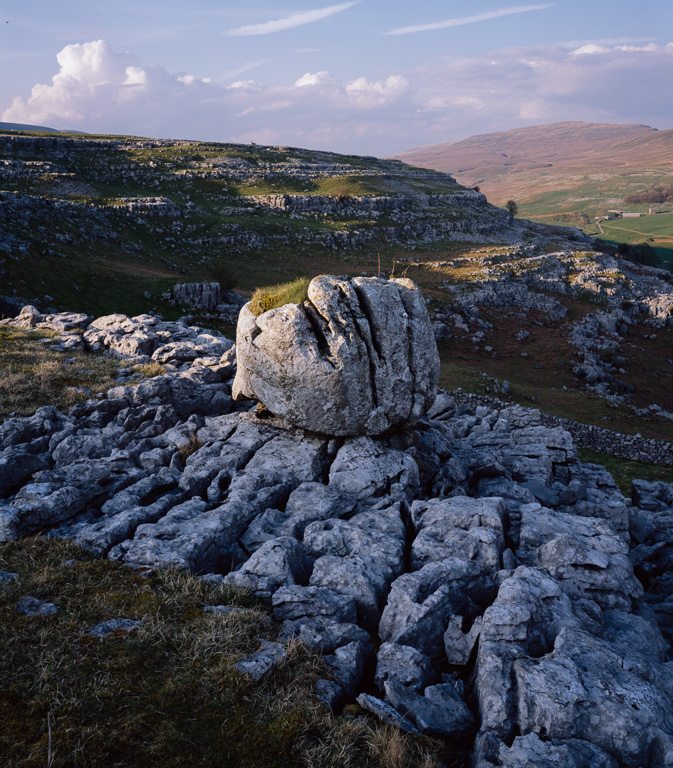
- Keld Head, Nr. Ingleton. – Ebony 45SU 110mm
Richard Childs
Rather than repeating much of the technical information regarding different types of Large Format cameras that Tim has covered ( far more eloquently and with far more detail than I could) I thought I would relate some of my own experiences in operating the five different 5x4 cameras that I have had the pleasure of using over the past thirteen years.
Back in 2003 the range of information and feedback through networking sites simply wasn't there. I wasn't particularly aware of online Large Format forum groups either and to be honest looking around today there is so much advice of a contradictory nature ( what else would you expect if you ask the question ' i'm thinking about buying..... what should I get?') that I would certainly find myself more confused than before asking.
Having discovered the work of Paul Wakefield and Joe Cornish I was drawn to the quality of their imagery and intrigued by their choice of camera for much of what they were shooting. In 2003 my Grandmother passed away leaving £1000 to each of her grandchildren in her will. Wishing to put her gift to good use and in the hope that it would help to develop and improve my photography I purchased my first Ebony, an RSW45 based on a favourable write up in a national magazine. As an entry level model with only basic movements available on the front standard it certainly provided me with the perfect tool to practice the craft and start to build my own work flow. With a short bellows I was limited to what lenses could be used but this was, as Tim says, a positive negative. These days, if I get a new lens I try to limit myself to using only this for a few weeks to really get to know how it performs. I have shot every large format image over the last three or four months with just my Rodenstock 120mm lens.
Moving on eighteen months I felt ready to upgrade and made the huge leap up to the 45su which proved to be incredibly robust and versatile but with a weight to match the metal cameras built by Linhof. With asymmetric tilt, a vastly longer bellows and a full range of movements and both ends of the camera I was finally able ( with the necessary investment in both wider and longer lenses) to photograph pretty much everything I was interested in. The only real downside with this camera is the weight which when carried with 4-5 lenses made climbing hills far more taxing for me.
With mountains in mind I tried both a Shenhao and a Tachihara camera to help reduce the weight but both were ditched pretty quickly due to the frustration of working with something far less stable than I was used to. That said they both enabled me to make successful images but had a profound impact on my workflow that had taken me five years or more to perfect. Someone coming to one of these cameras first would of course develop their own systems for making images based around the model they had. The Shenhao was much like my original Ebony RSW45 with just enough bellows to take my Schneider 180mm lens and allow for some close focus. It also took my Fujinon 300t but only focused at infinity. It was incredibly light but this proved its downfall as it just wasn't stable enough in windy conditions. Large Format cameras couldn't be less aerodynamic and this is where weight becomes essential providing extra stability in a stiff breeze. My 45su could be effectively operated in wind in excess of twice the speed of the Shenhao or Tachi. I only really used the Tachihara for a couple of weeks while my 45su was being repaired following the discovery of a fault caused by a tooling error. My first experience of a folding camera, I wasn't particularly impressed by the clumsiness of operation and by the flimsy feel of the metalwork which made applying movements awkward. It would be perfect in good weather where I had lots of time to set up an image but in poor conditions I knew it would be the cause of missed opportunities.
It's worth mentioning at this point that, while water is unlikely to destroy a large format camera, some wooden cameras are susceptible to being affected by moisture and humidity. Both of my Ebony cameras ( and those of other users I have known) needed adjustment for the Scottish environment as they seized up. Something that the Linhof fans and users used to delight in. With just a little adjustment with a screwdriver these problems are quickly fixed.
Sadly Ebony Camera are no longer with us but as will all LF equipment there are plenty available second hand and with their build quality there should be for many decades to come.
I decided to sell my 45su back in 2013 in order to get something much lighter and almost as capable in the form of the Chinese built Chamonix 045F1. It's nowhere near as strong a camera as the Ebony ( although it has proved faultless in operation for four years now) and being a folder takes a couple of minutes longer to set up. However, it weighs only 1.5 kgs and offers nearly the same range of movements ( including asymmetric tilt ) as my 45su did and all for a fraction of the cost. The camera has had an impact in changing my work flow a little but I'm happy to embrace this as part of my own evolution as a photographer. In fact it's one of the huge pluses to me to actually be able to see the effect that a piece of equipment can have in steering me on a slightly different course.
As a final point it must be mentioned that all of the cameras I have used and of course all the other models available today will enable you to make incredible images with patient practice. More critical that the make, model, range of movements etc are your own skills in composing an image and then correctly exposing a sheet of film. Accept though that your camera will play a vital role in the development of your vision over the years. Think of it as your partner rather than a mere tool in your image making and let it guide you for some of the journey.
Large Format Photography Articles
- Introduction to Large Format Photography
- Large Format Lenses - The Standards
- Large Format Camera Accessories
- Ben Horne Interview - 8x10 large format camera user
- My Journey into Large Format Photography
-

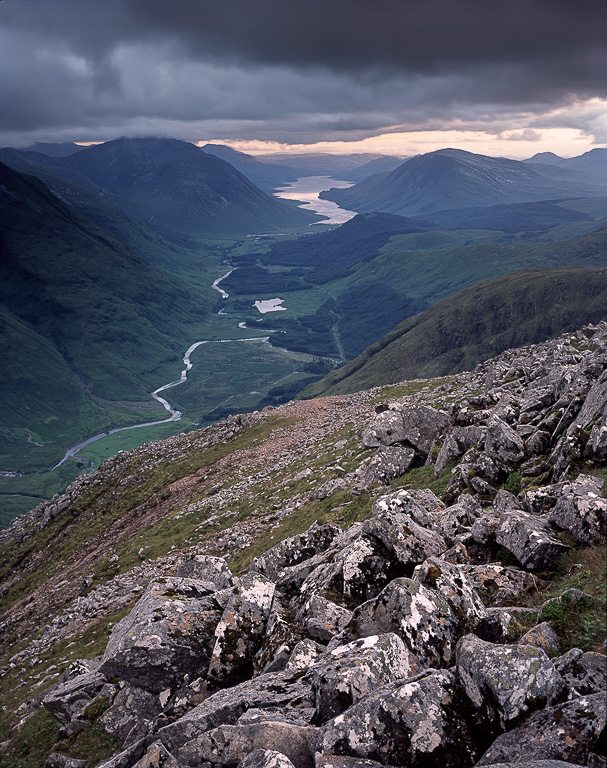
- View from Stob Dubh, Shenhao. 135mm lens
-

- Winter Fire, Beinn Fionnlaidh. Ebony 45su. 90mm lens

-

- Cooling Shower. Chamonix 045f1. 180mm lens
-

- Evening glow, Port Appin. Ebony RSW45. 90mm lens

-

- Rowan Flow, Glen Duror. Tachihara. 180mm