The Supporting Cast

Tim Parkin
Tim Parkin is a landscape photographer living in Scotland who co-founded On Landscape magazine. Alongside his photography and writing he also co-founded the Natural Landscape Photography Awards, runs a film scanning business and is a judge for other international landscape and nature competitions.

Richard Childs
Richard trained as an Orchestral Percussionist in the 1980's but his true love has always been the outdoors and particularly mountain environments. Throwing in his drumsticks to become a full-time photographer in 2004 he continues to work with a large format camera alongside digital equipment and exhibits his work in solo and group exhibitions as well as at his own gallery in the Ironbridge Gorge. Links to Website and Facebook
Once you’ve bought your large format camera, it’s time to look at the ‘extras’ that you’ll need in order to take pictures. We’ll be covering lenses and lens panels in the next chapter so for now here is a run down of what else you’ll need for your bag. It’s worth remembering that most of what you know about choosing equipment is not the same for large format. Even a poor camera with a cheap lens can make stunning images and so what you tend to pay for with large format is to do with ease of use, flexibility of control and enhanced pleasure in operation.
First of all, we’ll look at the ground glass, loupe and dark cloth. These are the components that give you your view of the world and the better quality you get, the better your experience of using the camera will be.
Ground Glass & Fresnel
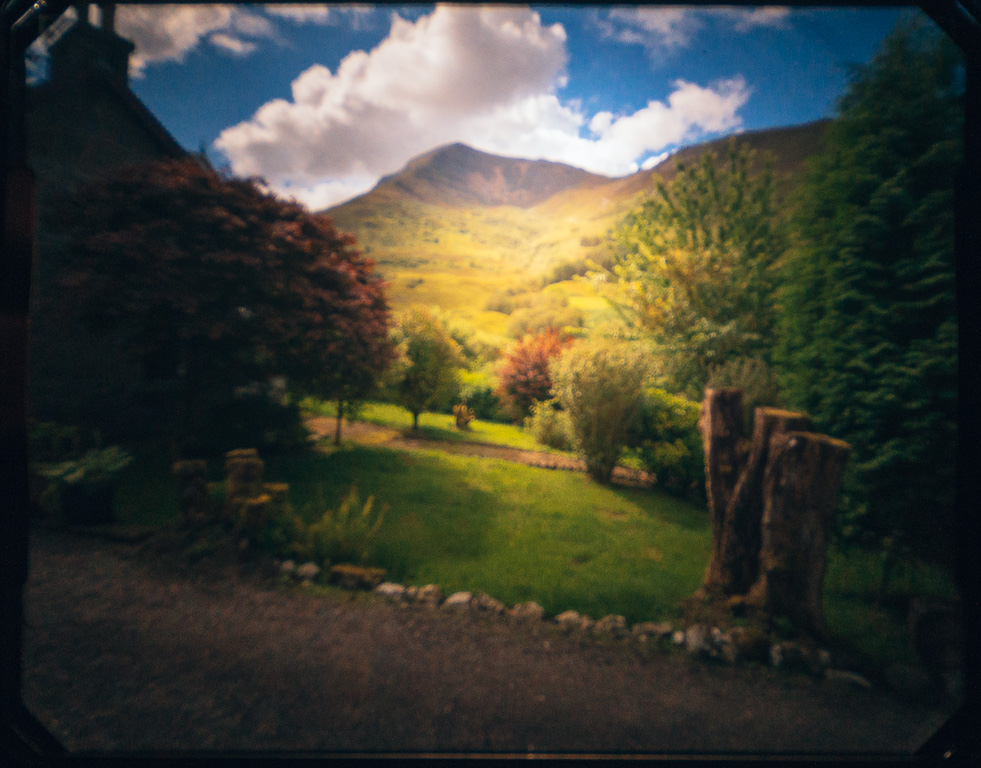
The ground glass is your window to the world, your live view and your auto focus. Having a ‘bad’ ground glass can make using the camera considerably less enjoyable. However, the good news is that a good quality, basic ground glass can be had very cheaply and most modern cameras come with a good quality example as standard.
The ground glass is just what the name implies, a piece of plain float glass which has been ground on one side until it becomes diffuse. The amount of grind is a personal taste and why some people like to grind their own (a long process, only for the patient). Less grind and you will have a brighter screen but potentially have double images and a ‘hotspot’. A coarse grind can be brighter but the texture will be visible. A very fine grind will be darker but will be clear and easy to focus. People have done the research before you though so I would trust a decent commercial screen.
For most lenses, a standard ground glass will do the job nicely but you need to know that the light coming from a wide angle lens will hit the corners of the ground glass at an acute angle. Most of the light hitting a ground glass carries on in the same direction and so in order to see the corners, you have to move your head in line with the light rays. In practice, this means that on a wide angle lens it looks like you get a ‘hot spot’ in the centre of the ground glass and dark in the corners. As you move your head around, this hot spot moves around the screen of the ground glass. This can make focusing hard in the corners and also makes composing quite difficult. To solve this problem you can introduce a fresnel lens behind the ground glass (some manufacturers say in front but that can cause focus registration issues). The fresnel is effectively a flat lens which redirects these acute light rays hitting the corner of the ground glass back towards your eye. This means that the hot spot is a lot less.
Looking straight onto the ground glass you can see the bright centre and darker edges. This is with a 75mm f/6.8 Rodenstock Grandagon
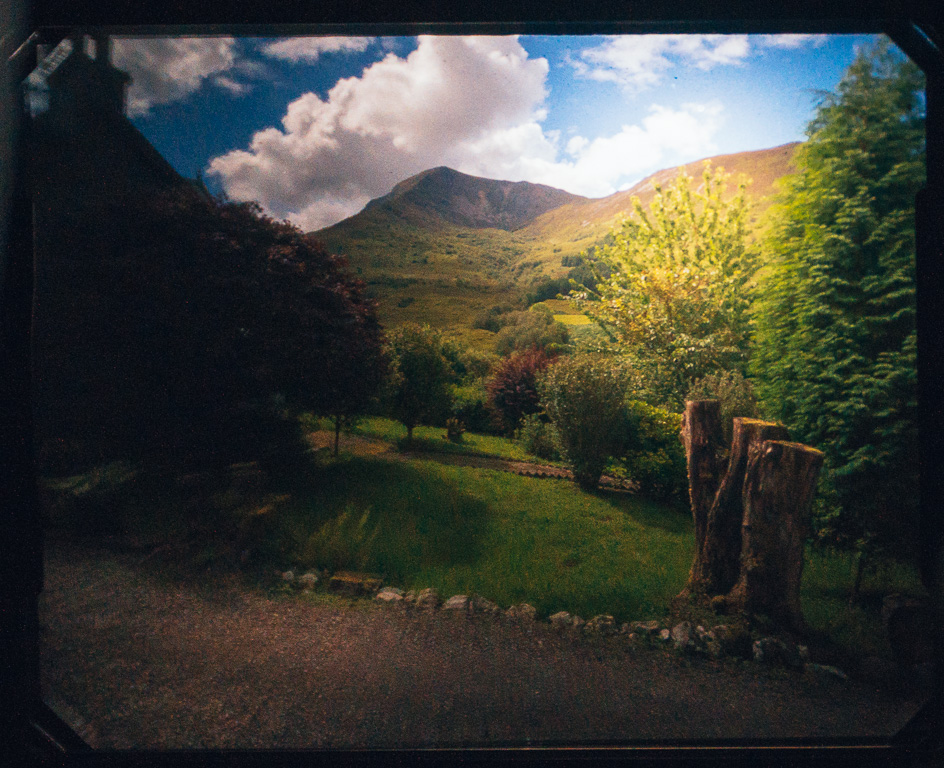
You have to move your head to one side in order to move the 'bright' area around the screen and see different parts of the composition. This effect is very noticeable during twilight or other darker conditions. This is with a Maxwell fresnel and ground glass.
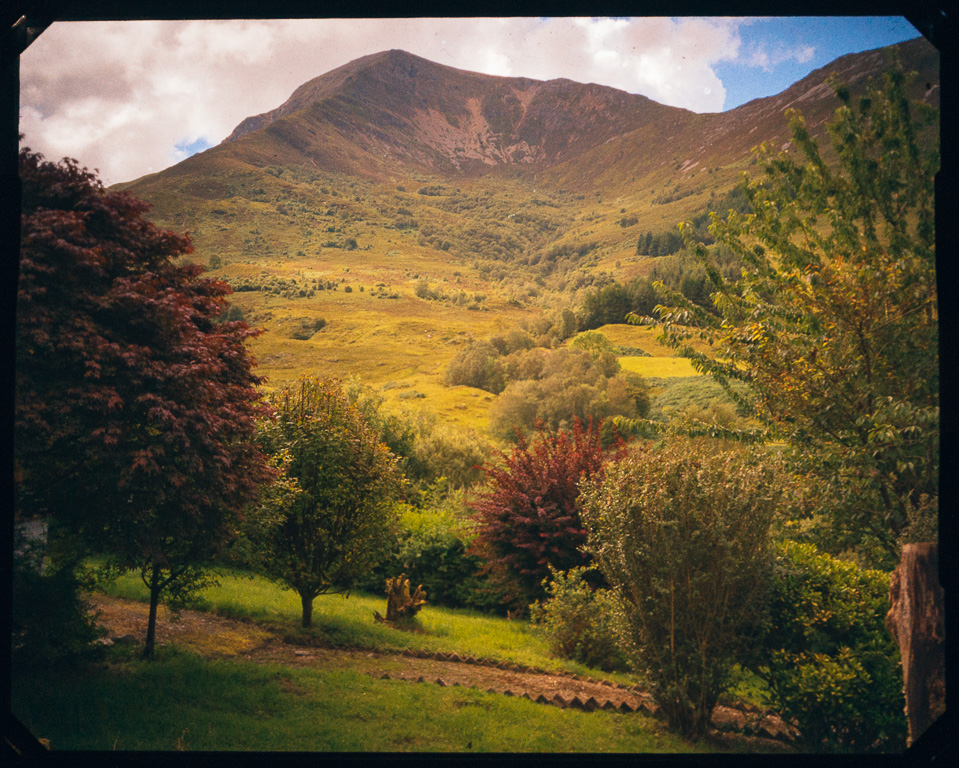
With longer lenses the whole of the image area is illuminated well. This is with a 150mm f/5.6 Rodenstock Sironar S
Just like lenses, fresnels can range in quality. At the very top end, the Maxwell fresnel is particularly good but also particularly expensive. Just like a normal lens, the fresnel can have different focal lengths and Maxwell screens are available in focal lengths to accommodate ultra wide angle lenses. The Maxwell screen (and some others) combine the ground glass and the fresnel into a single moulded unit. Being in control of the ground glass as well means that you can buy brighter versions. Have a chat with Mr Maxwell on the phone (but don’t expect the phone call to last less than an hour!).
Chamonix cameras come with a very good fresnel/ground glass combination which can be bought separately. Yanke screens (also a Chinese manufacturer) sell very good budget fresnel/ground glass units.
The downside of a fresnel is that it can make focussing a little more difficult because you don’t get the ‘snap’ into focus that you can with just a plain ground glass (this is worse on cheaper fresnels and is to do with the quality of moulding for the fresnel). Also, when you use a longer fresnel where the light rays are almost parallel, the fresnel can over bend the light rays and you can end up with a peculiar version of a hot spot (in practice it isn’t that hard to deal with).
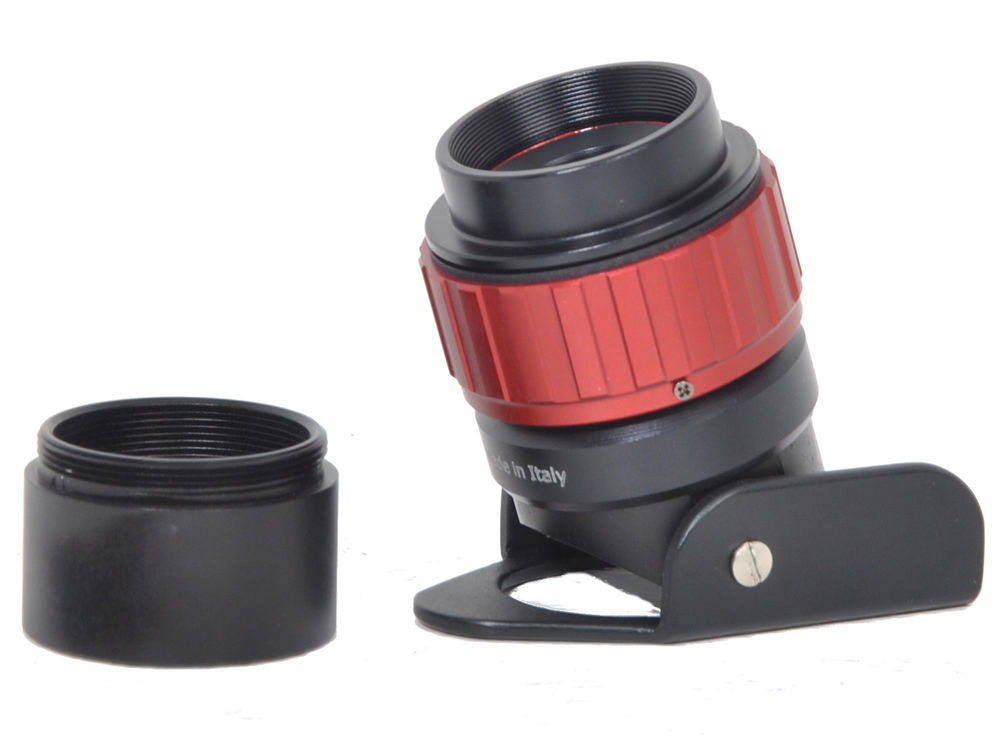
Viewfinders
When starting large format, it is very tempting to get hold of a ‘reflex’ viewing hood. This allows the view on the ground glass to be seen ‘the right way up’ via a mirror. The problem with most viewing hoods is that they only really work well when you don’t have any rise or fall and you still have to remove them to do any critical focusing with a loupe. Personally, I would only recommend them if you plan on not using movements on your camera and are looking to find a way to take ‘quick’ pictures. Even then, I’m not sure if they save you enough time to warrant the trouble and it will only delay the moment when your brain ‘flips’ and you learn to see the inverted image as if it were the correct way around (it never really looks the right way around but your brain adapts to understanding the inverted image as reality, rather than being confused by it).
Loupe
In order to see what you are focussing on clearly, some sort of magnification is usually needed. If you’ve got good eyesight and are stopping down then you can just about get away without one but we wouldn’t recommend it.
Magnification
The range of magnifications usually available with a loupe start from 3x and go up to 10x. For most purposes, we would highly recommend you stick to 4x as more powerful loupes show less of the image and reveal too much of the ground glass or fresnel texture. A 3x loupe could be used but you’d have to have good eyesight and a loupe with very good coverage to warrant one.
Using a loupe stronger than 4x can make the lines on a fresnel (shown her) or the ground glass texture overpowering.
Better Quality Loupes
Just like any other lens, a better quality loupe will be sharper and clearer, especially in the corners, and usually, have a wider field of view. The problem with a ‘blurry’ loupe is knowing when the blur is your fault or the loupe’s fault, usually with a poor loupe you have to rely on just the very centre of the view to be most accurate. The more expensive loupes are multi-coated for reflection control, use multiple lens elements and sometimes use aspheric components.
Jewellers Loupes
The problem with jewellers loupes is that they don’t have a reference base and are usually too powerful. The lack of a base means that you can’t be sure if your view is blurry because your camera is out of focus or because the loupe isn’t held at the right distance from the ground glass.
Tilting Loupes
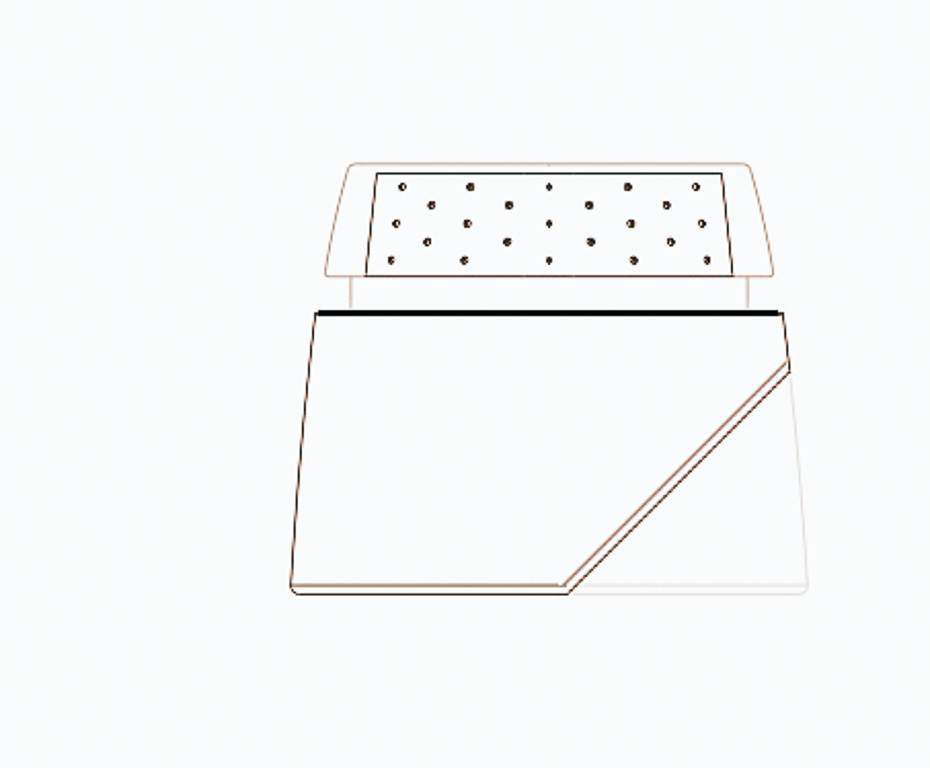
One of the problems of wide angle lenses is that the rays of light hit the ground glass at an acute angle. This means that to get the brightest view of the ground glass, your eye has to be inline with the ray of light and so you end up looking at the ground glass at an angle. However, your loupe has a flat base and so you can only place it on the ground glass at 90 degrees. Silvestri have a solution for this and sell a 6x loupe with a base that allows the loupe to tilt over. I have used one of these loupes and it is effective, however, it only allows you to focus on a small section of the view (the tilt of the ground glass means that, viewed at an angle, only a ‘slice’ of it is in focus at once). In reality, a good fresnel lens redirects the light enough that a normal loupe works satisfactorily (and 6x is considered too much magnification by many and on 4x5 you can’t really fit the base of the loupe into a corner anyway). A cheap version of the tilting loupe can be made by cutting away a section of a normal loupe’s skirt as shown (the light grey shows the area to be removed).
Hood Loupes
You can buy loupes that are purposefully made long enough to be used inside the folding hood of many 5x4 cameras. The Toyo 3.6x is a good example of this - be wary of the more powerful loupes (many hood loupes are 8x).
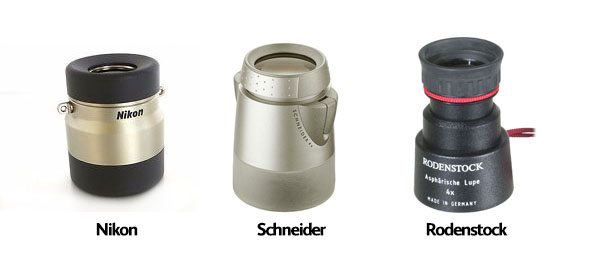
Recommended Loupes
The highest quality loupes are made by Schneider and Rodenstock. Cabin, Peak, Nikon, Agfa, Horseman and Toyo are also decent makes. Keep your eye out for the Calumet badged version of the Rodenstock 4x loupe which sometimes sells for very low prices.
Make Do with an Old Lens
At a push, you can use an old 50mm lens reversed as a loupe. I’ve tried this and it’s better than nothing but not very satisfying.
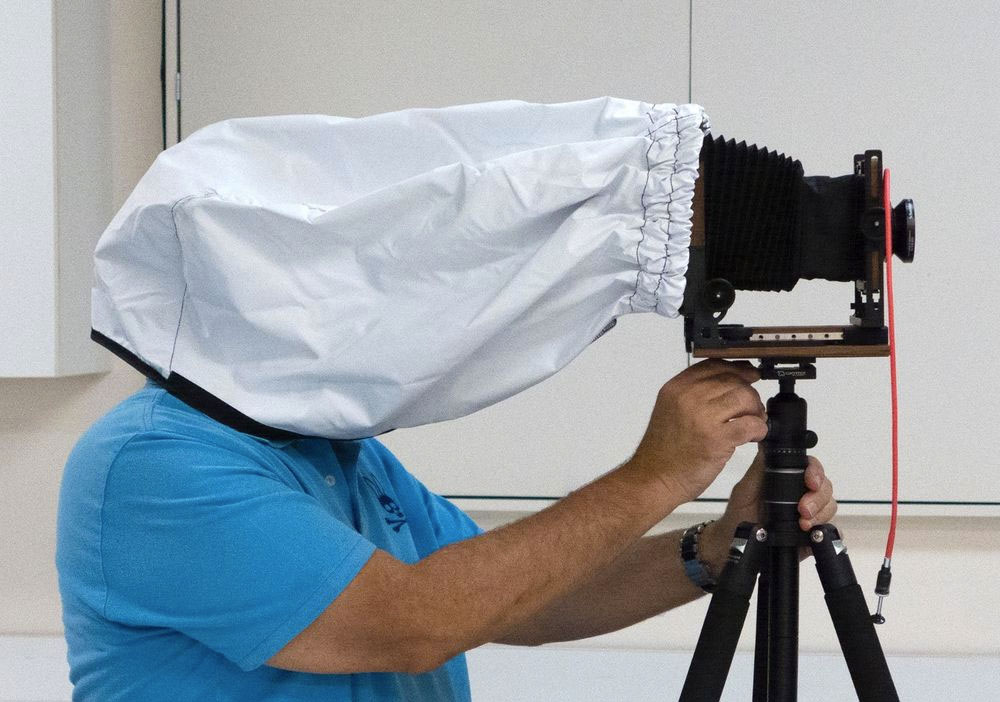
Dark Cloth
On a bright summer’s day, it’s quite easy to see the image on a ground glass, particularly with a nice fast normal lens like a 150 f/5.6. As light levels fade and you’re using wider lenses or ones with smaller apertures, it becomes harder and harder to see the ground glass. The answer is to use something to create shade. Photographers of old used to use simple squares of thick black material draped over themselves. A modern version of this simple tool creates a tube of cloth and adds an elasticated ‘waist’ to go around the camera. To help keep things cool, these are often light on the outside and dark on the inside.

BlackJacket Dark Cloth
More advanced versions can have arm holes (Black Jacket - highly recommended) and can even be made out of breathable materials (Paramo). In my mind, the cheapest and best dark cloth is the BTZS Hood, available from View Camera Store in the US. It’s light, reflective and holds well on the camera.
BTZS Dark Cloth from View Camera Store
Cable Release
Cable releases serve two purposes. The first is to allow you to trigger the shutter without contorting your finger around the edge of the lens and the second is to do so without vibrating the camera. Most cable releases will serve this basic purpose so why should you buy one over another?
1) Should have optimum breaking strength. Too weak and it will break to easily; too strong and the shutter connection will break instead of the cable release. As to longevity, the cable release must not become less flexible over time and should be resistant to corrosion.
2) The cable itself should not be too stiff. If it is, it will transmit any movements of your hand to the camera.
3) The action should be smooth
4) It should be lockable
The best cable releases we’ve found are the Nikon AR-3s which, although short, are quite flexible.

The problem with cable releases is that they can be quite fiddly to attach to the lens. One option that many people use is to keep a cable release attached to each lens. This can end up expensive, can take up more room in your bag and can end up damaging the cable releases or the lens. An alternative is to use short cable release extensions attached to each lens. Although these aren’t cheap, they make attaching a cable release a lot easier and don’t take up too much room. The ones we have tried are made by Gepe and can be bought in the UK through Walker Cameras.
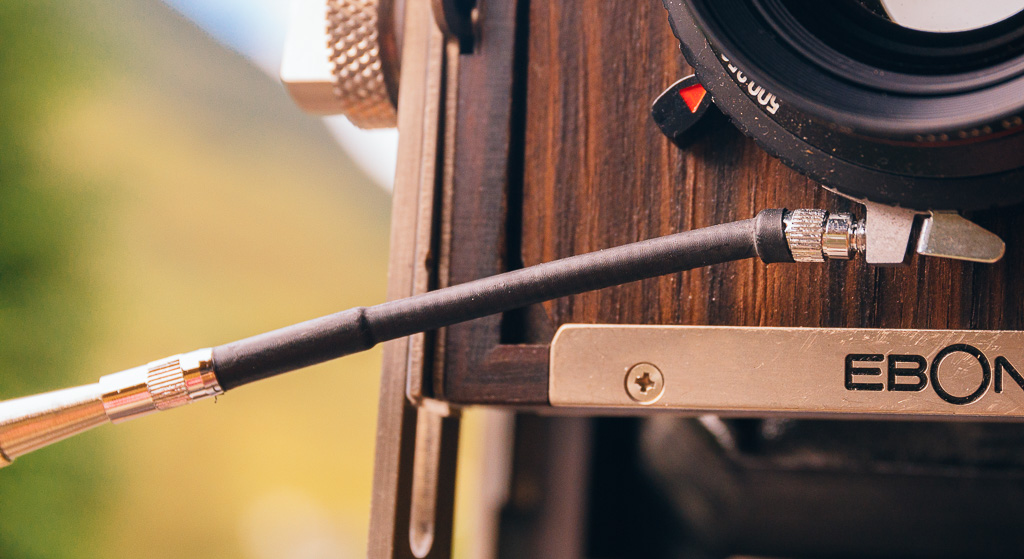
Gepe Cable Release Extension
Double Dark Slides
Without something to hold the film you’d be pretty stuck and so the typical large format photographer has a few ‘double dark slides’. Why double, you may ask? Well originally dark slides on had one slide, i.e. they could only be used one way around. When the ‘innovation’ came with a piece of film and slide at each end, they become ‘double’ dark slides.
Anyway, there are a range of manufacturers of dark slides around but we’d highly recommend getting either Fidelity Elite (or Lisco and Regal who rebadged them) or Toyo and if you have the budget the Chamonix dark slides are beautiful and light.
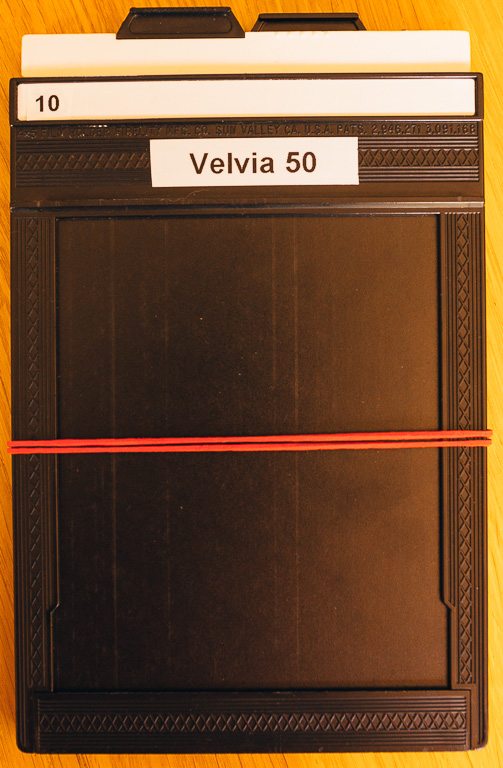
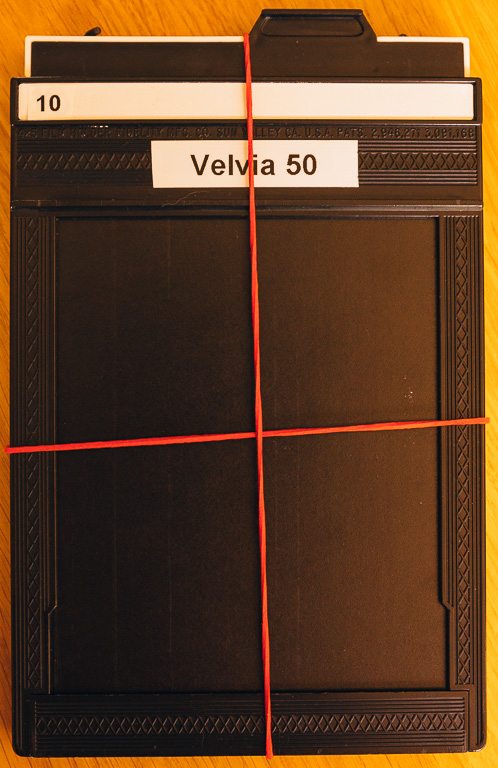
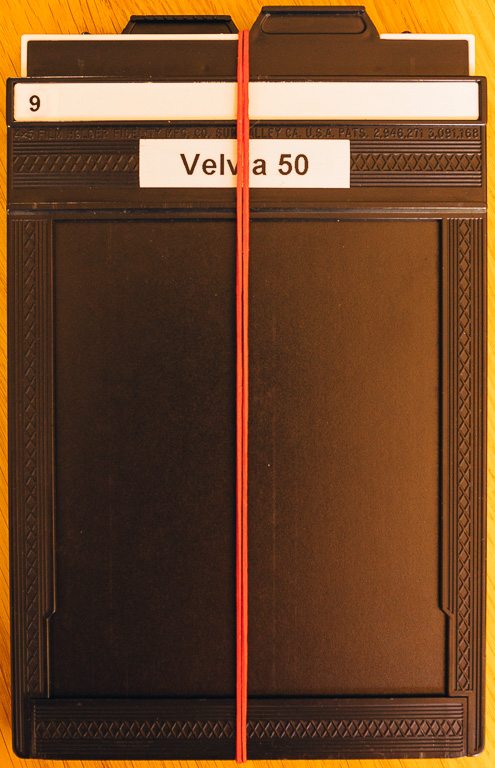
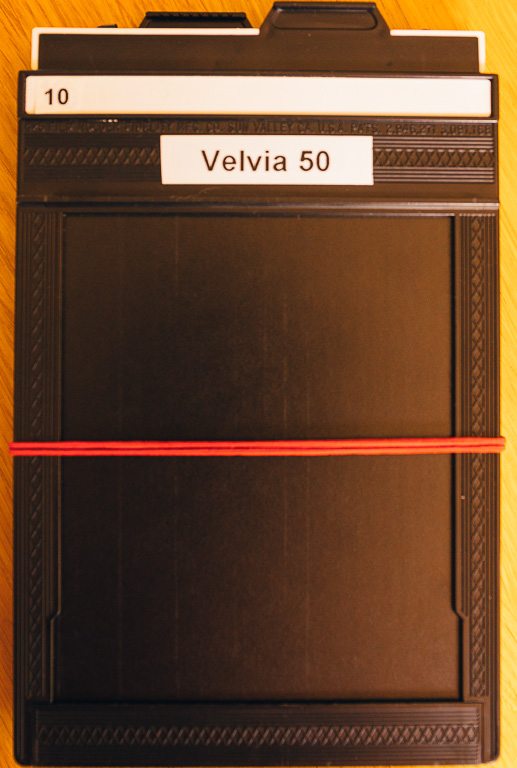
One of the tricks we invented when we started large format is a way of identifying whether a dark slide has film in or not. Each dark slide has a marker at the top which shows either black or white. When it’s white, it means it’s unexposed; when it’s black it means exposed. Unfortunately, there is no ‘code’ for empty and you don’t want to leave the dark slide out because dust will get in. The method we use is to wrap an elastic band around the dark slide. When the elastic band is sideways and the darkslide shows white, the film is unexposed; when the elastic band is lengthways and the darkslide shows black, the film is exposed. When the elastic band is sideways but the darkslide shows black, it is empty.
We extended this method to use two rubber bands. This can then show you whether the darkslide has zero, one or two sheets left unexposed. See the photos below and the captions to see what we mean.
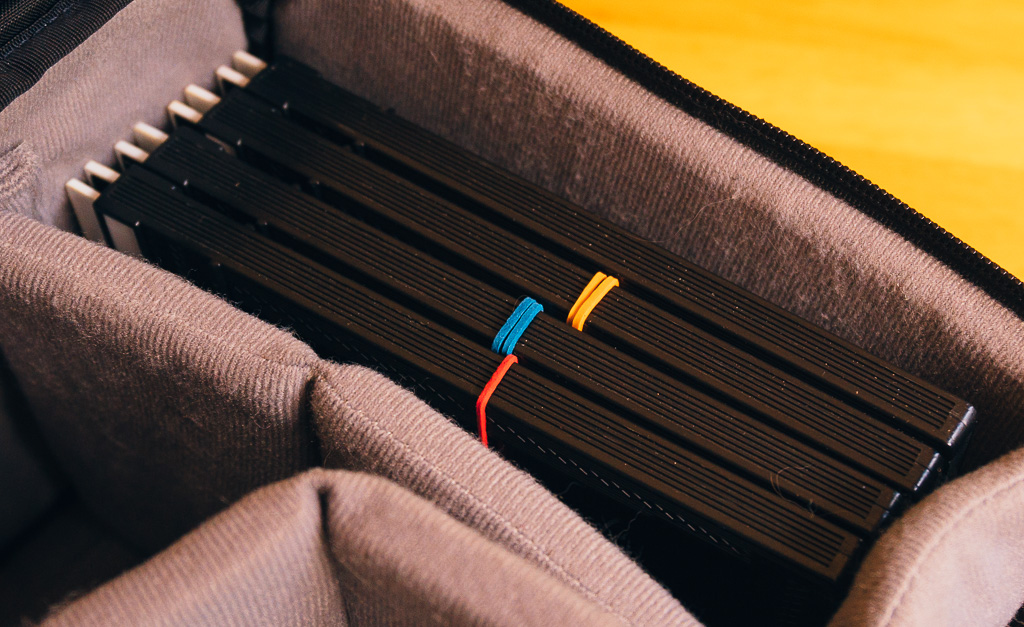
Two Provia (blue), two E100G (yellow) and one Velvia 50 (red) plus one completely exposed dark slide
Finally, we bought a range of coloured elastic bands and so we can also tell what film type is in the dark slide (in my case I use red for Velvia, blue for Pprovia, white for Portra 160, purple for Portra 400, orange for other negative film, usually Ektar, and yellow for other transparency film). Now I can have a glance at the darkslides sitting in my bag and quickly tell how much of each film type I have left.
Two unexposed
One side expose and the other unexposed
Both sides exposed
Empty (black showing on dark slide)
Dark Tent
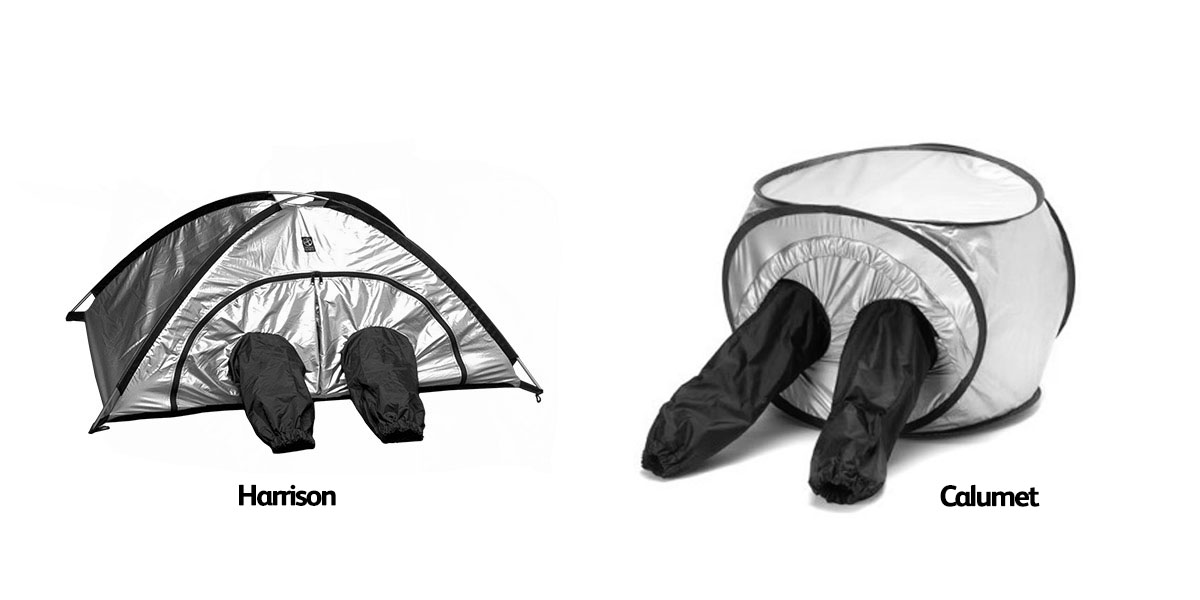
In order to load and unload your dark slides, you need somewhere dark. Using a bathroom or bedroom at night can do the job, but you need to check for leds and mobile phones switching on when you’re in the middle your task. Most people buy a dark tent of some sort. We would recommend a tent which has supports inside it so you don’t have to constantly fight with the material while loading. The Calumet dark tent is a good example which can be bought for around £60. The Harrison tent is the Rolls Royce of changing tents and used in the movie industry for loading rolls of motion picture film. The tents retail at £282 can be bought for around £120 if you look around. Larger tents can be bought for 5x7, 10x8 etc and sometimes a larger tent makes it easier to load film.
A Spare Film Box
This the one that everyone misses. It is only once you’ve bought your first box of film, loaded them and then decide to send them off for developing that you realise you have nowhere to put them! Your only choice now is to try to separate the box you have into two, exposed and unexposed, by putting the exposed outside the envelope but inside the box, a recipe for disaster, or you find someone willing to donate an old box. It’s better to ask in advance for a box - most people are willing to help! Don’t forget to mark the box as ‘exposed’ plus the film types you’ve got in and wrap some elastic bands around them so they don’t accidentally open.
Viewfinder
One of the most desirable accessories in days of old was the Linhof zoom viewfinder. This was a calibrated zoom viewer that used to be mounted on the top of Linhof Technicas (if you got the Rolls Royce version) and we used to ‘compose’ your images. The downside was that they were rare as hen’s teeth and exchanged hands for multiple hundreds of pounds. The view wasn’t that clear through them either. Cheaper versions were available, the Zorki for example, but they view through these was even worse
Linhof Zoom Finder
Most people who couldn’t afford these just cut a square hole in a piece of card or plastic sheet and these days many just carry a compact camera around with them. I still like to use a simple ‘hole in a card’ viewfinder as it forces you to close one eye and gives a more visceral rendition of the landscape but I also carry my Sony A7RII around with a 24-70 zoom on which I use to sketch images and find photos.
Tim’s Experiences
Once you’ve bought your large format camera, the next step is to make a series of mistakes buying all of the accessories and then going back to the start and buying everything again - or so the saying goes. I suppose I lucked out a little by having a very good group of friends to recommend gear, not having too many budget constraints (I’d sold most of my digital gear) and by spending far too long on the largeformatphotography.info forums. So the Schneider 4x loupe, Blackjacket dark cloth, Harrison 5x7 dark tent, Maxwell fresnel and ground glass and Linhof cable releases all did the job very well (but cost way too much) and I still have them. Not being one to stop when I’m winning though, I have since also bought a Schneider 3x and 8x loupe, a set of cable release extensions and a couple of Nikon cable releases (you will lose them!), a BTZS dark cloth and another film changing tent for 10x8 film. Obviously, you can never have too much of a good thing.
I only realised some of the pain I avoided when I began teaching large format and realised how bad poor or too powerful loupes were, the problems with ultra short cable releases, the joy of using an ultra wide angle lens on a plain ground glass at dawn and fighting with a square dark cloth with lead weights on the corners in the wind (I only lost the vision in one eye for an hour or so).
You shouldn't worry too much about these accessories though, even a simple magnifying glass for a loupe, a plain ground glass, a couple of nested t-shirts for a dark cloth, a battered cable release using the bathroom for a dark tent won’t affect your images. You’ll still have all the visual advantages of large format but the process of taking the photographs won’t be as easy or enjoyable. But if it was was easy everyone would be doing it!
-

- 240mm f/9 Fujinon A – Ballachulish
-

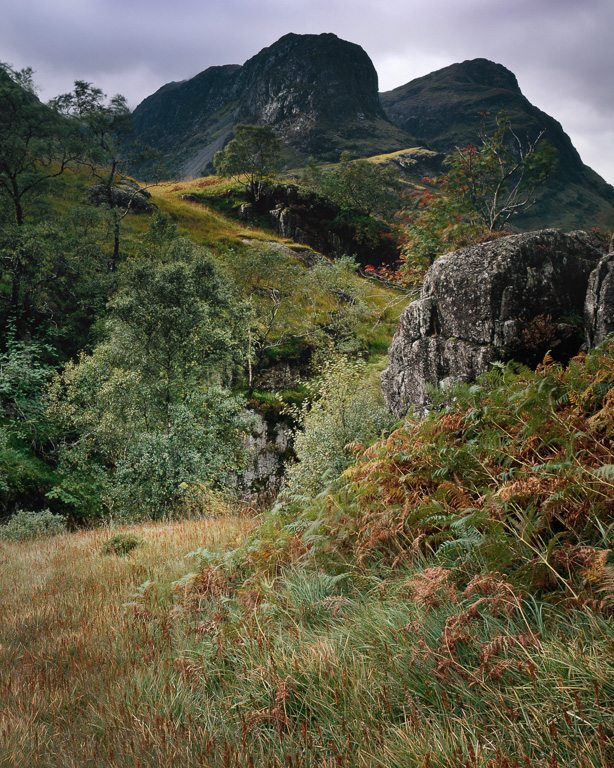
- 110mm f/5.6 Schneider SSXL – Glencoe
-

- 150mm f/5.6 Rodenstock Sironar S – Glen Etive
-

- 150mm f/5.6 Rodenstock Sironar S – Seil Beach
-

- 240mm f/9 Fujinon A – Lochan Na h’Achlase
Richard Childs' Experiences
My hands were shaking with excitement as I opened the parcel covered in Robert White packaging tape. Inside was my very first large format camera and lens and I couldn't wait to get it on a tripod in my back garden and have a go at taking my first 5x4 image.
I had been pursuing photography as a hobby for just four years and had upgraded during that time from a Pentax P30T through a Nikon F65 and F100 to a Pentax 6x7 camera. Each upgrade required very little extra investment as I already had a suitable filter system and a decent tripod. Why I thought moving on to large format would be just as simple is beyond me but on opening the box I knew there was much to learn and more equipment to buy.
I already had two new Fidelity double darkslides and twenty sheets of Velvia ( nowhere sensible to change the film out though=more on that later) but was quick to realise that five double darkslides would make perfect sense as film comes in foil sleeves of ten sheets. Most equipment buying decisions are about working towards an optimum efficient workflow which with large format extends way beyond operating the camera into film handling\management etc. Having to split packs of film and return to them to get a couple more sheets out simply doesn't make sense to me. Anyway, back to my unboxing...
First the camera itself, all very simple, a beautiful Ebony RSW45. I fitted a base plate and put it on my tripod, the bellows extending smoothly as I turned one of the titanium thumb wheels. Then the Schneider 90mm lens... There appeared to be two lenses in the box and neither of them fitted the felt lined hole on the front standard of my camera! After much head scratching, I decided to call Robert Whites to see what I was doing wrong. 'Ah yes' came the reply 'you will need a lens panel and a copal shutter for that lens'. 'While I'm on the phone then is there anything else I will need to get up and running' I asked. The next day another box arrived containing an Ebony lens panel, shutter, lens spanner wrench, cable shutter release, Harrison dark cloth and a Horseman 8x Loupe.
Those of you who are experienced LF users will already know that some of the gear listed above will have served me pretty poorly. The loupe was way too strong and showed too much of the detail in the ground glass rather than the image. This was switched out for a Rodenstock 4x loupe just two weeks later. The dark cloth, a huge lightweight silver square sheet proved to be far to temperamental in a breeze and was quickly replaced by the Gnassgear dark cloth ( sadly no longer available) I still use today. As I've mentioned before there is a wealth of information available now that wasn't as easy to access back in 2003. Two weeks after getting my first Ebony I was away on the Gower Peninsula where I not only learned how to operate the camera with guidance from Messrs Ward and Cornish but also picked up a wealth of tips from other attendees regarding equipment choices. Having struggled to change film without a tent I opted to invest in a Quickload holder and used this until I began processing my own film in 2007 when I purchased a further fifteen secondhand double dark slides and a Calumet film changing tent which still serves me well. For the first six months of use, I metered my scenes using my Pentax 6x7 but eventually opted for the much lighter, convenient and incredibly accurate Pentax Digital spot meter which has for me has been the perfect partner for a large format lens. For many years I also carried a Linhof zoom viewfinder which was sadly lost on the Island of Luing. Looking at the replacement cost I opted to buy an alternative in the form of a Lumix GF1 which could also take photographs and has now been replaced in my bag by my Sony A7r.
Despite the enormous amount of information available online I continue to find that clients coming to me for help with LF and metering have all sorts of unusual pieces of equipment that can act as a real block to the creative workflow. Arriving at a perfect set up takes lots of trial and error but can be an enjoyable part of the process and certainly helps to gain a better understanding of working completely manually. The equipment I carry continues to evolve but once I find an accessory that works it will remain with me as long as it's fit for purpose and fortunately, much of the gear associated with LF has proven to be incredibly robust.
I thought it might be useful to list below what accessories I take with me when I go away for a few days of large format photography to ensure that everything goes to plan. Just one missing item can make the difference between success and failure.
Film management
- Film changing tent
- Fifteen DDS ( 5 each for Velvia, Provia, Colour neg)
- Spare film
- Empty film box for storing exposed sheets ( box covered in 'exposed' stickers and four rubber bands).
- Separate box for any colour neg.
Accessories
- Spot meter and a spare battery
- Cable release and a spare.
- Dark cloth
- Screwdriver and allen keys
- Lens spanner wrench
Filters
- Filter holders
- Two plus sheets of kitchen roll to clean filters and lenses in the rain without smearing
- Umbrella
- Small hiking flannel/towel ( sits on top of the camera if it's raining)
- Reading glasses!!
- Head torch and spare battery.